Furniture / Storage Shelving
Assembly Instructions for Style Selections Kenwood 2-CT Chairs
Complete assembly guide for Style Selections Kenwood 2-CT Chairs. Includes step-by-step installation instructions, hardware lists, care tips, and warranty information.
Quick answers from the manual
Quick answer
- This manual provides assembly instructions for the Style Selections Kenwood 2-CT Chairs, including hardware lists, safety warnings, and maintenance guidelines. p. 1, 5, 6, 7
Key actions
- Assemble the chair p. 5, 6, 7
First start
- Assemble on a soft surface to avoid damage. p. 5
Problems and fixes
Parts won't properly align
Loosen all bolts, align parts, and tighten only after assembly is complete.
p. 8Technical specifications
| Parameter | Value | Meaning | Pages |
|---|---|---|---|
| Load capacity | 250 lbs | Maximum weight per seat | p. 5 |
Where to find it in the PDF
- Package Contents p. 3
- Hardware Contents p. 4
- Assembly Instructions p. 5, 6, 7
Table of contents
Manual images
Click an image to enlargeQuick guide from the manual
This manual provides assembly instructions for the Style Selections Kenwood 2-CT Chairs. Key information includes:
- Load Capacity: 250 lbs per seat.
- Assembly Time: Approximately 15 minutes per chair.
- Assembly Requirements: One or two people are recommended. Do not use power tools.
- Surface: Assemble on a soft, non-abrasive surface like carpet or cardboard to prevent damage.
Package Contents
Ensure all parts are present before beginning assembly:
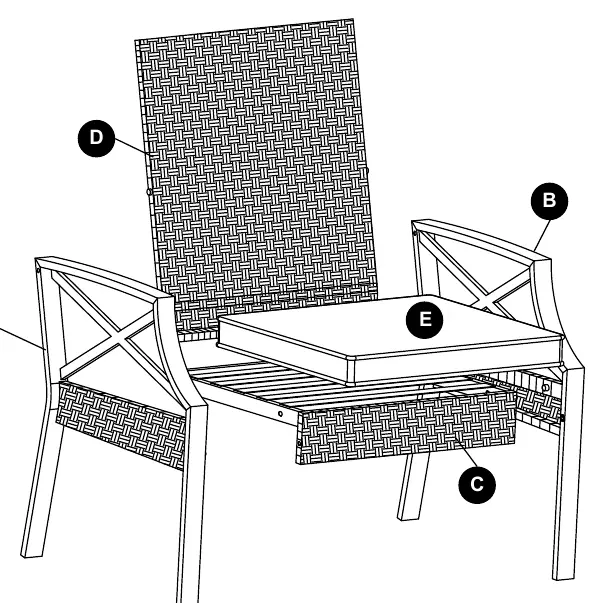
- A: Right Armrest (2)
- B: Left Armrest (2)
- C: Seat Frame (2)
- D: Backrest (2)
- E: Seat Cushions (2)
Hardware Contents
The following hardware is included:
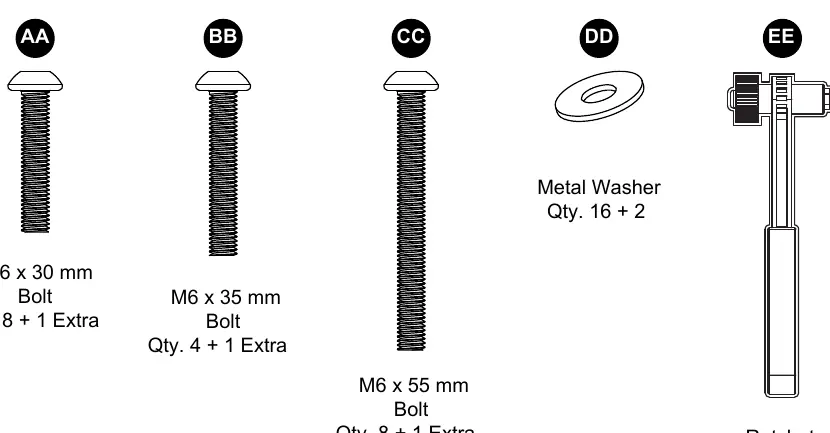
- AA: M6 x 30 mm Bolt (8 + 1 extra)
- BB: M6 x 35 mm Bolt (4 + 1 extra)
- CC: M6 x 55 mm Bolt (8 + 1 extra)
- DD: Metal Washer (16 + 2 extra)
- EE: Ratchet (1)
Assembly Instructions
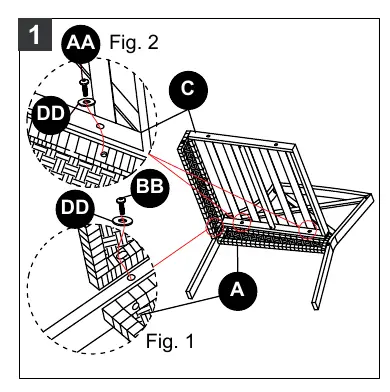
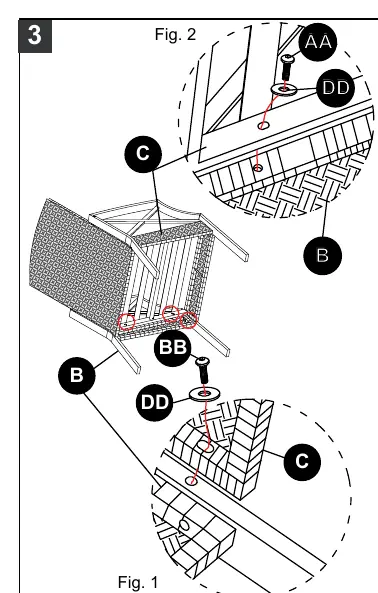
- Step 1: Secure the front of the seat frame (C) to the right armrest (A) using bolt (BB) and washer (DD). Then, secure the seat frame (C) to the right armrest (A) using bolts (AA) and washers (DD). Do not fully tighten bolts yet.
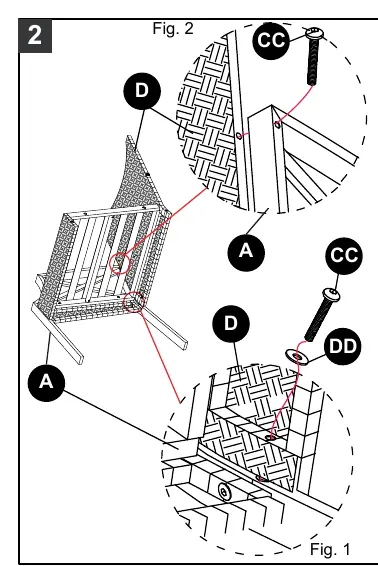
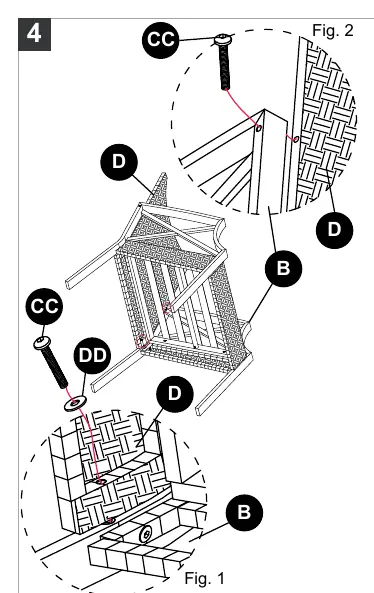
- Step 2: Secure the bottom of the backrest (D) to the right armrest (A) using bolt (CC) and washer (DD). Secure the right armrest (A) to the backrest (D) using bolt (CC). Do not fully tighten bolts yet.
- Step 3: Secure the front of the seat frame (C) to the left armrest (B) using bolt (BB) and washer (DD). Then, secure the seat frame (C) to the left armrest (B) using bolts (AA) and washers (DD). Do not fully tighten bolts yet.
- Step 4: Secure the bottom of the backrest (D) to the leg of the left armrest (B) using bolt (CC) and washer (DD). Repeat for the other side of the backrest. Secure the seat frame (C) to the backrest (D) using bolt (BB) and washer (DD). Tighten all bolts at this step.
- Step 5: Turn over the assembled chair and place the seat cushion (E) on it. Repeat the process for the second chair.
Care and Maintenance
- Never allow water to build up in frames to avoid corrosion and freeze damage.
- Wash cushions with mild soap and water; rinse and air dry. Never machine wash or tumble dry.
- The frame can be treated with liquid wax for protection against UV rays and salty air.
- Do not use bleach or solvents.
Troubleshooting
If parts do not align properly, loosen all bolts, align all parts according to the instructions, and only tighten bolts once assembly is complete.
Warranty
The frame and fabric are warranted for two years against defects in material or workmanship for personal, residential use. Free replacement of items is covered within 1 year of purchase. Contact customer service at 877-888-8225 for warranty claims.
Practical help
Common problems
Parts won't properly align
Loosen all bolts, properly align all parts according to assembly instructions, and only tighten bolts once assembly is complete.
Before use
- Verify all parts are present against the package contents list.
- Assemble on a soft, non-abrasive surface (carpet or cardboard).
- Do not use power tools.
- Ensure one or two people are available for assembly.
Specs in practice
- Load capacity
- 250 lbs per seat.
Images and diagrams
- The manual provides detailed diagrams for each assembly step, showing the specific bolt (AA, BB, CC) and washer (DD) placement for each connection point.
Model compatibility
- Designed for personal, residential use only.
- Not covered by warranty if used for commercial or contract purposes.

Manual page author
Michael Turner
Technical manual editor
Reviews PDF manuals for structure, safety notes, and practical product details so readers can find the right information quickly.