Lighting / Fixtures
User Manual for Sunco 6" LED Retrofit Baffle Downlight
Quick guide for the Sunco 6" LED Retrofit Baffle Downlight (SKU: DL_BFDR56-13W). Includes installation steps, safety warnings, specifications, and troubleshooting tips for common issues like flickering or buzzing.
Table of contents
Manual images
Click an image to enlargeQuick Guide
This guide provides essential information for installing and troubleshooting your Sunco 6" LED Retrofit Baffle Downlight. Always turn off the circuit breaker before beginning any installation work.
What's in the Box
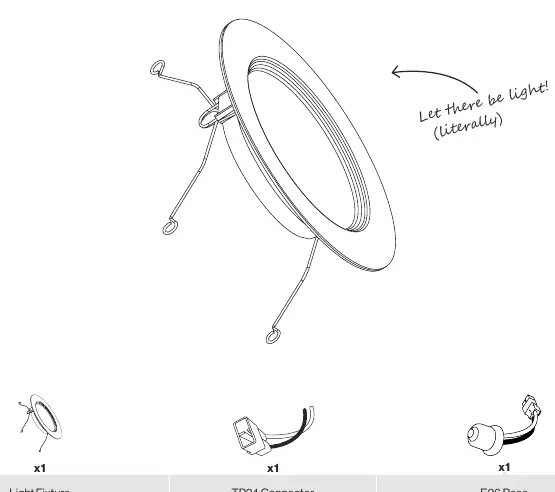
- 1x Light Fixture
- 1x TP24 Connector
- 1x E26 Base
Safety Information
To reduce the risk of fire, electric shock, or physical injury, observe the following:
- Turn off the circuit breaker before installation.
- Installation should be performed by a person familiar with the construction and operation of the product.
- Proper grounding is required.
- Do not alter, relocate, or remove wiring during installation.
- Suitable for damp locations (-4°F to 104°F). Not for use where directly exposed to water.
- Not compatible with 3rd party sensors, photo controls, occupancy sensors, or timing devices.
Installation Guide
- Step 1: Turn off the circuit breaker and locate the housing. Remove the previous fixture if necessary.
- Step 2: Secure the clip springs firmly within the retrofit connector. If the spring does not lock in easily, try turning it around.
- Step 3: Determine the type of connector available (TP24 or E26).
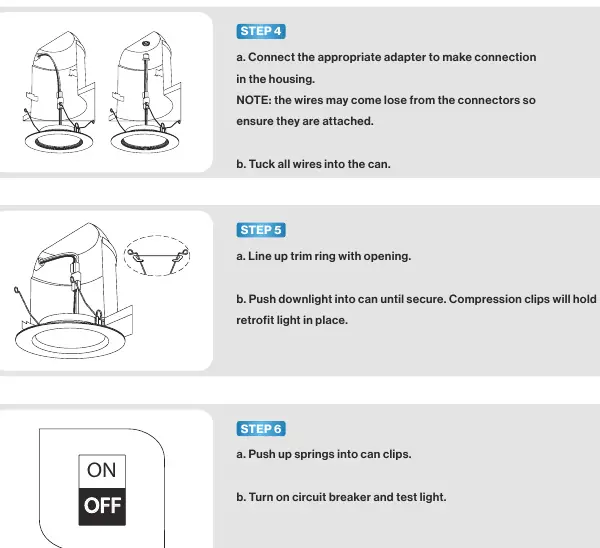
- Step 4: Connect the appropriate adapter to the housing. Ensure wires are securely attached and tuck them into the can.
- Step 5: Line up the trim ring with the opening and push the downlight into the can until secure. Compression clips will hold it in place.
- Step 6: Push up springs into can clips, turn on the circuit breaker, and test the light.
Specifications
- Voltage: 120V
- Wattage: 13W (120W equivalent)
- Lumens: 965LM
- Beam Angle: 90°
- Average Lifetime: 50,000 hrs
- Moisture Rating: Damp
- CRI: 80+
- Dimmable: Yes
Troubleshooting
If you experience issues, check the following:
- Light not turning on: Check connections and circuit breaker.
- Flickering: Ensure wiring connections are secure and the circuit is not overloaded. Verify dimmer compatibility.
- Buzzing: Check for nearby interference (electronics) or dimmer compatibility.
- Dimming issues: Ensure minimum dimmer load requirements are met and verify switch compatibility.
Customer Support
For further assistance, contact Sunco at [email protected] or call/text (844) 334-9938.
Practical help
Common problems
Light not turning on
Double check if the fixture is properly connected and the circuit breaker has not been tripped.
Light flickering
Check that wiring connections are secure, the circuit is not overloaded, and the dimmer switch is compatible.
Fixture buzzing
Verify dimmer compatibility or check for nearby interference from electronics like televisions or computers.
Light not dimming smoothly
Ensure the minimum dimmer load requirement is met and verify dimmer compatibility with the fixture.
Before use
- Turn off the circuit breaker before starting installation.
- Inspect the product for shipping damage.
- Ensure the installation location is not directly exposed to water.
- Verify that you are not using 3rd party sensors, photo controls, or timing devices.
- Wear safety eyeglasses and gloves.
Specs in practice
- Wattage Equivalency
- 120W (The brightness output is equivalent to a traditional 120W bulb, while consuming only 13W).
- Moisture Rating
- Damp (Suitable for damp locations, but not for direct water exposure).
Images and diagrams
- The parts diagram identifies the Light Fixture, TP24 Connector, and E26 Base.
- Installation steps illustrate the connection of the adapter and the use of compression clips to secure the light in the housing.
Model compatibility
- Not compatible with 3rd party sensors.
- Not compatible with photo controls.
- Not compatible with occupancy sensors.
- Not compatible with timing devices.

Manual page author
David Miller
Documentation analyst
Organizes user manual content into clear summaries, with attention to model details, product context, and everyday usability.