Lighting / Fixtures
User Manual for Sunco 6-Inch Slim Baffle Downlight
Quick guide for the Sunco 6-Inch Slim Baffle Downlight (DL_SLBF6-14W). Includes installation steps, wiring instructions, safety warnings, troubleshooting, and technical specifications.
Table of contents
Manual images
Click an image to enlargeQuick Guide
This manual provides instructions for the Sunco 6-Inch Slim Baffle Downlight (SKU: DL_SLBF6-14W). The installation involves cutting a 6.33-inch hole in the ceiling, wiring the junction box, and securing the fixture. Ensure the circuit breaker is turned off before starting any work.
Safety Information
To reduce the risk of fire, electric shock, or physical injury, follow these precautions:
- Turn off the circuit breaker before installation.
- Proper grounding is required.
- Suitable for damp locations (temperature range -4°F to 113°F). Not for use where directly exposed to water.
- Do not use with 3rd party sensors, photo controls, occupancy sensors, or timing devices.
- Do not alter, relocate, or remove wiring during installation.
- Check for shipping damage before installing.
What's in the Box
Ensure you have the following components:

- Light Fixture
- Junction Box
- Installation Template
- Wire Nuts (x3)
Required tools (not included): Wire clamp, hole saw, ladder, wire strippers.
Installation Guide
Follow these steps to install your downlight:
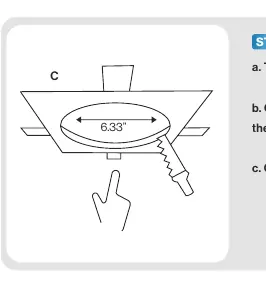
- Prepare the hole: Use the provided Installation Template (C) to cut a 6.33-inch hole in the ceiling.
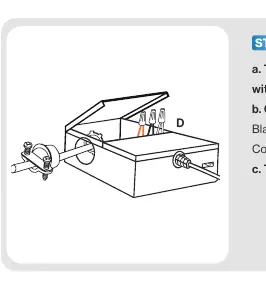
- Prepare the Junction Box: Open the Junction Box (B) and remove the appropriate knockout.
- Wiring: Thread the cable connector through the knockout and secure it. Connect supply wires to junction wires using wire nuts (D): Black to Black (Live), White to White (Neutral), and Bare Copper to Bare Copper (Ground). Tuck wires inside and close the cover.
- Select Color Temperature: For selectable models, slide the CCT switch on the junction box to your desired color temperature.
- Mounting: Insert the junction box through the ceiling hole. For new construction, secure to studs or joists.
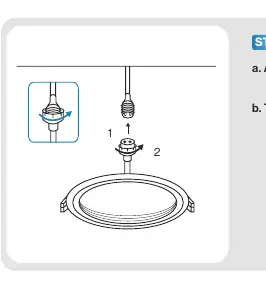
- Attach Fixture: Connect the fixture to the junction box using the connector and tighten by hand. Push up the spring clips and insert the fixture into the ceiling.
- Test: Turn on the circuit breaker and test the light.
Troubleshooting
If you encounter issues, check the following:
- Light not turning on: Verify connections and ensure the circuit breaker has not tripped.
- Flickering: Check that wiring connections are secure and that the circuit is not overloaded. Verify dimmer compatibility.
- Buzzing: Ensure the light is connected to a surge protector if experiencing power outages. Check for interference from nearby electronics like televisions or radios.
Specifications
- Voltage: 120V
- Wattage: 14W
- Lumens: 1200 lm
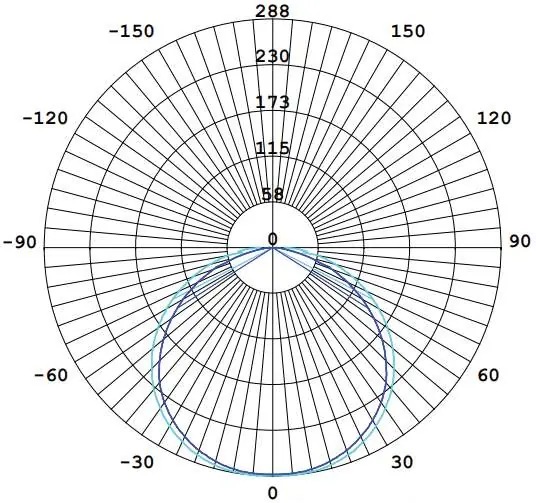
- Beam Angle: 120°
- Moisture Rating: Damp Rated
- Average Lifetime: 50,000 hrs
- Warranty: 7 Years
Practical help
Common problems
Light not turning on
Double check if the fixture is properly connected and the circuit breaker has not been tripped.
Light flickering
Check that wiring connections are secure, ensure the circuit is not overloaded, and verify dimmer compatibility.
Fixture buzzing
Verify the light is connected to a surge protector securely and check for nearby electronic interference (TVs, radios, etc.).
Light not dimming smoothly
Ensure minimum dimmer load requirement is met and verify dimmer compatibility with the fixture.
Before use
- Turn off the circuit breaker.
- Ensure you have a hole saw, ladder, wire strippers, and wire clamp.
- Verify the installation location is not directly exposed to water.
- Check the fixture for shipping damage.
- If using a dimmer, verify it is on the compatible list.
Specs in practice
- Moisture Rating
- Damp Rated; suitable for humid areas but not direct water exposure.
Images and diagrams
- Wiring: Connect Black to Black (Live), White to White (Neutral), and Bare Copper to Bare Copper (Ground).
- Installation: Cut a 6.33-inch hole using the template before inserting the junction box.
Model compatibility
- Not compatible with 3rd party sensors.
- Not compatible with photo controls.
- Not compatible with occupancy sensors.
- Not compatible with timing devices.

Manual page author
Emily Carter
User documentation editor
Prepares concise manual descriptions and highlights the most useful setup, operation, and maintenance information for readers.