Lighting / Industrial Lighting
Installation Manual for Sunco 150W UFO High Bay
Quick installation guide for the Sunco 150W UFO High Bay. Includes step-by-step instructions for hook, pipe, and ceiling mounting, wiring diagrams, and safety specifications.
Table of contents
Manual images
Click an image to enlargeQuick Guide from the Manual
This document provides installation instructions for the Sunco 150W UFO High Bay. Before beginning, ensure you have the necessary tools: drill, ladder, hammer, pliers, bolt cutters (for chain install), wire strippers, tape measure, marker, and a mounting bracket if required.
Installation Methods
The fixture supports three mounting methods. Ensure the circuit breaker is turned off before starting any installation.
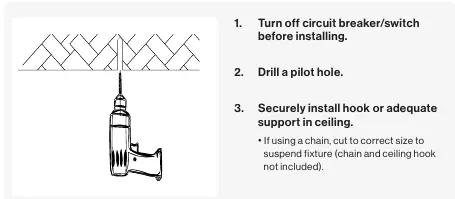
Hook Mount with Lifting Ring
- Drill a pilot hole and securely install a hook or adequate support in the ceiling.
- Thread the provided lifting ring into the fixture and tighten the set screw.
- Hang the fixture onto the ceiling hook or chain.
- Secure the light with the included safety cable by looping it on the hanging hook and clipping it to the precut hole between the fins on the fixture.
1/2 NPT Pipe Mount
- Unscrew nuts on the 1/2 NPT.
- Screw the mounting bracket onto the fixture.
- Insert the 1/2 NPT stem into the bracket holes.
- Secure by re-screwing and tightening the nuts or screwing the pipe into the drive hole of the light fixture.
- Modify the fixture position by adjusting the bracket screws.
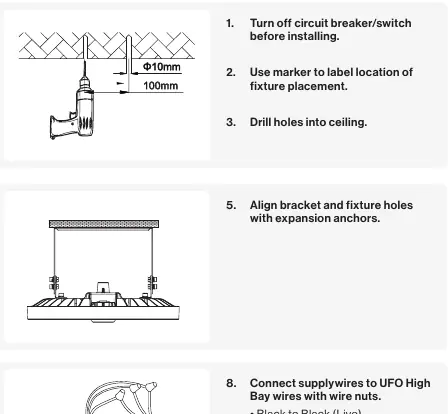
Ceiling Mount
- Use a marker to label the location, drill holes, and hammer in expansion anchors.
- Align the bracket and fixture holes with the anchors.
- Push the fixture up, slide to adjust, and tighten the fixture nuts.
Wiring Instructions
Connect the supply wires to the UFO High Bay wires using the included wire nuts:
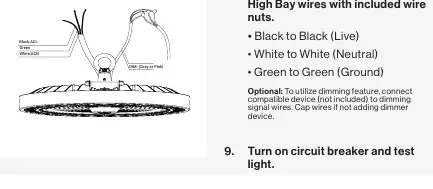
- Black: Live
- White: Neutral
- Green: Ground
Dimming Feature: To utilize the dimming feature, connect a compatible device (not included) to the dimming signal wires (Grey or Pink). Cap these wires if not using a dimmer.
Specifications
- Voltage: 120-277V
- Wattage: 150W
- Moisture Rating: IP65
- Housing Material: Aluminium Alloy
- Weight: 3.74 lbs
- Warranty: 7 Years
Safety Warnings
- Install in accordance with regional and local laws.
- Check for shipping damage prior to installation.
- Proper grounding is required.
- Do not install directly over a heat source (e.g., stove).
- Do not install on radiant heating ceilings or combustible surfaces.
- Use a listed waterproof strain relief bushing when connecting the supply cord to the outlet box.
- Wear safety eyeglasses and gloves.
Practical help
Common problems
Light does not turn on
Verify that the circuit breaker is on and that all wire connections (Black to Black, White to White, Green to Green) are secure.
Fixture is unstable or falling
Ensure the safety cable is properly looped on the hanging hook and clipped securely to the fixture fin.
Before use
- Turn off circuit breaker/switch before starting
- Check for shipping damage
- Ensure proper grounding
- Verify mounting surface is not combustible
- Use waterproof strain relief bushing for outlet box connection
Images and diagrams
- Wiring diagram indicates Black (Live), White (Neutral), and Green (Ground) connections.
- Dimming wires are identified as Grey or Pink.
Model compatibility
- Not for use on radiant heating ceilings.
- Do not install directly over heat sources like stoves.
- Dimming feature requires a compatible external device.

Manual page author
Emily Carter
User documentation editor
Prepares concise manual descriptions and highlights the most useful setup, operation, and maintenance information for readers.