Lighting / Fixtures
User Manual for Sunco 5/6" LED 12W Disk Downlight
Quick guide for the Sunco 5/6" LED 12W Disk Downlight. Includes installation steps for surface mount and retrofit, safety warnings, troubleshooting, and specifications.
Table of contents
Manual images
Click an image to enlargeQuick Guide from the Manual
This document provides installation and safety instructions for the Sunco 5/6" LED 12W Disk Downlight. Before beginning, ensure the circuit breaker is turned off. This fixture is suitable for damp locations but should not be directly exposed to water. It is not compatible with 3rd party sensors, photo controls, occupancy sensors, or timing devices.
What's in the Box
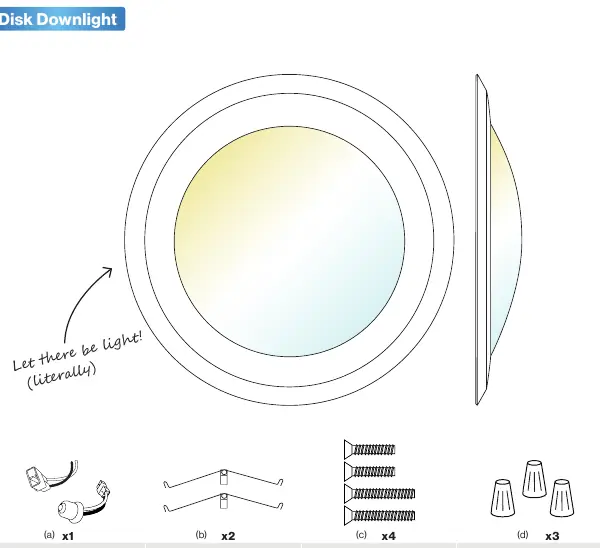
- (a) TP24/E26 Connector
- (b) Spring Clips (x2)
- (c) Mounting Screws (Short/Long, x4)
- (d) Wire Nuts (x3)
Safety Information
To reduce the risk of fire, electric shock, or physical injury:
- Turn off the circuit breaker before installation.
- Installation should be performed by a person familiar with the construction and operation of the product.
- Proper grounding is required.
- Do not alter or remove wiring during installation.
- Keep the fixture away from corrosive substances.
- Operating temperature range: -4°F to 104°F.
Installation Guide (Surface Mount)
- Step 1: Turn off the circuit breaker and remove the previous fixture.
- Step 2: Remove the lens by twisting it clockwise.
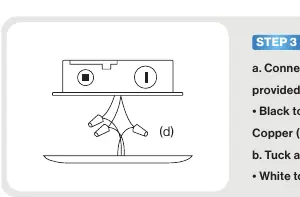
- Step 3: Connect the supply wires to the junction box wires using the provided wire nuts: Black to Black (Live), White to White (Neutral), and Green to Bare Copper (Ground). Tuck all wires inside the junction box.
- Step 4: Determine the appropriate mounting screw length based on the junction box size. Align the mounting screws with the keyhole slots and tighten until the fixture is secure. Do not over-tighten.
- Step 5: Insert the lens back into place by twisting it counterclockwise. Turn on the circuit breaker to test the light.
Installation Guide (Retrofit)

- Step 1: Turn off the circuit breaker and remove the previous fixture. Allow it to cool if necessary. Remove the lens by twisting clockwise.
- Step 2: Attach the spring clips (B) to the keyhole slots using the provided screws. Ensure the spring clip ears point outwards.
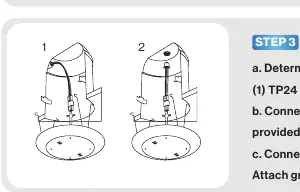
- Step 3: Identify the connector type (TP24 or E26). Connect the light wires to the selected connector using wire nuts. Connect the ground wire to the grounding screw inside the can.
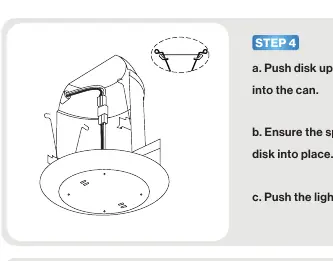
- Step 4: Push the disk up into the can while pinching both spring clips until they enter the hooks inside the can to secure the fixture.
- Step 5: Re-insert the lens counterclockwise and turn on the circuit breaker.
Troubleshooting
If you encounter issues, check the following:
- Light not turning on: Verify connections and ensure the circuit breaker is not tripped.
- Light not bright enough: Check for proper wattage and ensure the fixture is not obstructed.
- Flickering: Check wiring connections, ensure the circuit is not overloaded, and verify the fixture is grounded.
- Buzzing: Ensure the light is connected to a surge protector and check for nearby electronic interference.
Specifications
- Voltage: 120 V
- Wattage: 12 W
- Lumens: 850 lm
- Average Lifetime: 50,000 Hours
- Moisture Rating: Damp Rated
- CRI: 90+
- Dimmable: Yes
Practical help
Common problems
Light isn't turning on
Double check if the fixture is properly connected and the circuit breaker hasn't been tripped.
Light isn't bright enough
Check for proper wattage and ensure the fixture is not obstructed.
Light flickering
Check that wiring connections are secure, the circuit is not overloaded, and the fixture is grounded.
Fixture buzzing
Verify the light is connected to a surge protector and check for nearby interference from appliances or electronics.
Before use
- Turn off the circuit breaker before starting installation.
- Verify that the installation location is not directly exposed to water.
- Ensure you have all parts: TP24/E26 connector, spring clips, mounting screws, and wire nuts.
- Check for any shipping damage before installing.
- Confirm compatibility: This product is not compatible with 3rd party sensors, photo controls, occupancy sensors, or timing devices.
Specs in practice
- Moisture Rating
- Damp Rated (Suitable for humid environments, but not direct water exposure).
- Average Lifetime
- 50,000 Hours of operation.
Images and diagrams
- The 'What's in the Box' diagram identifies the TP24/E26 connector, spring clips, mounting screws, and wire nuts.
- The wiring diagram illustrates connecting Black to Black (Live), White to White (Neutral), and Green to Bare Copper (Ground).
- The retrofit installation diagrams show how to attach spring clips and connect the light to either a TP24 or E26 connector.
Model compatibility
- Not compatible with 3rd party sensors.
- Not compatible with photo controls.
- Not compatible with occupancy sensors.
- Not compatible with timing devices.

Manual page author
Emily Carter
User documentation editor
Prepares concise manual descriptions and highlights the most useful setup, operation, and maintenance information for readers.