Furniture / Bedroom Furniture
Installation Guide for Sweeek ASHTON Sideboard
Complete installation and assembly guide for the Sweeek ASHTON sideboard. Includes step-by-step assembly instructions, safety warnings, care and maintenance tips, and warranty details.
Table of contents
Manual images
Click an image to enlargeQuick guide from the manual
The Sweeek ASHTON sideboard requires assembly, which takes approximately 60 minutes and is recommended for two people. Mandatory wall mounting is required to prevent the furniture from tipping over. Please ensure you have the correct screws and dowels for your specific wall type, as these are not included in the package.
Safety Warnings
- Tipping Hazard: This product must be permanently fixed to the wall using the provided fixing devices to prevent serious or fatal injury.
- Wall Suitability: Check the suitability of your wall or ceiling to ensure the fixing devices can withstand the forces generated.
- Usage: Do not sit on the product.
- Moisture: Wipe spills immediately to avoid water damage.
- Environment: Keep away from extreme temperature variations and direct sunlight to prevent cracking, warping, or discoloration.
Assembly Instructions
Before starting, verify all parts against the parts list on page 21. Assemble all elements by hand first, tightening screws only partially to ensure stability and prevent damage to screw threads. Once the assembly is complete, tighten all screws firmly.
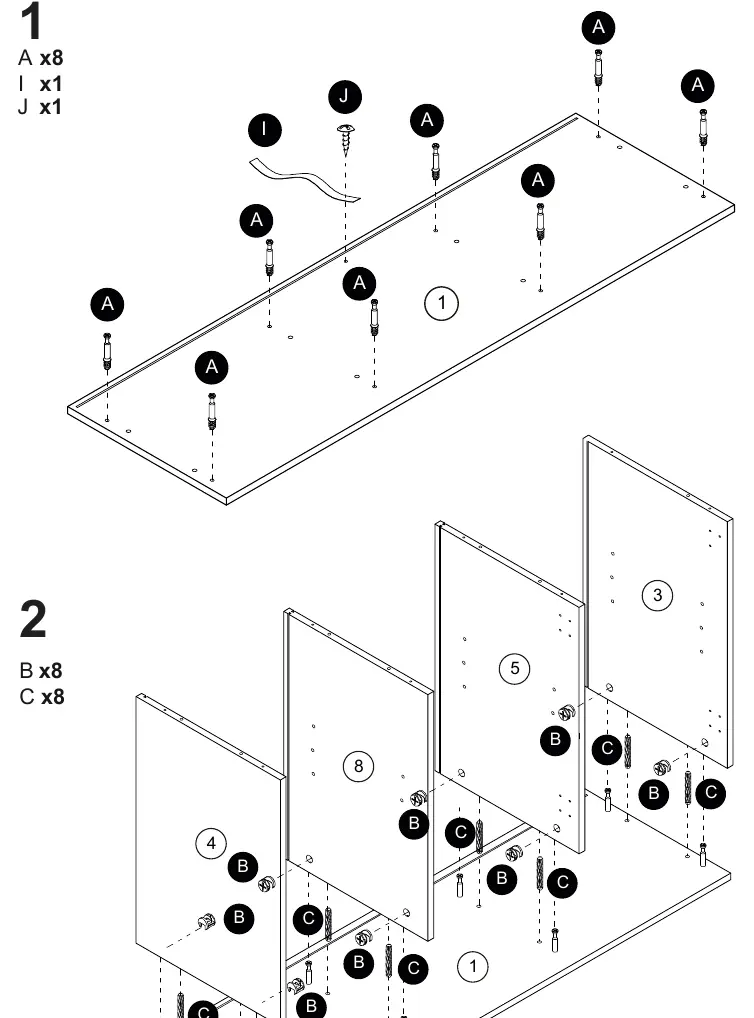
- Step 1-2: Prepare the main structure panels and insert the initial hardware.
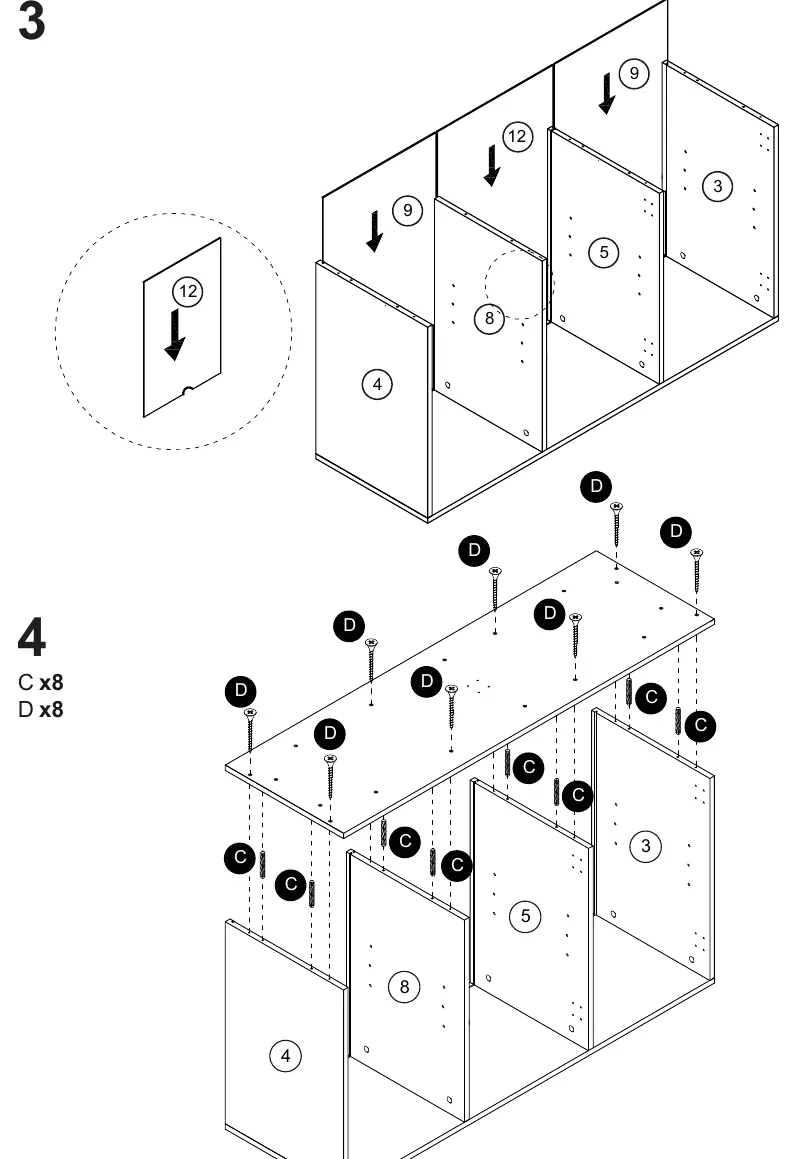
- Step 3-4: Assemble the main body structure.
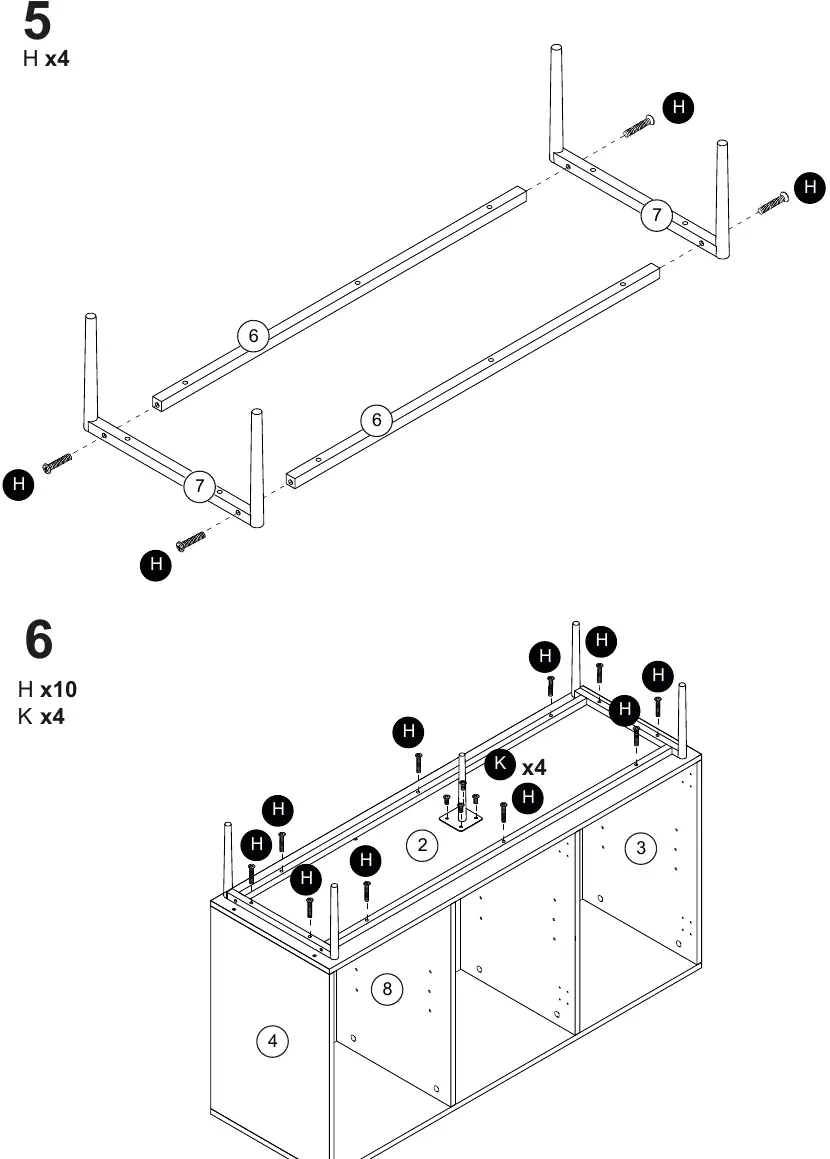
- Step 5-6: Attach the legs and base structure.
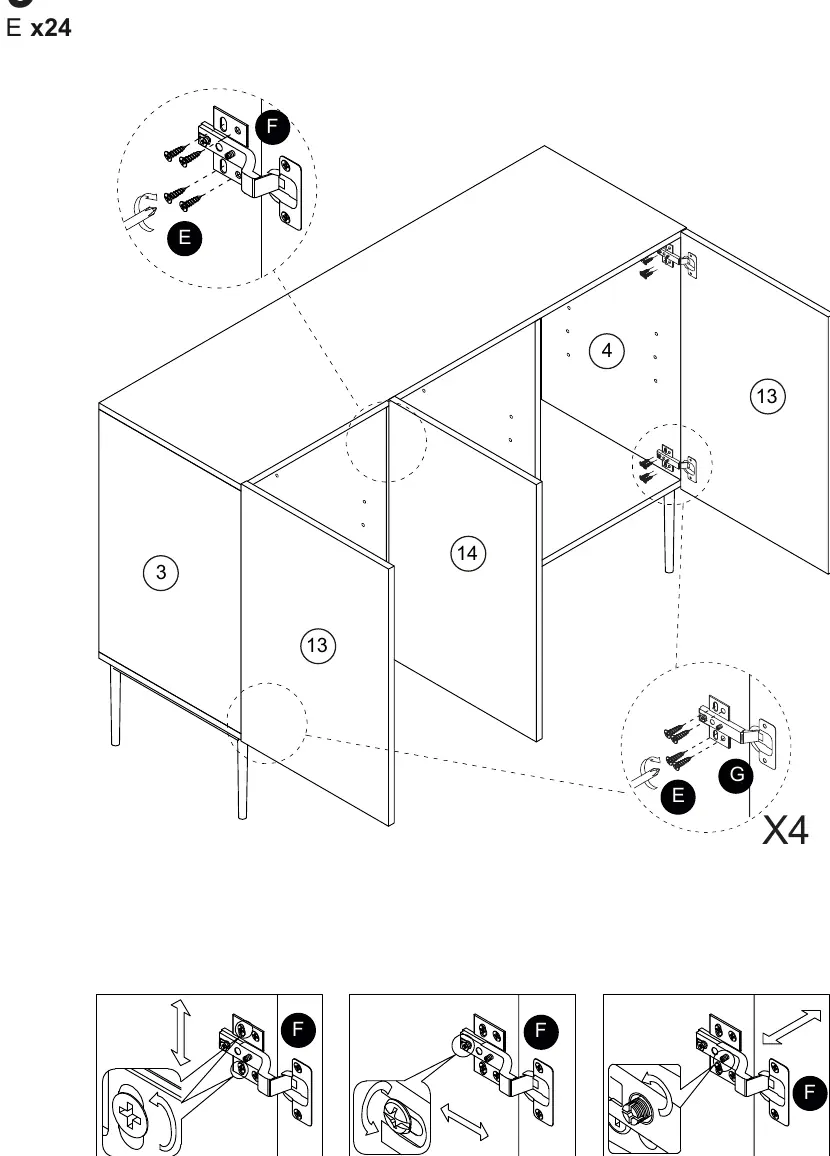
- Step 7-9: Install the hinges and mount the doors.
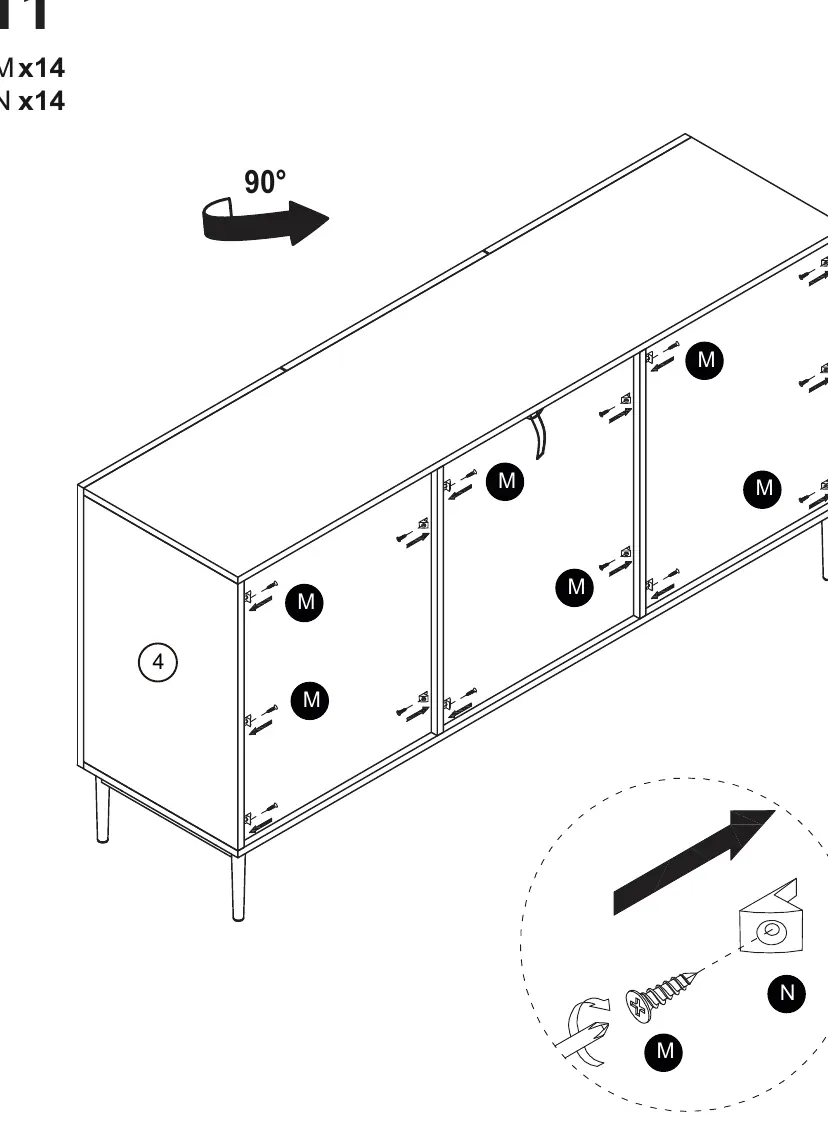
- Step 10-11: Finalize the assembly and secure the unit to the wall.
Care and Maintenance
- Wood: Dust regularly with a clean, soft, and dry cloth.
- Solid Wood: For minor damage or to revive appearance, lightly sand (180-240 grain) and varnish.
- Metal: Wipe with a damp cloth; do not use abrasive products, acidic cleaners, or solvents.
- Rattan: Keep away from radiators or heat sources to prevent drying and cracking.
Warranty
Sweeek provides a 2-year warranty against manufacturing and material defects from the date of receipt. The warranty covers repair or replacement of defective parts. It does not cover damage resulting from assembly errors, misuse, professional use, or normal wear and tear. In case of defects, contact customer service immediately and do not use the product.
Practical help
Common problems
Furniture tipping over
The unit must be permanently fixed to the wall using the included fixing devices.
Difficulty assembling or misaligned parts
Assemble all elements by hand first, then tighten screws firmly once the assembly is complete to ensure stability.
Surface damage or stains
Wipe spills immediately. Avoid using abrasive products, acidic cleaners, or solvents.
Before use
- Check all parts against the parts list on page 21.
- Ensure you have a clear space for assembly.
- Verify your wall material to purchase appropriate screws and dowels (not included).
- Have a second person available to assist with assembly.
- Ensure you have basic tools (screwdriver) ready.
Specs in practice
- Maximum Weight Supported
- 50 kg. Do not exceed this limit to avoid damage or injury.
- Assembly Time
- Approximately 60 minutes.
- Warranty Period
- 2 years from the date of receipt.
Images and diagrams
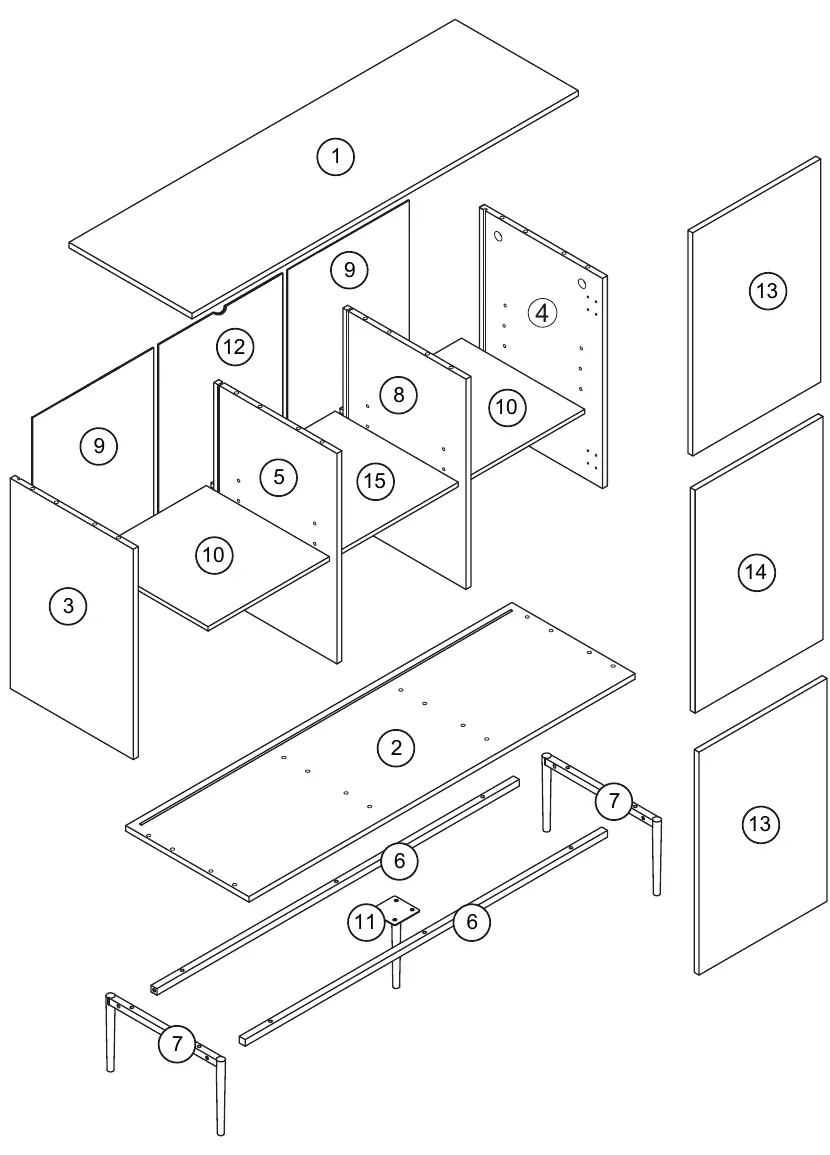
- Page 20 provides an exploded view of all components for easy identification.
- Pages 23-30 contain the step-by-step assembly sequence.
Model compatibility
- Wall mounting hardware (screws and dowels) is not included as it depends on your specific wall material.

Manual page author
Emily Carter
User documentation editor
Prepares concise manual descriptions and highlights the most useful setup, operation, and maintenance information for readers.