Electronics / Audio Processors
User Manual for Taramps PRO 2.6S Digital Audio Processor
Comprehensive user guide for the Taramps PRO 2.6S digital audio processor. Includes installation instructions, wiring diagrams, menu navigation, audio processing settings, and technical specifications.
Quick answers from the manual
Quick answer
- The Taramps PRO 2.6S is a digital audio processor that allows for precise control over audio signals, including crossover, delay, phase, limiting, and parametric equalization for up to 6 output channels. p. 1, 15
Key actions
- Installation p. 12, 24
- Menu Navigation p. 5, 17
First start
- Power on the unit, wait for the main screen, and adjust the master volume by rotating the encoder. p. 4, 16
Problems and fixes
Reset to factory settings
Hold CH1 and CH2 keys + encoder button while powering on.
p. 11, 23Maintenance and reset
- Reset to factory settings p. 11, 23
Technical specifications
| Parameter | Value | Meaning | Pages |
|---|---|---|---|
| Input channels | 2 | Number of audio inputs | p. 13, 25 |
| Output channels | 6 | Number of audio outputs | p. 13, 25 |
| Voltage Range | 9 ~ 16VDC | Operating voltage | p. 13, 25 |
Where to find it in the PDF
- Wiring Diagram p. 12, 24
- Technical Specifications p. 13, 25
Table of contents
Manual images
Click an image to enlargeQuick Guide and Safety Information
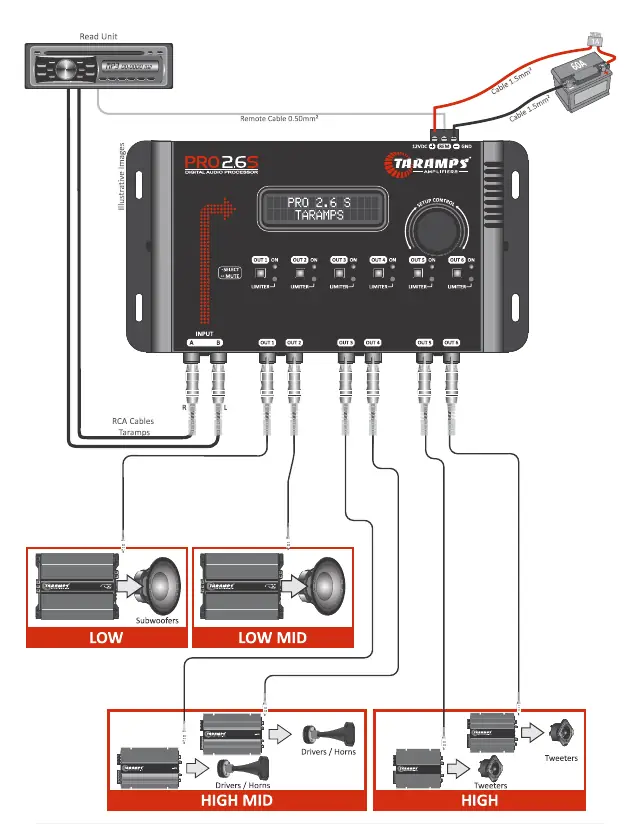
The Taramps PRO 2.6S is a digital audio processor designed for automotive sound systems. Installation must be performed by a qualified professional. Ensure the system is powered by a 12V battery and always verify voltage before installation. A 1A fuse must be installed on the positive supply line near the battery to prevent damage. Avoid installing the unit in areas exposed to dust, humidity, water, or excessive heat.
Processor Overview
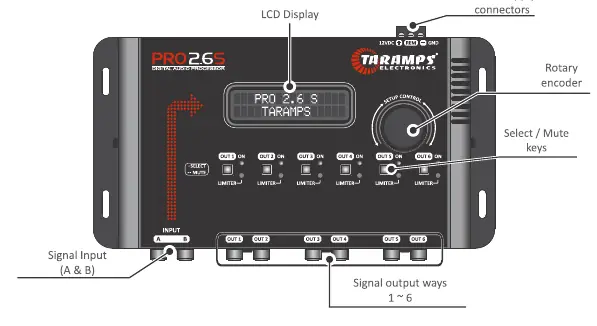
The front panel features an LCD display, a rotary encoder for navigation and adjustments, and six output keys (OUT 1 to OUT 6) that also function as Mute buttons. The rear/bottom panel contains the signal inputs (A and B) and the six signal output channels.
Menu Navigation
After startup, the main screen displays the product name. Rotate the encoder to adjust the master volume. To access the main menu, perform a short press (click) on the center of the encoder. Rotate the encoder to navigate through options and click to select. A long press on the encoder returns you to the previous menu or the main screen.
Audio Settings
The processor offers extensive audio control for each output channel:
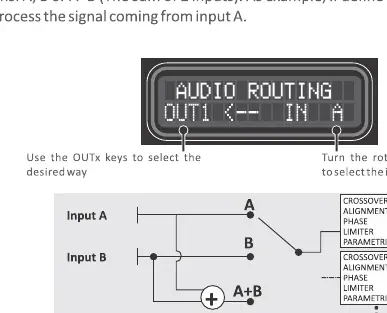
- I/O Routing: Configure internal connections between inputs A, B, or A+B.
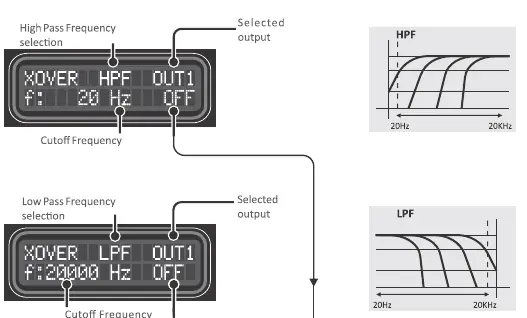
- Crossover: Set High Pass (HPF) and Low Pass (LPF) filters with various slopes (Butterworth, Bessel, Linkwitz-Riley) ranging from 20Hz to 20KHz.
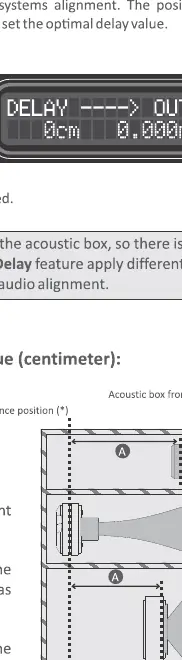
- Delay: Apply time alignment to compensate for the physical distance of transducers in the acoustic box.
- Phase: Invert the output signal phase (0 or 180 degrees).
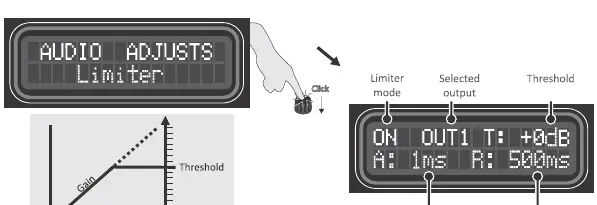
- Limiter: Protect speakers by setting a threshold, attack, and release time to prevent signal clipping.
- Parametric EQ: Adjust 3 bands per output with control over frequency, gain (-12dB to +12dB), and Q factor.
System Settings
Additional features include:
- Mirroring: Clone settings from one output to another.
- Audio Generator: Built-in sine wave generator for testing.
- Memory: Save and load up to 3 custom configurations.
- Security: Lock the processor with a 4-digit password (default is 1234).
Technical Specifications
The PRO 2.6S features 2 input channels and 6 output channels. It operates on a voltage range of 9-16VDC with a nominal consumption of 0.30A. The frequency response is 10Hz to 20KHz with a total harmonic distortion of 0.01%.
Practical help
Common problems
Forgot password
Hold the CH1 and CH2 keys plus the encoder button while powering on the processor and select YES to reset to factory settings.
Audio distortion
Check the limiter settings and ensure the gain levels are not set too high for the connected equipment.
No sound from output
Verify the input routing settings and ensure the output channel is not muted (check if the Mute LED is active).
Before use
- Ensure installation is performed by a qualified professional.
- Verify the vehicle battery is 12V.
- Install a 1A fuse on the positive supply line near the battery.
- Use 1.5mm² wire for power connections and 0.50mm² for the remote wire.
- Check that all RCA cables are securely connected.
Specs in practice
- Parametric EQ
- Allows precise adjustment of specific frequency bands to correct acoustic response.
Images and diagrams
- The wiring diagram illustrates the connection from the head unit to the processor inputs, and from the processor outputs to the respective amplifiers (Subwoofers, Low-Mid, High-Mid, High).
Model compatibility
- Requires 12V DC power source.
- Compatible with standard car audio head units via RCA.

Manual page author
Michael Turner
Technical manual editor
Reviews PDF manuals for structure, safety notes, and practical product details so readers can find the right information quickly.