Automotive / Car Audio
User Manual for Taramps PRO 2.4D Digital Audio Processor
Comprehensive user guide for the Taramps PRO 2.4D Digital Audio Processor. Includes installation instructions, wiring diagrams, menu navigation, audio settings, and technical specifications.
Quick answers from the manual
Quick answer
- The Taramps PRO 2.4D is a digital audio processor for automotive sound systems. It features 2 inputs and 4 outputs, with advanced audio processing tools like crossovers, equalizers, limiters, and delay alignment. p. 1
Key actions
- Access Main Menu p. 5
- Reset to Factory Settings p. 12
First start
- Upon first power-up, the processor will prompt for language selection. Rotate the encoder to choose and press to confirm. p. 4
Problems and fixes
Input clip LED is on
Reduce the volume of the signal source and readjust system gains.
p. 4Maintenance and reset
- Reset to factory settings by turning on the processor while holding keys 1, 2, and the center of the encoder simultaneously. p. 12
Technical specifications
| Parameter | Value | Meaning | Pages |
|---|---|---|---|
| Supply Voltage | 9 to 16VDC | Operating voltage range | p. 14 |
| Dimensions | 198 x 37 x 113mm | Physical size | p. 14 |
Where to find it in the PDF
- Safety & Installation p. 3
- Wiring Diagram p. 13
- Technical Features p. 14
Table of contents
Manual images
Click an image to enlargeImportant Information
The Taramps PRO 2.4D is a digital audio processor designed for automotive sound systems. Installation must be performed by a qualified professional. The device requires a 12V power supply and a 1A fuse on the positive wire near the battery. Always verify voltage before installation.
Safety Requirements
- Install in a firm location away from heat sources, dust, humidity, and water.
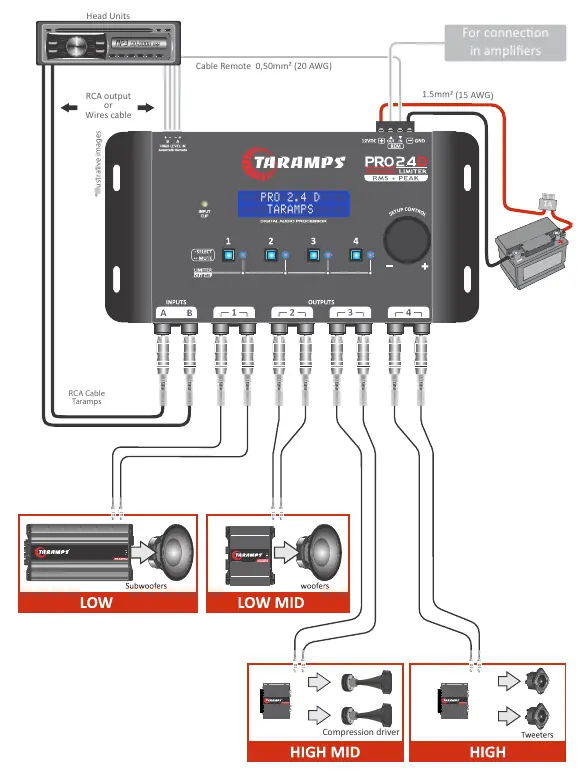
- Use correct wire gauges: 1.5mm² (15 AWG) for power, 0.50mm² (20 AWG) for remote signal.
- Protect wires routed through the vehicle body with rubber or plastic grommets.
- Avoid continuous exposure to sound levels over 85dB to prevent hearing loss.
Installation and Wiring
The processor features RCA inputs and High Level inputs. The High Level input supports automatic turn-on by signal detection, eliminating the need for a remote wire in some configurations. Connect the power supply negative to the battery negative, and the positive to the battery positive (12V) with a 1A fuse.
Operation and Menu Navigation
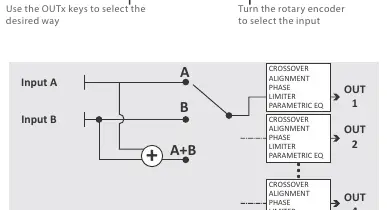
The device is controlled via a rotary encoder and output selection keys. A quick click on the encoder accesses the Main Menu. Turning the encoder adjusts volume or navigates menus. A long press on the encoder returns to the previous screen.

Audio Settings
- I/O Routing: Defines internal connections between inputs (A, B, or A+B).
- Band Equalizer: 5 filters with adjustable gain, Q factor, and frequency.
- Crossover: High Pass (HPF) and Low Pass (LPF) filters with various slopes (Butterworth, Bessel, Linkwitz-Riley).
- Delay: Allows alignment of transducers by setting delay in cm or ms.
- Phase: Inverts signal phase (0° or 180°).
- Limiter: RMS and PEAK limiters to protect speakers from overheating and excessive displacement.
Advanced Features
- Audio Generator: Sine wave generator for testing.
- Presets EQ: 12 preset equalization curves (e.g., Flat, Bass Boost, Vocal).
- Password/Lock: Protect settings with a 4-digit password.
- Save/Load Config: Store and recall system configurations.
Technical Specifications
The processor operates on 9-16VDC, features 24-bit resolution at 48kHz sampling rate, and provides 4 output channels with individual gain and mute control.
Practical help
Common problems
System does not turn on
Check 12V power supply, remote wire connection, and ensure the 1A fuse is intact.
Signal distortion
Check the Input Clip LED. If illuminated, reduce the volume of the signal source and readjust system gains.
Forgot password
Reset to factory settings by turning on the processor while holding keys 1, 2, and the center of the encoder simultaneously.
Before use
- Ensure installation is performed by a qualified professional.
- Verify 12V battery voltage.
- Install a 1A fuse on the positive wire near the battery terminal.
- Use correct wire gauges (1.5mm² for power, 0.50mm² for remote).
- Ensure all wires are protected from sharp edges.
Specs in practice
- Sampling Rate
- 48kHz for standard digital audio processing.
- Input Impedance (RCA)
- 10K ohms for low-level signals.
- Supply Voltage
- 9 to 16VDC operating range.
Images and diagrams
- Wiring diagram shows connections for Head Unit, Amplifier, Subwoofers, Woofers, Compression Drivers, and Tweeters.
- Encoder controls volume and menu navigation.
- LED indicators show input clipping and limiter status.
Model compatibility
- Designed for 12V automotive systems.
- Compatible with most multimedia head units.
- Requires external amplifiers for speakers.

Manual page author
Emily Carter
User documentation editor
Prepares concise manual descriptions and highlights the most useful setup, operation, and maintenance information for readers.