Automotive / Car Audio
User Manual for Taramps DYNAMIC 200A 280A Smart Charger
Quick guide for the Taramps DYNAMIC 200A 280A Smart Charger. Includes installation requirements, operating modes, LED indicators, and technical specifications.
Quick answers from the manual
Quick answer
- The Taramps DYNAMIC 200A 280A is a smart battery charger and power supply. It features automatic bivolt detection, smart charging modes, and dynamic power output for car audio systems. p. 3
Key actions
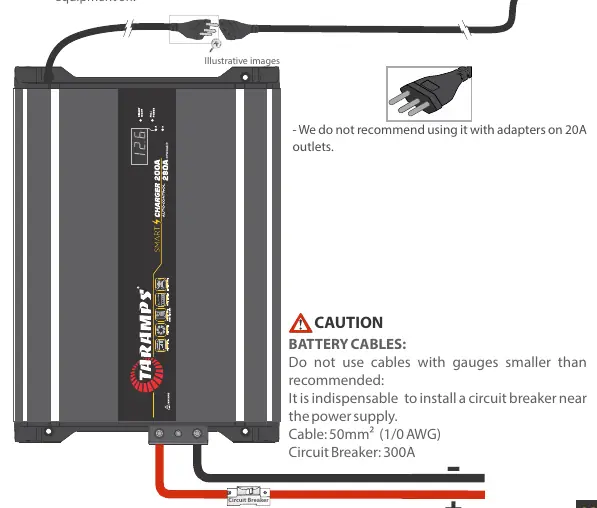
- Installation must be performed by a qualified professional using 50mm² cables and a 300A circuit breaker. p. 4
- Use the Smart Key to turn the device on/off and switch between operating modes. p. 5, 7
First start
- Ensure correct polarity when connecting to the battery, then turn on using the Smart Key. p. 5, 7
Problems and fixes
Short circuit
The power supply automatically re-checks the output every 5 seconds.
p. 6
Over-temperature
The power supply shuts off the output and waits for the internal temperature to drop.
p. 6Technical specifications
| Parameter | Value | Meaning | Pages |
|---|---|---|---|
| Max Output Current | 200A (280A Dynamic) | Rated maximum output current. | p. 8 |
| Max Output Power | 4000W | Maximum power output. | p. 8 |
| Dimensions | 229 x 65 x 319mm | Physical size of the unit. | p. 8 |
Where to find it in the PDF
- Installation and Connections p. 4
- Operation and Modes p. 5, 7
- LED Indicators and Protections p. 6
- Technical Features p. 8
Table of contents
Manual images
Click an image to enlargeQuick guide from the manual
The Taramps DYNAMIC 200A 280A is a high-performance smart battery charger and power supply designed for car audio systems. Important: Installation must be performed by a qualified professional. Ensure the electrical network is compatible (automatic bivolt 127V/220V) and use the recommended cable gauges and circuit breakers to avoid damage or performance loss.
Installation and Electrical Connections
Proper installation is critical for safety and performance:
- Electrical Network: The device is automatic bivolt. Ensure the outlet can handle the current.
- Cables: Use 50mm² (1/0 AWG) cables for battery connections.
- Circuit Breaker: It is mandatory to install a 300A circuit breaker near the power supply.
- Ventilation: Install in a firm, well-ventilated area. Do not obstruct fans or install near vibrating surfaces like speaker boxes.
- Extension Cords: If used, ensure they meet the minimum gauge requirements (10mm² for 127V, 6mm² for 220V) and do not exceed 10 meters.
Operation and Modes
The device features a Smart Key for control:

- Turning On/Off: Quick press (1 second) to turn on. Long press (2 seconds) to turn off.
- Smart Mode: Automatically detects load characteristics and manages charging cycles (float, equalize) to optimize battery health.
- Dynamic Mode: Automatically activated when the system detects a music signal, providing up to 280A for high-demand audio systems.
- Fixed Voltage Mode: Allows manual setting of output voltage (12.6V, 13.8V, 14.4V) by disabling smart functions.
LED Indicators and Protection
The illuminated logo and LEDs indicate the current status:
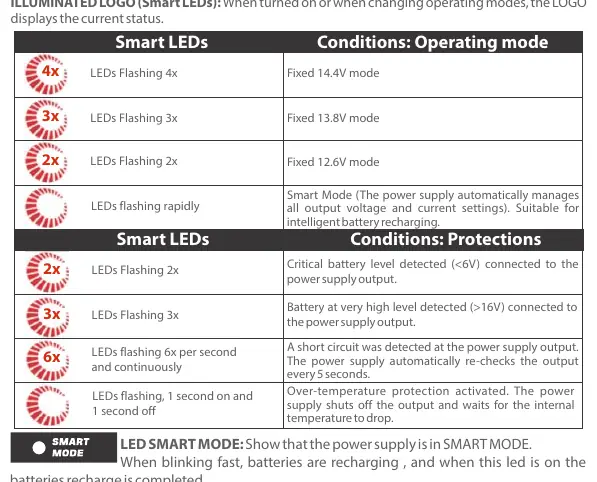
- Flashing 4x: Fixed 14.4V mode.
- Flashing 3x: Fixed 13.8V mode.
- Flashing 2x: Fixed 12.6V mode.
- Rapid Flashing: Smart Mode active.
- Protections: The device includes short circuit protection (re-checks every 5 seconds) and over-temperature protection (shuts off output until cooled).
Technical Specifications
The charger is designed for 12V batteries, with optimal performance for battery banks between 60Ah and 2500Ah. It features a maximum output power of 4000W and an average efficiency of 90%.
Practical help
Common problems
Short circuit detected
The power supply automatically shuts off and re-checks the output every 5 seconds.
Over-temperature protection
The device shuts off the output. Wait for the internal temperature to drop; it will return to full power automatically.
Battery not charging / LED blinking slowly
Check if the battery is disconnected or if the battery health is compromised.
Before use
- Ensure installation is performed by a qualified professional.
- Verify the electrical network voltage (127V or 220V).
- Use 50mm² (1/0 AWG) cables for battery connections.
- Install a 300A circuit breaker near the power supply.
- Ensure the installation area is well-ventilated and free from direct sunlight.
- Do not obstruct the fans or ventilation openings.
Specs in practice
- Dynamic Mode
- Provides up to 280A with music signal, offering 30% more power than standard 200A.
- Automatic Bivolt
- Automatically recognizes and adjusts to 127V or 220V electrical networks.
Images and diagrams
- Wiring diagram shows the connection between the power supply, circuit breaker, and battery.
- Front panel diagram identifies the Smart Key, fans, and LED indicators.
Model compatibility
- Compatible with 12V batteries.
- Best performance for battery banks between 60Ah and 2500Ah.

Manual page author
Michael Turner
Technical manual editor
Reviews PDF manuals for structure, safety notes, and practical product details so readers can find the right information quickly.