Lighting / Outdoor Lighting
User Manual for Tecnolite 1SOLLED28DC Solar Light Stake Set
Quick guide for the Tecnolite 1SOLLED28DC solar light stake set. Includes installation steps, charging instructions, technical specifications, and maintenance tips.
Quick answers from the manual
Quick answer
- The Tecnolite 1SOLLED28DC requires a full 24-hour charge before its first use. It should be installed in a location with direct sunlight for 6-8 hours daily to ensure proper operation. p. 1
Key actions
- Charge for 24 hours before first use p. 1
- Press power button once for 50% brightness, twice for 100% p. 1
First start
- Assemble the components, connect the cable, and place in direct sunlight for 24 hours. p. 1
Problems and fixes
Insufficient light duration
Ensure the solar panel is not obstructed by trees or shadows.
p. 1Maintenance and reset
- Clean the luminaire and its parts periodically with a dry rag. p. 1
Technical specifications
| Parameter | Value | Meaning | Pages |
|---|---|---|---|
| Power | 1W | Power consumption | p. 1 |
| Voltage | 3.2V | Supply voltage | p. 1 |
Where to find it in the PDF
- Installation and Specifications p. 1
- Warranty Information p. 2
Table of contents
Manual images
Click an image to enlargeQuick guide from the manual
The Tecnolite 1SOLLED28DC is a solar-powered outdoor lighting system. Important: You must charge the unit fully for 24 hours before its first use. For optimal performance, ensure the solar panel is placed in an area with direct sunlight for 6-8 hours daily. The system features two brightness modes.
Parts List

- A-01: Stake (x1)
- A-02: Stake (x4)
- A-03: Screw (x2)
- A-04: Anchor (x2)
Installation
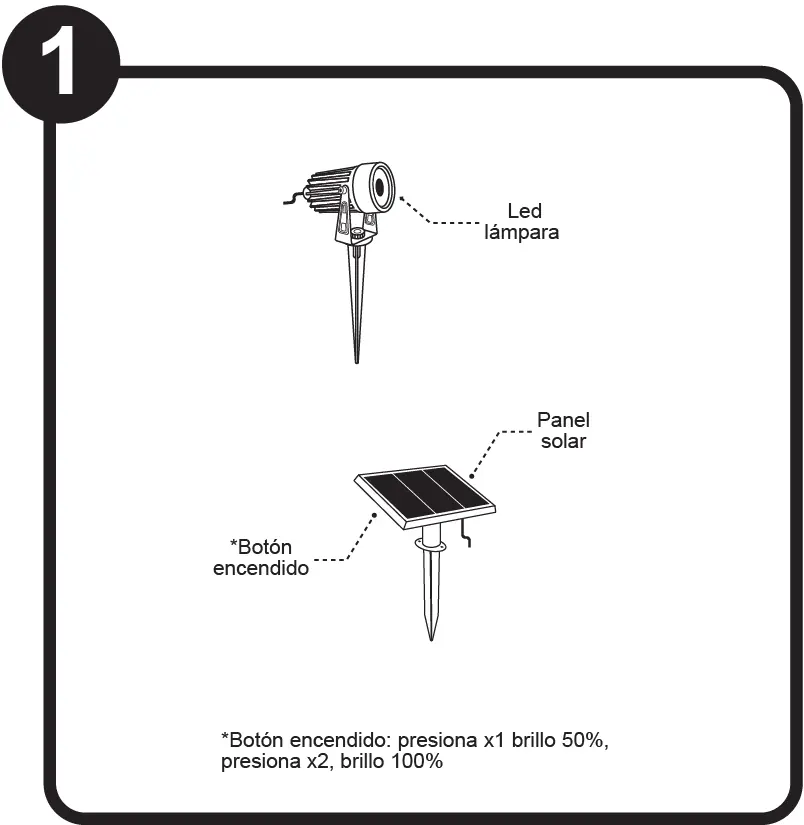
- Step 1: Identify the LED lamp and solar panel components.
- Step 2: Attach the stake (A-01) to the solar panel. Ensure it is level.
- Step 3: If mounting to a wall or hard surface, use the provided anchors (A-04) and screws (A-03).
- Step 4: Attach the stakes (A-02) to the LED lamps.
- Step 5: Connect the light cable to the solar panel. Ensure the connection is secure (IP65 rated).
- Step 6: Position the solar panel in a location with maximum sunlight exposure, avoiding shadows from trees or structures.
Operation and Charging
The solar panel features a power button. Press once for 50% brightness, and press twice for 100% brightness. The system requires 6-8 hours of continuous sunlight for a full charge. Discharge time is approximately 6 hours at high intensity and 10 hours at low intensity.
Maintenance and Safety
Clean the luminaire and its parts periodically with a dry rag. Do not use near flammable materials to avoid fire hazards. Ensure the unit is kept away from children. If the luminaire becomes hot, use gloves to handle it.
Technical Specifications
- Power Supply: 3.2V, 1W, 0.33A
- Charging Time: 6-8 hours (minimum)
- Discharge Time: 6 hours (high intensity), 10 hours (low intensity)
- Protection Rating: IP65, IK02
Manufacturer information
Tecnolite
Practical help
Common problems
Light does not turn on
Ensure the unit was charged for 24 hours before first use and that the solar panel is receiving direct sunlight.
Short operating time
Check if the solar panel is obstructed by trees, buildings, or other shadows that prevent 6-8 hours of direct sunlight.
Before use
- Charge the unit for 24 hours before first use
- Verify all parts (A-01 to A-04) are included
- Ensure the installation site is not near flammable materials
- Confirm the solar panel location has direct sunlight access
Specs in practice
- Power Supply
- 3.2V, 1W, 0.33A
- Charging Time
- 6-8 hours of direct sunlight required for full charge
- Discharge Time
- 6 hours at high intensity, 10 hours at low intensity
Images and diagrams
- Step 1: Component identification
- Step 2-3: Solar panel mounting options (stake or screw)
- Step 4: Light stake assembly
- Step 5: Cable connection
- Step 6: Sunlight exposure requirements
Model compatibility
- Outdoor use only
- IP65 rated for weather resistance

Manual page author
David Miller
Documentation analyst
Organizes user manual content into clear summaries, with attention to model details, product context, and everyday usability.