Tools / Grinding Tools
User Manual for Fieldmann FDB 200901-E Angle Grinder
Comprehensive user guide for the Fieldmann FDB 200901-E angle grinder. Includes setup instructions, safety guidelines, disc installation, maintenance procedures, and troubleshooting tips.
Quick answers from the manual
Quick answer
- The Fieldmann FDB 200901-E is a 900W angle grinder intended for household or hobby use, suitable for cutting, grinding, and polishing metals, stones, and ceramic articles. p. 16
Key actions
- Mounting the side handle p. 16
- Attaching the safety guard p. 16
- Mounting the grinding disc p. 17
First start
- Ensure the tool is unplugged before assembly. p. 17
- Check that the switch is in the '0' (off) position before plugging in. p. 17
Show 4 more answers Show less
Problems and fixes
Product does not start
Check power connection and cord.
p. 20
Excessive vibration
Replace disc or tighten nuts.
p. 20Maintenance and reset
- Carbon brushes should be checked regularly and replaced if worn. p. 18
Technical specifications
| Parameter | Value | Meaning | Pages |
|---|---|---|---|
| Power input | 900W | Power consumption | p. 19 |
| Speed | 11000 rpm | Rotational speed | p. 19 |
| Disc diameter | 125 mm | Max disc size | p. 19 |
Where to find it in the PDF
- Machine Description p. 7
- Safety Instructions p. 7, 8, 9, 10
- Use and Operation p. 16, 17
- Technical Specifications p. 19
Table of contents
Manual images
Click an image to enlargeQuick Guide from the Manual
The Fieldmann FDB 200901-E is a 900W angle grinder designed for household and hobby use. It is suitable for cutting, grinding, and polishing metals, stones, and ceramic articles. Always ensure the tool is unplugged before performing any assembly, maintenance, or disc changes.
Machine Description
The grinder consists of the following main components:
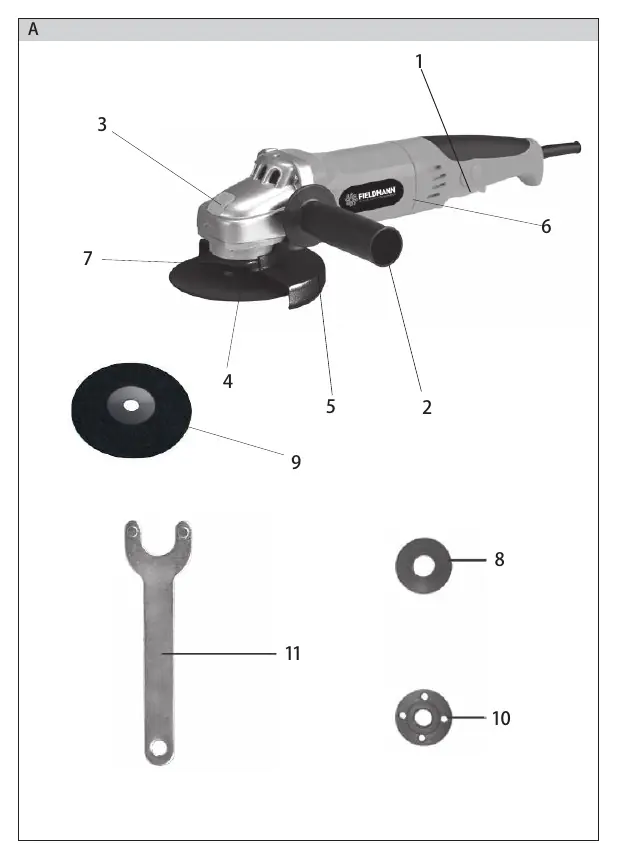
- Switch: Used to turn the tool on and off.
- Side Handle: Provides stability and control during operation.
- Spindle: The rotating shaft where discs are mounted.
- Protective Cover: Essential safety guard to protect the operator from debris.
- Disk Lock-Button: Used to lock the spindle when changing discs.
Assembly and Setup
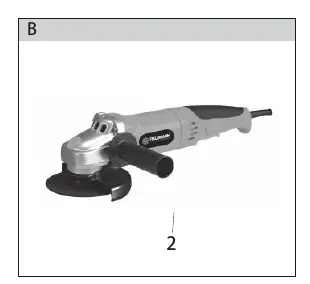
Attaching the Side Handle: Screw the side handle into one of the mounting holes on the grinder head.
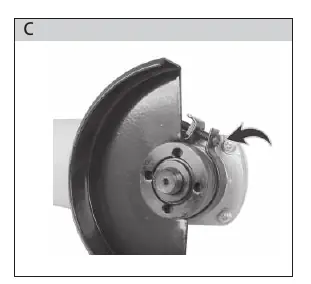
Attaching the Safety Guard: Unscrew the bolt on the guard clamp, place the guard over the spindle area, and tighten the bolt firmly. Never operate the tool without the guard.
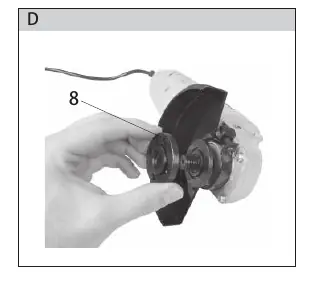
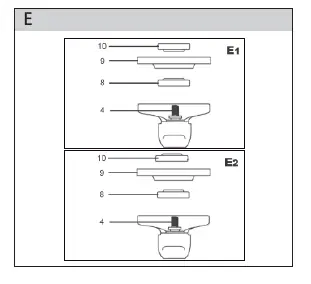
Mounting the Grinding Disc:
- Unplug the tool from the power source.
- Place the grinder with the spindle facing up.
- Fit the washer onto the spindle.
- Place the grinding disc onto the washer.
- Screw the tightening nut onto the spindle.
- Press the spindle lock button and tighten the nut using the provided spanner.
Operation
To operate the grinder, slide the switch to the "I" position. To stop, slide it to the "0" position. Maintain an optimum angle of 150° between the disc and the workpiece. Apply only slight pressure and avoid lateral loads on the disc.
Safety Guidelines
- Always wear eye and ear protection.
- Do not use the tool in environments with flammable liquids or gases.
- Keep the work area clean and well-lit.
- Ensure the disc rotational speed rating is at least 11000 rpm.
- Never use damaged or cracked discs.
- Disconnect the tool from the power supply before changing accessories or performing maintenance.
Maintenance
The tool requires minimal maintenance. Keep the engine fan apertures clean to prevent overheating. Carbon brushes should be checked regularly and replaced if worn. Store the tool in a dry place with constant temperature and humidity.
Practical help
Common problems
Product does not start
Check if the tool is connected to the power supply and inspect the power cord for damage.
Product does not reach full power
Ensure the extension cord is suitable, check the power source voltage, and clean the air vents.
Excessive vibration or noise
Replace the disc if it is damaged or dull, and ensure all bolts and nuts are tightened.
Before use
- Ensure the power supply matches the tool (230V/50Hz).
- Verify the protective guard is securely attached.
- Check that the disc is not cracked or damaged.
- Ensure the side handle is securely mounted.
- Wear appropriate eye and ear protection.
Show more Show less
Specs in practice
- Disc diameter
- 125 mm - Maximum size of the grinding disc.
- Spindle thread
- M 14 - Standard thread size for mounting discs.
Images and diagrams
- Figure A: Parts identification (Switch, Handle, Spindle, Guard, etc.)
- Figure B: Attaching the side handle.
- Figure C: Attaching the safety guard.
- Figure D, E, F: Mounting the grinding disc.
- Figure G: Switching the tool on/off.
Model compatibility
- Use only discs with a diameter of 125 mm.
- Do not use discs intended for larger tools.
- Ensure the disc rotational speed rating is at least 11000 rpm.

Manual page author
David Miller
Documentation analyst