Tools / Grinding Tools
User Manual for Draper 83605 Angle Grinder
Quick guide for the Draper 83605 Angle Grinder. Includes setup, safety instructions, accessory installation, operation, and maintenance tips.
Quick answers from the manual
Quick answer
- The Draper 83605 is a 230V, 850W angle grinder intended for grinding and cutting operations. Always use the auxiliary handle and safety guard, and ensure the disc is rated for 11,000 rpm. p. 2, 7, 8
Key actions
- Fitting the auxiliary handle p. 7
- Fitting the safety guard p. 8
- Changing the disc p. 9
First start
- Ensure the switch is off, attach the handle and guard, and connect to a 230V power supply. p. 6, 7, 9
Show 4 more answers Show less
Problems and fixes
Kickback
Maintain a firm grip, avoid sharp edges, and do not use toothed saw blades.
p. 5
Disc binding
Switch off the tool and let it come to a complete stop before removing the disc.
p. 6Maintenance and reset
- Regularly clean the motor air vents to prevent dust accumulation. p. 5, 10
Technical specifications
| Parameter | Value | Meaning | Pages |
|---|---|---|---|
| Rated voltage | 230V~50Hz | Power supply requirement | p. 2 |
| Rated input | 850W | Power consumption | p. 2 |
| No-load speed | 11,000 rpm | Rotational speed | p. 2 |
| Disc Diameter | 115mm | Max disc size for 83605 | p. 2 |
| Spindle thread | M14 | Mounting thread | p. 2 |
Where to find it in the PDF
- Introduction and Specifications p. 2
- Safety Instructions p. 3, 4, 5, 6
- Assembly and Operation p. 7, 8, 9
Table of contents
Manual images
Click an image to enlargeQuick guide from the manual
This document provides essential instructions for the safe operation and maintenance of the Draper 83605 Angle Grinder. Always wear appropriate personal protective equipment (PPE), including eye protection, ear defenders, and gloves. Ensure the tool is disconnected from the power supply before performing any adjustments, maintenance, or accessory changes.
Product Overview
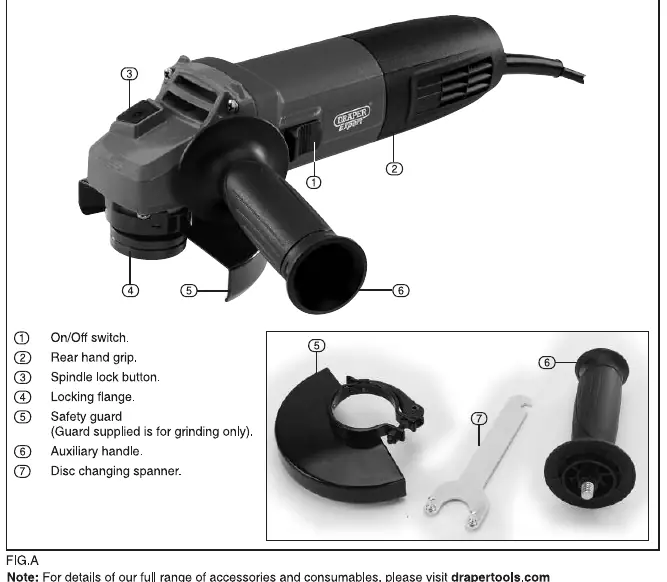
The angle grinder features an on/off switch, rear hand grip, spindle lock button, locking flange, safety guard, and auxiliary handle. Familiarize yourself with these components before use.
Preparation and Assembly
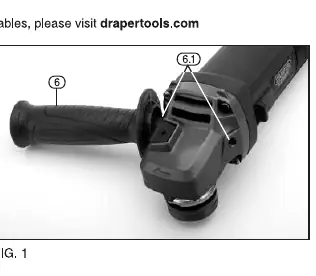
- Auxiliary Handle: For safety, the operator must always use the auxiliary handle. Screw it clockwise into one of the two threaded apertures best suited to the application.
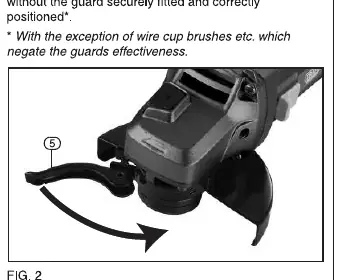
- Safety Guard: Position the guard onto the grinder collar with the quick-release lever in the open position. Rotate it to the correct position and close the lever to lock it. Never operate the machine without the guard correctly fitted.
Accessory Installation
To fit or replace grinding discs:
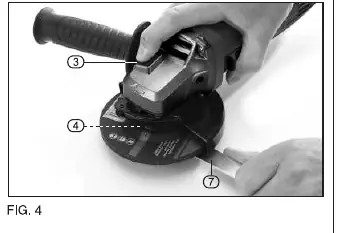
- Press and hold the spindle lock button.
- Loosen the locking flange anti-clockwise using the provided pin spanner.
- Remove the locking flange and clean the spindle.
- Place the accessory onto the spindle, ensuring it locates correctly.
- Securely tighten the locking flange clockwise using the spanner while holding the spindle lock button.
Warning: Never press the spindle lock button while the spindle is in motion.
Operation
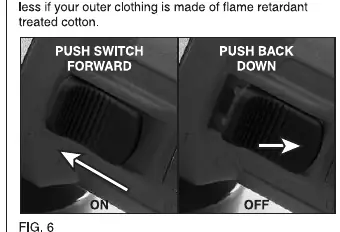
- On/Off Switch: Push the switch forward to start the grinder. To stop, push the back half of the switch down.
- Grinding: Maintain an angle of approximately 30° between the work surface and the disc face.
- Cutting: Cutting operations should only be attempted with the "cutting" guard fitted. Do not incline the machine during cutting to avoid jamming or damage.
Maintenance
Regular inspection and cleaning are essential. Keep the motor ventilation slots clear of dust and debris to prevent overheating. If the tool requires repair, contact an authorized Draper repair agent.
Manufacturer information
Draper Tools
Practical help
Common problems
Kickback
Maintain a firm grip on the tool, avoid working corners or sharp edges, and ensure the accessory is appropriate for the task.
Disc binding
Switch off the tool immediately, hold it until the disc comes to a complete stop, and investigate the cause before restarting.
Overheating
Ensure motor air vents are not blocked and clean them regularly.
Before use
- Check that the voltage matches the power supply (230V).
- Ensure the auxiliary handle is securely fitted.
- Verify the safety guard is correctly positioned and locked.
- Inspect the disc for cracks or damage before fitting.
- Wear approved safety goggles and ear protection.
- Ensure the switch is in the OFF position before connecting to power.
Show more Show less
Images and diagrams
- Fig A: Identification of main components (switch, spindle lock, guard, handle).
- Fig 1: Correct installation of the auxiliary handle.
- Fig 2: Fitting the safety guard with the quick-release lever.
- Fig 4: Using the spindle lock and spanner to change discs.
- Fig 6: Operation of the on/off switch.
Model compatibility
- Model 83605 is designed for 115mm discs.
- Cutting operations require a specific cutting guard (not included).
- Do not use accessories that are not specifically designed and recommended by the manufacturer.

Manual page author
Emily Carter
User documentation editor