Tools / Grinding Tools
Draper 31235 230V Wet and Dry Bench Grinder User Manual
Quick guide for the Draper 31235 230V Wet and Dry Bench Grinder. Includes assembly instructions, operating procedures for grinding and honing, maintenance steps, and safety guidelines.
Quick answers from the manual
Quick answer
- The Draper 31235 is a 230V wet and dry bench grinder. It features a 125mm dry grindstone (2850rpm) and a 200mm wet whetstone (320rpm). Always inspect wheels for damage before use and ensure all guards are installed. p. 5, 14
Key actions
- Assemble the tool rest, spark deflector, and eye shield before first use. p. 11, 12
- Inspect grinding wheels for damage before every use. p. 14
First start
- Ensure the switch is OFF, mount the grinder securely, install all guards, and check wheel clearance (1.5mm). p. 11, 14
Show 4 more answers Show less
Problems and fixes
Grinder won't start
Check fuse (5A) or electrical fault.
p. 18
Vibration
Tighten loose wheels, dress the stone, or replace damaged wheels.
p. 18Maintenance and reset
- Regularly dress the grindstone to remove grooves and ensure an even finish. p. 16
Technical specifications
| Parameter | Value | Meaning | Pages |
|---|---|---|---|
| Rated Voltage | 230V~50Hz | Power supply requirement | p. 5 |
| Rated Input | 350W | Power consumption | p. 5 |
| Grindstone Speed | 2850rpm | Rotational speed for dry grinding | p. 5 |
| Whetstone Speed | 320rpm | Rotational speed for wet honing | p. 5 |
Where to find it in the PDF
- Product Overview p. 9
- Installation p. 11, 12, 13
- Operation p. 14, 15
- Maintenance p. 16, 17
Table of contents
Manual images
Click an image to enlargeQuick guide from the manual
The Draper 31235 is a 230V wet and dry bench grinder designed for sharpening and reshaping metal tools. Before use, always inspect the grinding wheels for damage, ensure all guards are properly installed, and verify that the tool is securely mounted to a workbench. Never operate the grinder if any parts are damaged or if the eye shield is missing.
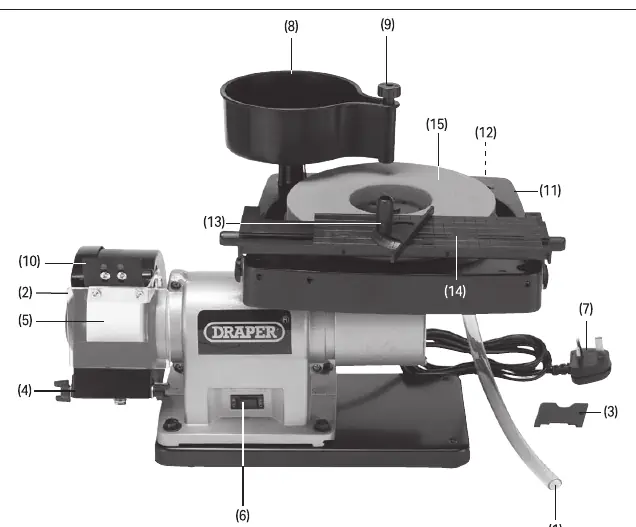
Product Overview
The unit consists of a motor housing, a dry grindstone (left), and a wet whetstone (right). Key components include the adjustable tool rests, spark deflector, clear eye shield, water reservoir with tap, and drainage hose.
Installation and Assembly
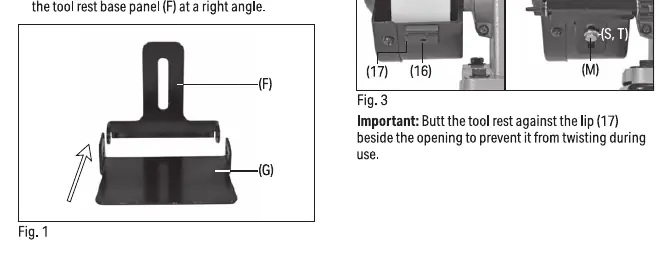
Tool Rest Assembly: Insert the tool rest front panel into the base panel at a right angle. Secure the panels using the provided M6 bolts, washers, and wing nuts. Fix the assembled tool rest into the socket on the grindstone housing.
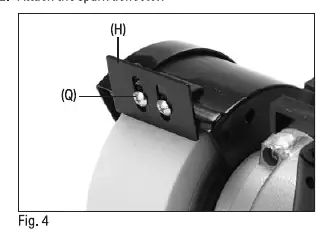
Spark Deflector and Eye Shield: Attach the spark deflector to the top of the grindstone housing using M4 screws. Adjust it to be approximately 1.5mm above the wheel surface. Attach the eye shield to the right-hand side of the grindstone housing using the provided brackets and screws.
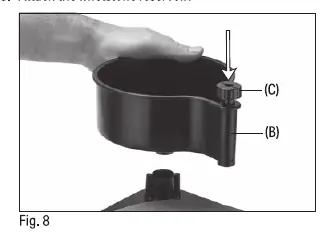
Whetstone Setup: Insert the reservoir tap into the reservoir. Place the reservoir onto the water tray frame. Connect the drainage pipe to the outlet beneath the water tray.
Operating Instructions
General Guidance: The coarse grindstone is for rough grinding and removing large amounts of metal. The fine whetstone is for honing and refining edges. Always keep the workpiece moving across the face of the wheel to prevent uneven wear.
Using the Grindstone: Ensure the eye shield is in place. Loosen the wing nuts to set the tool rest at the required angle (approx. 1.5mm from the wheel). Start the tool and allow it to reach full speed before applying the workpiece.
Whetstone Honing: Always use with water. Fill the reservoir halfway with clean water and regulate the flow using the tap. Set the tool rest and honing guide to the appropriate angles, ensuring the tool edge is parallel to the whetstone surface.
Maintenance and Troubleshooting
General Maintenance: Regularly check stones, flanges, and blotters for damage. Perform a ring test on new stones by tapping them with a non-metallic object; a clear ringing tone indicates the stone is intact. Replace wheels that are worn more than 25%.
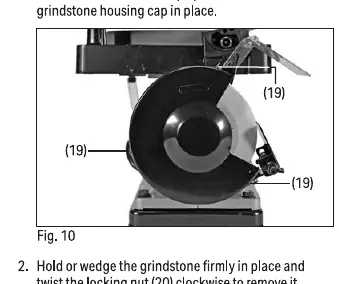
Replacing the Grindstone: Remove the housing cap screws. Hold the stone firmly and twist the locking nut clockwise to remove. Slide off the flange and stone. Install the new stone, ensuring it matches the specifications.
Troubleshooting: If the grinder fails to start, check the fuse (5A time-delay) or for electrical faults. If the grinder vibrates, check for loose wheels, out-of-balance stones, or damaged wheels.
Technical Specifications
Rated Voltage: 230V~50Hz. Rated Input: 350W. Whetstone: 200mm diameter, 80mm bore, 50mm width, 320rpm. Grindstone: 125mm diameter, 12.7mm bore, 25mm width, 2850rpm.
Manufacturer information
Draper Tools
Practical help
Common problems
Bench grinder will not start
Check if the fuse has blown (replace with 5A time-delay fuse) or if there is an electrical fault.
Grinder vibrates when running
Stop the tool immediately. Check if wheels are loose, out of balance, or damaged. Tighten or replace as necessary.
Before use
- Visually inspect both grinding wheels for chips and cracks.
- Ensure the switch is in the OFF position before connecting to power.
- Verify all protective fixtures (eye shield, spark deflector) are in place.
- Check that the clearance between the tool rest and the wheel is approximately 1.5mm.
- Ensure the whetstone reservoir is filled with water before use.
Show more Show less
Specs in practice
- Whetstone Speed
- 320rpm - optimized for slow, precise honing.
- Grindstone Speed
- 2850rpm - optimized for fast material removal.
Images and diagrams
- Fig 1-3: Assembly of the tool rest and mounting to the housing.
- Fig 4: Installation of the spark deflector.
- Fig 5: Installation of the eye shield.
- Fig 8-9: Reservoir and drainage pipe setup.
- Fig 10-11: Replacing the grindstone wheel.
Model compatibility
- Use only spare parts supplied by Draper Tools.
- Grinding wheels are not interchangeable; install only wheels matching the product specifications.
- Do not use the bench grinder if any part is damaged.

Manual page author
Michael Turner
Technical manual editor