Tools / Welding Equipment
User Manual for Telwin Infinity 220 Inverter Welder
Quick guide for the Telwin Infinity 220 inverter welder. Includes safety instructions, installation steps, welding procedures, maintenance, and troubleshooting.
Quick answers from the manual
Quick answer
- The Telwin Infinity 220 is an MMA inverter welder. To operate, ensure proper electrical connection, use required protective gear, and adjust current settings via the front panel potentiometer based on the electrode diameter. p. 6, 7, 8
Key actions
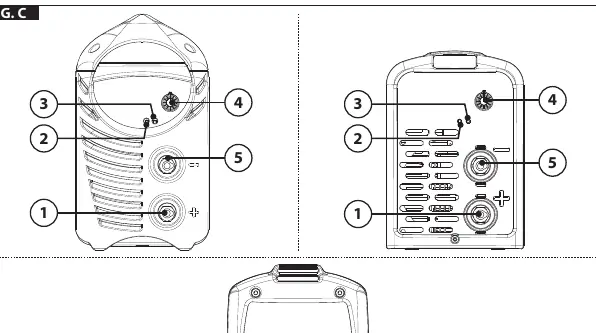
- Connect welding cables to the correct polarity (+/-) as per electrode type. p. 8
- Clean the interior of the machine regularly with dry compressed air. p. 5, 9
First start
- Check power supply voltage, connect cables, and ensure proper ventilation before switching on. p. 7, 8
Problems and fixes
Yellow LED on
Thermal protection or voltage error. Wait for cooling or check power supply.
p. 7Maintenance and reset
- Thermal protection resets automatically once the machine cools down. p. 7
Technical specifications
| Parameter | Value | Meaning | Pages |
|---|---|---|---|
| Duty Cycle | Varies by model | Percentage of 10 min cycle | p. 14 |
Where to find it in the PDF
- Safety Warnings p. 1, 2, 3, 4
- Technical Data p. 6, 14
- Installation and Operation p. 7, 8
Table of contents
Manual images
Click an image to enlargeImportant Information from the Manual
This document provides essential safety, installation, and operational guidelines for the Telwin Infinity 220 inverter welder. Users must read the full manual before operation to ensure safety and proper machine performance. The device is designed for MMA welding.
Safety Precautions
- Electric Shock: Avoid direct contact with the welding circuit. The no-load voltage can be dangerous.
- Fumes: Ensure adequate ventilation or use fume extraction equipment.
- Radiation: Use protective masks with appropriate filters (UNI EN 169 or UNI EN 379) and protective clothing to prevent UV/IR radiation exposure.
- Prohibitions: Do not use the machine if you have vital electrical/electronic medical devices (e.g., pacemakers) or metal prostheses. Do not hang the machine by its handle.
Installation
Ensure the machine is placed on a flat surface with at least 250mm of free space around it for ventilation. Electrical connections must be performed by qualified personnel. Ensure the power supply is properly grounded and protected by appropriate differential switches.
Welding Procedure
Preparation: Connect welding cables to the correct polarity (+/-) based on the electrode type. The earth clamp must be connected as close as possible to the welding point.
Operation:
- Adjust the welding current using the potentiometer based on the electrode diameter.
- Hold the mask in front of your face.
- Strike the arc by scratching the electrode against the workpiece like a match.
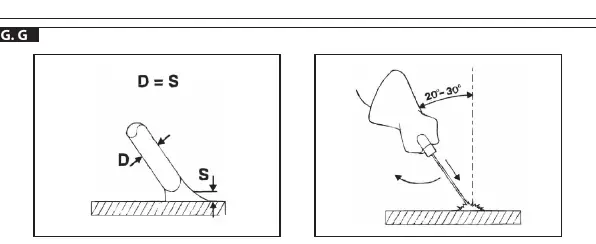
- Maintain a constant arc length equal to the electrode diameter during welding.
- Tilt the electrode 20-30 degrees in the direction of movement.
Maintenance
Regularly inspect the interior of the machine for dust accumulation, especially on the transformer and rectifier. Use dry compressed air (max 10 bar) to clean. Do not direct compressed air onto electronic boards; use a soft brush or suitable solvents instead. Ensure all electrical connections are tight and cable insulation is intact.
Troubleshooting
If the machine does not work satisfactorily, check the following:
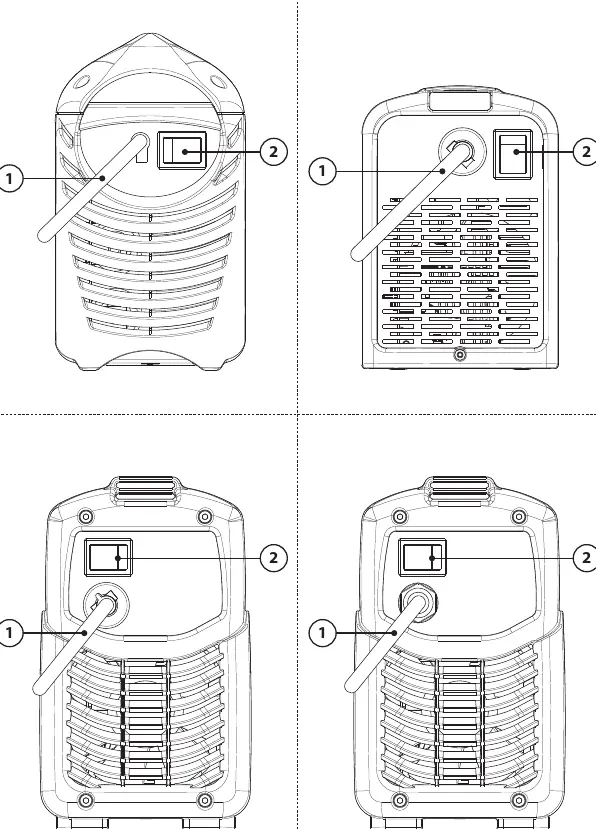
- Power Supply: Ensure the main switch is ON and the power line (cable, plug, fuses) is functional.
- Thermal Protection: If the yellow LED is lit, the thermal protection has triggered. Wait for the machine to cool down naturally.
- Voltage: Check that the supply voltage is within the required range.
- Short Circuit: Ensure there is no short circuit at the output.
Manufacturer information
Telwin SpA
Practical help
Common problems
Machine does not turn on
Check the main power supply, cable, plug, and fuses.
Yellow LED is lit
Thermal protection has triggered. Wait for the machine to cool down. Also, check for voltage issues or short circuits.
Electrode sticks to workpiece
Check welding current settings and ensure the electrode type is compatible.
Before use
- Ensure proper ventilation in the workspace.
- Verify power supply voltage matches the machine requirements.
- Check that all cable connections are secure.
- Wear appropriate protective gear (mask, gloves, protective clothing).
- Ensure no flammable materials are in the work area.
Images and diagrams
- Fig. C: Front panel controls (current adjustment, LEDs, cable connections).
- Fig. D: Rear panel (power switch, power cable).
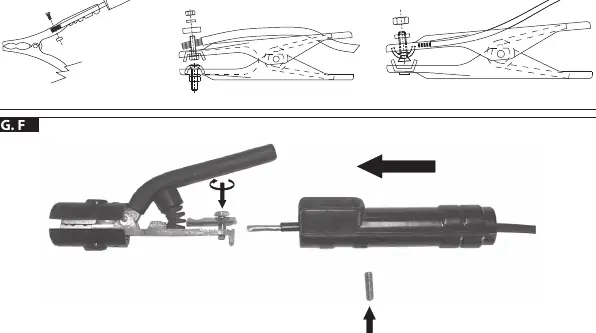
- Fig. E/F: Cable assembly instructions.
- Fig. G: Correct welding technique (angle and distance).
- Fig. H: Visual guide to welding defects (arc length, current, speed).
Model compatibility
- Compatible with MMA welding electrodes.
- Requires proper grounding and differential switch protection.
- Not suitable for use by persons with vital medical electronic devices or metal prostheses.

Manual page author
David Miller
Documentation analyst
Organizes user manual content into clear summaries, with attention to model details, product context, and everyday usability.