Tools / Welding Equipment
User Manual for GYS PROGYS 200E FV CEL Welding Machine
Comprehensive user guide for the GYS PROGYS 200E FV CEL welding machine. Includes safety instructions, installation steps, MMA and TIG welding procedures, maintenance tips, and troubleshooting.
Quick answers from the manual
Quick answer
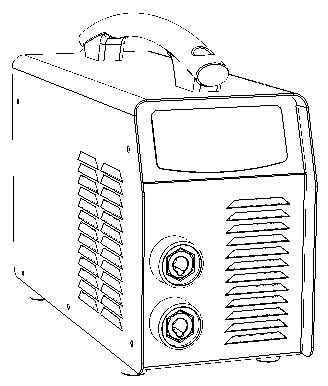
- The GYS PROGYS 200E FV CEL is a portable, inverter-based welding machine designed for MMA (covered electrode) and TIG Lift welding. It features 'Flexible Voltage' technology, allowing operation on power supplies ranging from 110V to 240V. p. 6, 13
Key actions
- MMA Welding: Connect cables, select MMA mode (hold button 5 for 3s), set intensity, adjust Hot Start/Arc Force. p. 6, 13
- TIG Welding: Connect earth clamp (+), torch (-), gas supply, select TIG mode (hold button 5 for 3s), set intensity, touch electrode to start. p. 7, 14
First start
- Connect to a 110V-240V earthed power supply, press the power button, and select the desired welding mode (MMA or TIG). p. 6, 13
Problems and fixes
Device does not deliver current and yellow thermal lamp is on.
Thermal protection is activated. Wait approximately 2 minutes for the cooling period to end.
p. 8, 15Maintenance and reset
- Regularly remove the casing to remove dust with compressed air. Check electrical connections with an insulated tool. p. 6, 12
Technical specifications
| Parameter | Value | Meaning | Pages |
|---|---|---|---|
| Power Supply | 110V - 240V | Flexible Voltage range | p. 58 |
Where to find it in the PDF
- Safety Rules p. 9, 10, 11
- Installation & Operation p. 13, 14
- Troubleshooting p. 15
- Technical Specifications p. 58
Table of contents
Manual images
Click an image to enlargeQuick Guide
The GYS PROGYS 200E FV CEL is a portable, inverter-based welding machine designed for MMA (covered electrode) and TIG Lift welding. It features 'Flexible Voltage' technology, allowing operation on power supplies ranging from 110V to 240V. This manual provides essential safety, installation, and operation instructions.
Safety Instructions
- Electrical Safety: Always connect to an earthed electrical supply. Never touch live parts inside or outside the machine. Disconnect from the mains and wait 2 minutes before opening the device.
- Environment: Use in a well-ventilated area, free from dust, acid, or corrosive agents. Keep away from rain and direct sunlight.
- Individual Protection: Wear insulated, dry, fireproof clothing covering the whole body. Use protective gloves and a welding helmet with appropriate protection levels.
- Fumes and Gas: Ensure adequate ventilation. Welding in small areas requires supervision. Degrease workpieces before welding.
- Fire and Explosion: Keep flammable materials at least 11 meters away. Do not weld near grease or paint.
Installation and Setup
Installation should only be performed by qualified personnel. Ensure the machine is unplugged during setup.
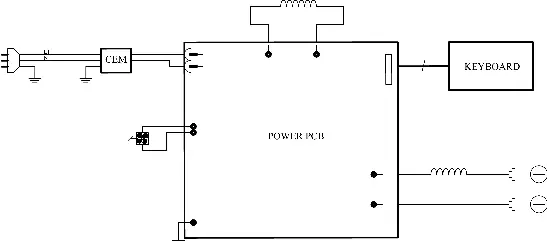
- Power Supply: The machine is supplied with a 16A CEE7/7 plug. It is compatible with 110V-240V (50-60 Hz) earthed power supplies.
- Generator Use: The machine can work with generators provided the auxiliary power is AC, frequency is 50-60 Hz, and peak voltage is below 400V.
- Positioning: Place on a floor with a maximum incline of 10°. Ensure sufficient ventilation and access to controls.
MMA Welding (Covered Electrode)
- Connect the electrode holder and ground clip to the connectors, respecting polarities.
- Position the electrode in the holder.
- Select MMA mode by holding the selector button (5) for 3 seconds.
- Set the desired intensity using the adjustment keys (4).
- Adjust 'HOT START' and 'ARC FORCE' by pressing the selector button (5) repeatedly.
TIG Welding (Tungsten Inert Gas)
- Connect the earth clamp to the positive pole (+) and the valve torch to the negative pole (-).
- Connect the gas hose to the gas cylinder regulator.
- Select TIG mode by holding the selector button (5) for 3 seconds.
- Set the desired intensity using the adjustment keys (4).
- Adjust gas flow on the regulator and open the torch valve.
- To start, touch the electrode to the workpiece.
- To finish, lift the arc twice (up-down-up-down) within 4 seconds to trigger the automatic arc fade.
Maintenance and Troubleshooting
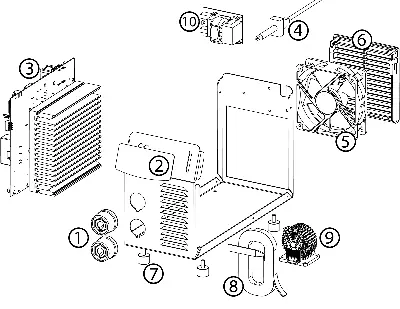
- Maintenance: Annual maintenance is recommended. Periodically remove the casing to remove dust with compressed air. Check electrical connections with an insulated tool.
- Troubleshooting: If the device does not deliver current and the yellow thermal lamp is on, wait for the cooling period (approx. 2 minutes). If the display is on but no current is delivered, check cable connections.
Technical Specifications
The machine operates on 110V-240V AC. It has an IP21 protection rating. Detailed duty cycle information is provided in the technical specifications table on page 58.
Manufacturer information
GYS
Practical help
Common problems
Device does not deliver current and yellow thermal lamp is on.
Thermal protection is activated. Wait approximately 2 minutes for the cooling period to end.
Display is on, but the device does not deliver current.
Check that the earth clamp or electrode holder is correctly connected to the welder.
Instable arc (TIG mode).
Check the tungsten electrode size and preparation, or reduce the gas flow rate.
Tungsten electrode oxidizes and turns dark at the end of welding.
Check and tighten all gas connections. Wait for the electrode to cool down before stopping the gas flow.
Before use
- Ensure the power supply is 110V-240V with earth.
- Verify that the work area is well-ventilated.
- Check that the earth clamp and electrode holder are securely connected.
- Ensure the tungsten electrode is correctly sharpened for TIG welding.
- Check that the gas cylinder is properly connected and the flow is set.
Specs in practice
- Flexible Voltage
- Allows the machine to operate on power supplies ranging from 110V to 240V.
Images and diagrams
- Front panel interface showing display, mode selection, and adjustment buttons.
- Electrode sharpening diagram (L = 2.5 x d).
Model compatibility
- Compatible with electric generators (230V +/- 15%).
- Not for use in residential areas with low-voltage public networks (Class A device).

Manual page author
David Miller
Documentation analyst
Organizes user manual content into clear summaries, with attention to model details, product context, and everyday usability.