Electronics / Monitors
User Manual for Terra 2447W-EN LCD/LED Monitor
Quick guide for the Terra 2447W-EN LCD/LED monitor. Includes setup instructions, stand assembly, OSD menu navigation, technical specifications, and troubleshooting tips.
Quick answers from the manual
Quick answer
- The Terra 2447W-EN is a 23.6-inch LCD/LED monitor. To set it up, connect the power, video (DVI/HDMI), and audio cables, then power on the computer and monitor. Use the front-panel buttons to access the OSD menu for image and color adjustments. p. 3, 6
Key actions
- Connect the monitor to a grounded AC outlet. p. 4, 6
- Set the resolution to 1920 x 1080 @ 60Hz in Windows Display Settings. p. 6
- Use the OSD menu to adjust image settings like Contrast, Brightness, and Color. p. 10, 11
First start
- Connect video cable (DVI or HDMI) while devices are powered off. p. 6
- Connect power cord to a grounded outlet. p. 6
- Power on the computer, then the monitor. p. 6
Show 4 more answers Show less
Problems and fixes
No power
Check power cord connection and outlet voltage.
p. 15
No screen image
Check video cable connection and adjust brightness.
p. 15
Wrong or abnormal colors
Check video cable pins, connect to another computer, or use Memory Recall.
p. 15Maintenance and reset
- Use the 'Memory Recall' function in the OSD menu to reset video and audio controls to factory settings. p. 12
Technical specifications
| Parameter | Value | Meaning | Pages |
|---|---|---|---|
| Display Size | 59.9 cm (23.6") | Screen diagonal size. | p. 14 |
| Resolution | 1920 x 1080 | Maximum displayable resolution. | p. 14 |
| Input Voltage | AC 100-240 V | Power requirement. | p. 14 |
| Operating Temperature | 0°C ~ + 40°C | Safe operating range. | p. 14 |
Where to find it in the PDF
- Safety Precautions p. 4
- Quick Installation p. 6
- OSD Functions p. 10, 11, 12
- Technical Specifications p. 14
Table of contents
Manual images
Click an image to enlargeQuick guide from the manual
The Terra 2447W-EN is a 23.6-inch high-resolution LCD/LED monitor. This guide provides essential information for installation, operation, and maintenance. Ensure the monitor is placed in a clean, dry, and well-ventilated environment away from magnetic objects and heat sources.
Installation
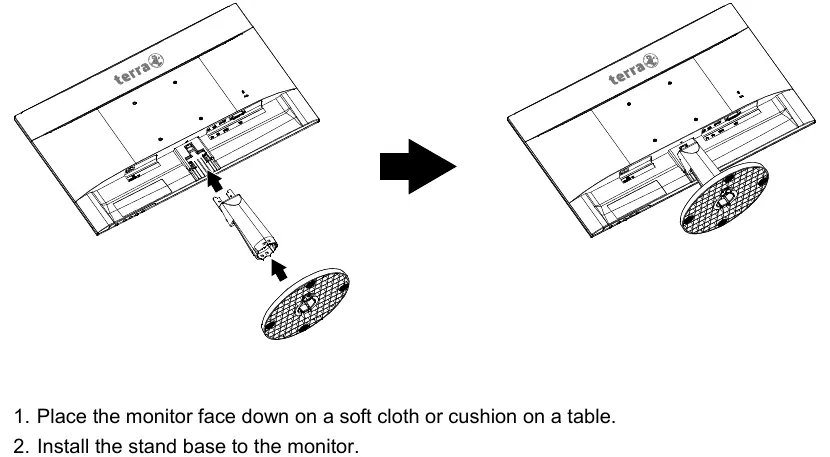
Stand Assembly: Place the monitor face down on a soft cloth or cushion. Attach the stand base to the monitor. To disconnect, place the monitor face down, press the tenon inwardly, and pull the stand base to remove.
Cable Connections:
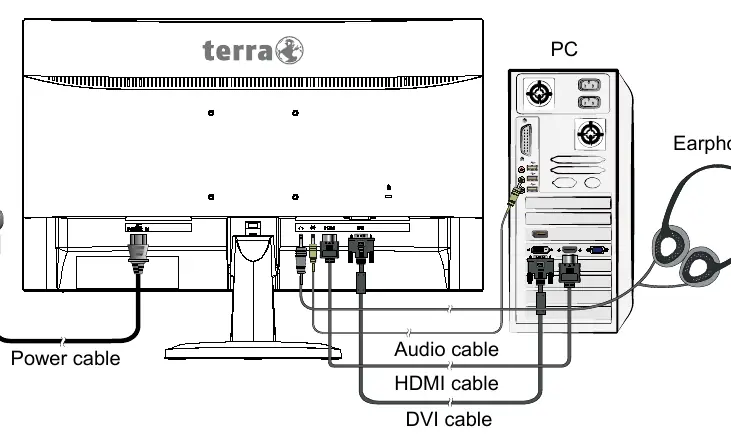
- Video: Connect the DVI or HDMI cable from your computer to the monitor.
- Power: Connect the power cord to a grounded AC outlet and then to the monitor.
- Audio: Connect the audio cable from the computer's audio output to the monitor's audio input.
- Earphones: Connect headphones to the earphone output terminal (optional).
After connecting, power on the computer first, then the monitor. For Windows users, configure the resolution (1920 x 1080) and refresh rate (60Hz) in Display Settings.
Controls and OSD Menu
The monitor features front-panel buttons for OSD navigation:
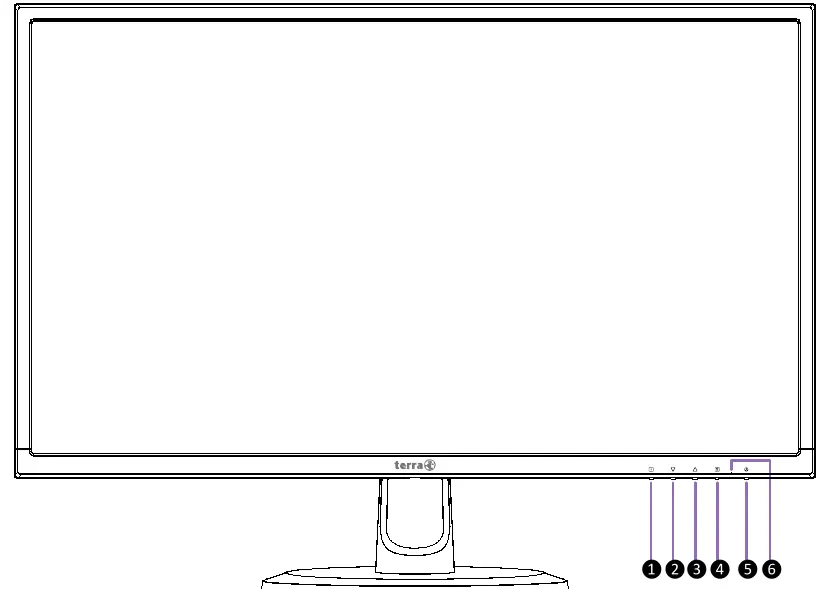
- 1: OSD Menu On/Off / Exit.
- 2: Manual adjust mode select / Confirm.
- ▼: Scroll Down / Decrease / Contrast/Brightness menu.
- ▲: Scroll Up / Increase / Anti Blue Light menu.
- 5: Power ON/OFF.
The OSD menu allows adjustments for Contrast/Brightness, Input Source, Audio, Colour Settings, Image Adjustment, and Menu settings.
Care and Maintenance
- Always unplug the monitor before cleaning.
- Use a clean, dry cloth for the cabinet.
- Use non-ammonia based cleaners on a cloth, never directly on the screen.
- Keep the monitor away from magnets, motors, and transformers.
Troubleshooting
- No Power: Check if the power cord is securely connected and the outlet is functional.
- No Image: Ensure the video cable is tightly secured and check brightness settings.
- Abnormal Colors: Check video cable connections or use the "Memory Recall" function to reset to default settings.
Practical help
Common problems
No power
Ensure the AC power cord is securely connected to the monitor and the power outlet. Verify the outlet is supplying voltage by testing with another device.
No screen image
Ensure the video cable is tightly secured to both the computer and the monitor. Adjust the brightness settings via the OSD menu.
Wrong or abnormal colors
Check the video cable for loose or broken pins. Connect the monitor to another computer to isolate the issue. Use the 'Memory Recall' function to reset settings.
Before use
- Ensure the monitor is placed on a stable, flat surface.
- Verify the power source matches the label on the rear of the monitor (AC 100-240V).
- Use a grounded power supply cord.
- Use the provided shielded video interface cable with bonded ferrite cores.
- Ensure the monitor is in a clean, dry, and well-ventilated area.
Show more Show less
Specs in practice
- Display Size
- 59.9 cm (23.6 inches).
- Refresh Rate
- 60Hz maximum.
- Operating Temperature
- 0°C to +40°C.
- Power Consumption (Off Mode)
- ≤ 0.3 W.
Images and diagrams
- Front buttons: 1 (Menu), 2 (Down/Select), 3 (Up), 4 (Confirm), 5 (Power), 6 (LED Indicator).
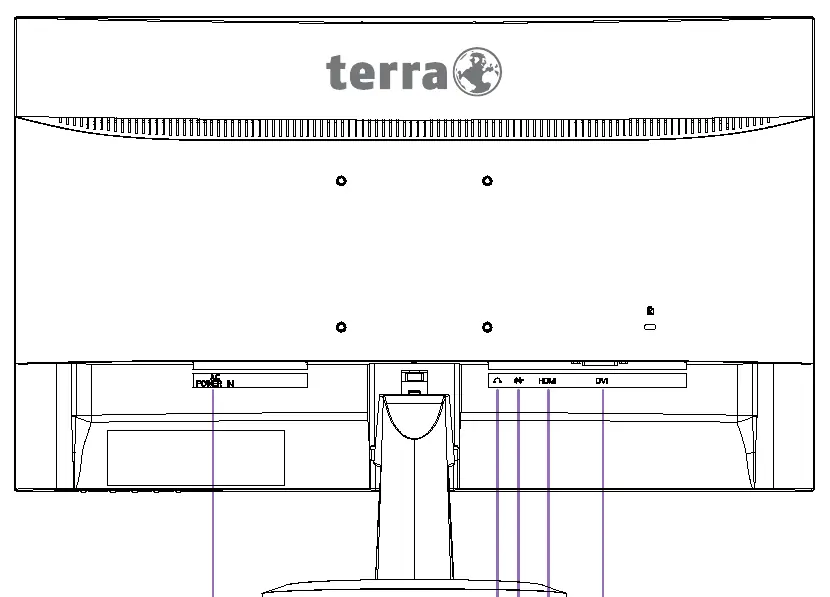
- Rear ports: Power input, Earphone output, Audio input, HDMI input, DVI input.
Model compatibility
- Supports VESA DPMS power management.
- Compatible with DVI and HDMI input signals.
- Supports various timing modes from VGA to Full HD.

Manual page author
David Miller
Documentation analyst