Home Appliances / Space Heaters
User Manual for TESY GH 200 / GH 200 B Glass Panel Heater
Quick guide for the TESY GH 200 / GH 200 B glass panel heater. Includes installation steps, operating modes, programming, safety precautions, and maintenance.
Quick answers from the manual
Quick answer
- The GH 200 / GH 200 B is a glass panel heater for domestic use. It features manual and program modes, towel heating, motion detection, and open window detection. p. 5, 6
Key actions
- Mounting on wall p. 4
- Cleaning the filter p. 6, 7
First start
- Connect to power, press ON/OFF button. Buzzer sounds, screen lights up for 1 min, then enters standby. p. 5
Problems and fixes
Heater does not start
Check if set temperature is higher than room temperature.
p. 6Maintenance and reset
- Long press SET for 5 seconds to recover factory settings. p. 6
Technical specifications
| Parameter | Value | Meaning | Pages |
|---|---|---|---|
| Power | 2000W | Nominal heat output | p. 8 |
Where to find it in the PDF
- Safety Precautions p. 2, 3
- Wall Mounting p. 4
- Usage Instructions p. 5, 6
- Technical Specifications p. 8
Table of contents
Manual images
Click an image to enlargeImportant Information from the Manual
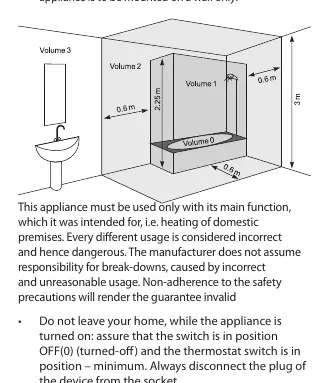
The TESY GH 200 / GH 200 B is a glass panel heater designed for domestic heating. It features multiple operating modes, including manual, program, and towel heating. It is rated IPX4, making it suitable for installation in bathroom zone 2, provided it is mounted on a wall and maintains a minimum distance of 1 meter from water sources.
Safety Precautions
- Wall Mounting Only: Floor or ceiling mounting is strictly forbidden.
- Distance Requirements: Keep flammable objects at least 100 cm away. Maintain at least 1m clearance in front of the heater.
- Bathroom Installation: Must be installed in volume 2 to prevent access to controls by a person in the shower or bath.
- Overheating: Do not cover the appliance. Ensure ventilation openings are free of dust and dirt.
- Children: Children under 3 years should be kept away unless supervised. Children 3-8 years may only operate the ON/OFF button.
Installation
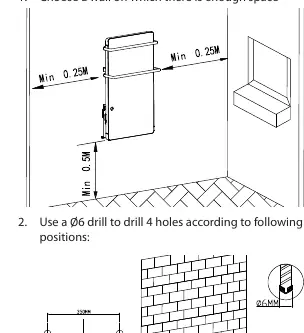
- Choose a wall with sufficient space, ensuring no pipes or wires are behind it.
- Drill 4 holes using a Ø6 drill bit.
- Insert the provided pegs into the holes.
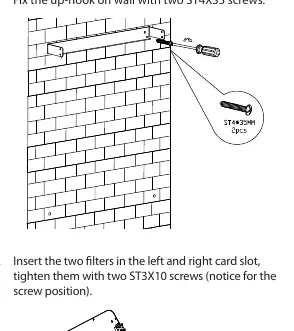
- Detach the up-hook from the back of the appliance and fix it to the wall using two ST4X35 screws.
- Insert the two filters into the left and right slots and secure them with ST3X10 screws.
- Attach the Z wall hanging brackets to the back of the appliance with M4X8 screws.
- Install the small and large towel racks into the fixed slots and lock them with M4X16 screws.
- Mount the appliance onto the up-hook and secure it with M4X10 screws on both sides.
- Fix the Z brackets to the wall using ST4X35 screws.
Operation
Manual Mode
Press the ON/OFF button to switch on. The heater starts at 1800W. You can set the temperature (5-40°C) by pressing SET and using the + or - buttons. The heater will stop when the ambient temperature reaches the set point and restart when it drops 2°C below.
Program Mode
In standby, long-press the program button for 3 seconds. You can set wake-up times and temperatures for each day of the week using the 24-hour grid display.
Towel Heating Function
Press the towel heating button to activate. It operates independently at 200W for a 2-hour cycle and switches off automatically.
Advanced Features
- Body Detector: Scans for presence; stops heating 15 minutes after the room is empty.
- Open Window Detection: Detects a 5°C drop in 10 minutes and switches to standby.
Maintenance
Clean the filter after 720 hours of use or when the display flashes 'CL'. Remove the filter from the back, clean it under running water, and let it dry naturally before reassembling. Clean the body with a damp cloth, vacuum cleaner, or brush.

Overheating Protection
If an error occurs, the built-in protection automatically turns off the appliance. Disconnect from the mains, set the switch to '0', and wait 10-15 minutes for it to cool down before restarting.
Manufacturer information
TESY
Practical help
Common problems
Heater does not start heating
Ensure the set temperature is higher than the current room temperature.
Display flashes 'CL'
The filter needs cleaning (after 720 hours of use). Clean it under running water and press OK.
Appliance shuts down automatically
Overheating protection may have triggered. Disconnect from power, set switch to '0', wait 10-15 minutes for cooling, then restart.
Before use
- Check that the supply voltage matches the technical plate.
- Ensure the wall is suitable for mounting (no wires/pipes).
- Verify all components are included in the package.
- Ensure no flammable objects are within 100cm.
- Check that air inlet/outlet openings are not blocked.
Images and diagrams
- Wall mounting diagram shows minimum distances: 0.25m from sides, 0.5m from bottom, 0.2m from ceiling.
- Bathroom installation diagram shows Volume 2 zone requirements.
Model compatibility
- For vertical wall mounting only.
- Not suitable for floor or ceiling mounting.
- Do not use in rooms smaller than 4m².

Manual page author
Michael Turner
Technical manual editor
Reviews PDF manuals for structure, safety notes, and practical product details so readers can find the right information quickly.