Lighting / Fixtures
User Guide for 1 Light Matte Black Stem Pendant Light 6641819
Installation and maintenance guide for the 1 Light Matte Black Stem Pendant Light (Item 6641819). Includes step-by-step assembly, wiring instructions, and safety precautions.
Quick answers from the manual
Quick answer
- This guide covers the assembly and installation of the 1 Light Matte Black Stem Pendant Light (6641819). It includes safety warnings, tool requirements, wiring procedures, and maintenance tips. p. 1, 2, 3, 4
Key actions
- Turn off power at the main fuse or circuit breaker before starting. p. 1, 3
- Connect ground wires to the green ground screw. p. 4
Problems and fixes
Canopy not secure
Adjust collar loop on single bar by screwing in or out.
p. 3Maintenance and reset
- Clean with a soft cloth; avoid abrasive materials. p. 4
Technical specifications
| Parameter | Value | Meaning | Pages |
|---|---|---|---|
| Max Wattage | 60W | Maximum wattage per bulb (Type A) | p. 1 |
Where to find it in the PDF
- Safety and Tools p. 1
- Parts and Pre-installation p. 2
- Installation Steps p. 3
- Wiring and Cleaning p. 4
Table of contents
Manual images
Click an image to enlargeQuick Guide
This guide provides instructions for the installation and maintenance of the 1 Light Matte Black Stem Pendant Light (Item 6641819). Before beginning, ensure the power is turned off at the main fuse or circuit breaker. Installation by a licensed electrician is recommended. Ensure the mounting surface is clean, dry, flat, and capable of supporting the fixture's weight.
Tools Required
Before starting, prepare the following tools:
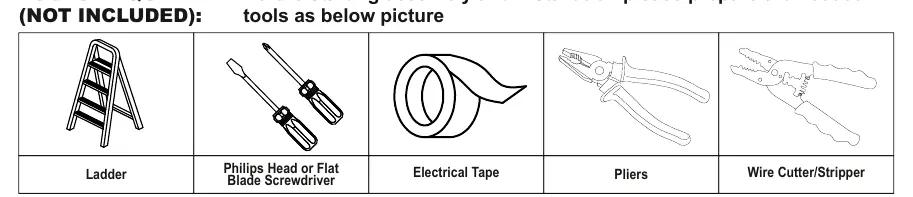
- Ladder
- Philips Head or Flat Blade Screwdriver
- Electrical Tape
- Pliers
- Wire Cutter/Stripper
Parts Included
Ensure all parts are present before installation:
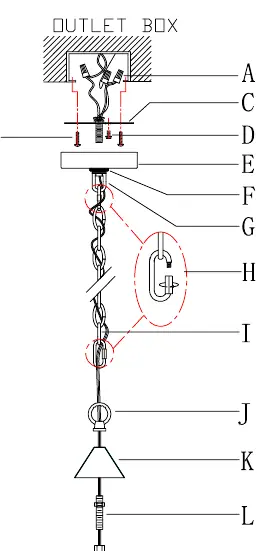
- Single bar, Canopy, Collar ring, Collar loop, Quick links (2), Chain, Loop, Lid, Threaded pipe, Socket, Lampshade
- Accessories: Wire connectors (3), Mounting screws (2)
Assembly & Installation
Pre-installation:
- Determine the desired hanging height by measuring and adjusting the chain length using chain pliers.
- Thread the threaded pipe through the wire and tighten it onto the lampshade connector.
- Place the lid over the top of the lampshade and tighten with the loop.
- Attach the quick link to the chain and loop.
- Weave the fixture wires through the chain, ensuring they are not stressed.
Installation:
- Attach the single bar to the outlet box using mounting screws. Ensure the side marked GND faces out.
- Raise the canopy over the collar loop and screw the collar ring to measure the proper position. Adjust the collar loop on the single bar if necessary to ensure the canopy sits snugly against the ceiling.
- Pass the chain through the collar ring and canopy.
- Attach the quick link to the collar loop and close it.
- Pass the fixture wires through the collar loop to the top of the threaded nipple.
- Shorten wire length if necessary, ensuring at least 6 inches of wire remains above the single bar.
Wiring Instructions
Connect the wires according to the provided charts. Note that the ground wire is bare copper; never connect other wires to ground wires. Twist wires together with plastic wire connectors until tightly joined, then wrap each connector with electrical tape. Ensure no wire strands are exposed and tuck all wires into the outlet box. Secure the canopy to the ceiling by tightening the collar ring onto the collar loop.
Maintenance
To clean the fixture, wipe it with a soft cloth. Do not use abrasive materials such as scouring pads, powders, steel wool, or abrasive paper. When replacing bulbs, turn off or unplug the lamp and wait until it is cool.
Manufacturer information
The Home Depot
Practical help
Common problems
Canopy is not flush with the ceiling
Adjust the collar loop on the single bar by screwing it in or out until the secure length is achieved.
Fixture wires are too long
Shorten the length of the fixture wires, ensuring at least 6 inches of wire remains above the single bar.
Before use
- Turn off electricity at the main fuse or circuit breaker.
- Ensure the mounting surface is clean, dry, and flat.
- Verify the ceiling can support the weight of the lamp.
- Check that the voltage is 120V.
- Prepare necessary tools: ladder, screwdriver, electrical tape, pliers, wire cutter.
Images and diagrams
- Wiring diagram illustrates connecting fixture ground to outlet box ground using the green ground screw.
- Assembly steps show the sequence of attaching the chain, canopy, and lampshade.
Model compatibility
- Mounting surface must be 1/4 inch larger than the canopy on all sides.
- Any gaps between the mounting surface and canopy exceeding 3/16 inch should be corrected.

Manual page author
Emily Carter
User documentation editor
Prepares concise manual descriptions and highlights the most useful setup, operation, and maintenance information for readers.