Lighting / Fixtures
Installation Guide for The Home Depot 21046-W4BK Lighting Fixture
Quick installation guide for The Home Depot 21046-W4BK lighting fixture. Includes safety warnings, parts list, wiring diagram, and step-by-step assembly instructions.
Quick answers from the manual
Quick answer
- This document provides assembly and installation instructions for the 21046-W4BK lighting fixture, including a parts list, wiring diagram, and safety warnings. p. 2
Key actions
- Turn off electricity at the main circuit breaker before beginning installation. p. 2
First start
- Follow the assembly steps: 1. Connect Mounting bracket (C) and Studs (D) to Junction box (A). 2. Connect Leading wires (E) and Wires (F) using Wire nuts (B). 3. Attach Canopy (J) and Screws (G) to Mounting bracket (C). p. 2
Where to find it in the PDF
- Cover Page p. 1
- Installation Instructions p. 2
Table of contents
Important Information
Before beginning the installation of your lighting fixture, please read all instructions carefully. Ensure that the power supply is turned off at the main circuit breaker until the installation is completed. If you are using any special control devices with this fixture, follow the instructions carefully to ensure full compliance with N.E.C. requirements. If you have any questions, it is recommended to contact a qualified electric contractor.
Safety Warning: This product contains lead, a chemical known to the state of California to cause cancer and birth defects or other reproductive harm. Do not place the product in your mouth and wash your hands after handling. Additionally, all glass components are fragile; handle with care.
Parts Included
- Junction box
- Wire nuts (3)
- Mounting bracket (1)
- Studs (2)
- Leading wires (2)
- Wires (2)
- Screws (2)
- Canopy (1)
- Color temperature switch (1)
Assembly and Installation
Follow these steps to assemble and install the fixture:
- Mounting: Connect the Mounting bracket (C) and Studs (D) to the Junction box (A).
- Wiring: Connect the Leading wires (E) and Wires (F) using the Wire nuts (B).
- Final Assembly: Attach the Canopy (J) and secure with Screws (G) to the Mounting bracket (C).
Wiring Connection
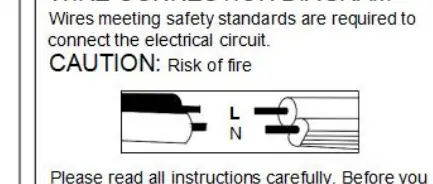
Refer to the wiring connection diagram provided in the manual to ensure wires are connected according to safety standards. Ensure the electrical circuit is properly connected before turning the power back on.
Support
If you encounter any issues or have questions, you can contact the support team via email at [email protected].
Manufacturer information
The Home Depot
Practical help
Common problems
Fixture not working after installation
Ensure the power supply is turned on at the main circuit breaker and verify that all wire connections are secure.
Handling glass components
All glass is fragile; handle with extreme care during installation to prevent breakage.
Before use
- Turn off electricity at the main circuit breaker
- Verify all parts listed in the manual are present
- Ensure compliance with N.E.C. requirements if using special control devices
- Wash hands after handling the product due to lead content
Images and diagrams
- The assembly diagram illustrates the connection sequence of the junction box, mounting bracket, and canopy.
- The wiring diagram shows the standard connection of fixture wires to the electrical circuit using wire nuts.
Model compatibility
- If using special control devices, follow instructions carefully to ensure compliance with N.E.C. requirements.

Manual page author
Emily Carter
User documentation editor
Prepares concise manual descriptions and highlights the most useful setup, operation, and maintenance information for readers.