Computers / Cooling Systems
User Manual for Thermaltake The Tower 900 Computer Case
Quick guide for the Thermaltake The Tower 900 computer case. Includes installation steps for components, cooling configurations, and cable management.
Quick answers from the manual
Quick answer
- The Thermaltake The Tower 900 is a Super Tower case. This manual provides instructions for component installation, including PSU, motherboard, drives, and cooling systems. p. 1, 2
Key actions
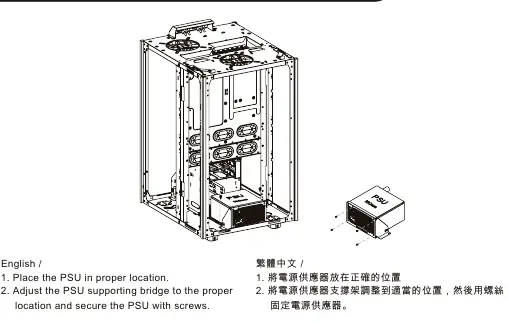
- Install PSU p. 6
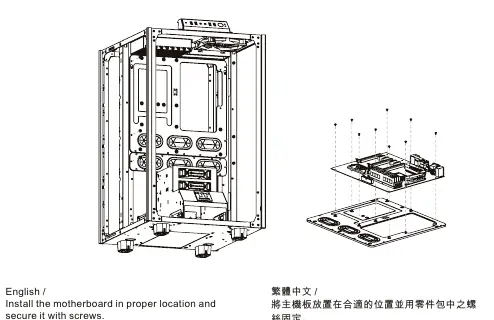
- Install Motherboard p. 6
- Install HDD p. 7, 8
First start
- Connect front panel leads p. 10, 11
Show 3 more answers Show less
Problems and fixes
Audio connection damage
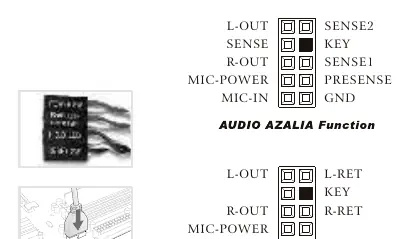
Ensure correct selection of AC'97 or HD Audio (Azalia) based on motherboard specifications.
p. 10, 11Technical specifications
| Parameter | Value | Meaning | Pages |
|---|---|---|---|
| CPU Cooler Height | 260mm | Maximum height limit | p. 3 |
| VGA Length | 400mm | Maximum length limit | p. 3 |
Where to find it in the PDF
- Specifications p. 3
- Installation Guide p. 4, 5, 6, 7
Table of contents
Manual images
Click an image to enlargeImportant Information
The Thermaltake The Tower 900 is a Super Tower chassis. This manual provides essential installation instructions for hardware components, cooling systems, and cable management. Before starting, ensure you have the necessary tools and verify your hardware compatibility with the case limitations.
Specifications
- Case Type: Super Tower
- Dimensions: 752 x 423 x 483 mm (29.6 x 16.7 x 19 inch)
- Motherboard Support: Mini ITX, Micro ATX, ATX, E-ATX
- Expansion Slots: 8
- I/O Ports: USB 3.0 x 4, HD Audio x 1
- PSU Support: Standard PS2 PSU
Warnings and Limitations
- CPU Cooler Height: Maximum 260mm (10.2 inches).
- VGA (Add-on card) Length: Maximum 400mm (15.7 inches).
- PSU Length: Maximum 220mm.
- Audio Connection: Ensure your motherboard supports AC'97 or HD Audio (Azalia) to avoid damaging your devices.
Installation Guide
The installation process involves several steps to prepare the chassis and mount components:
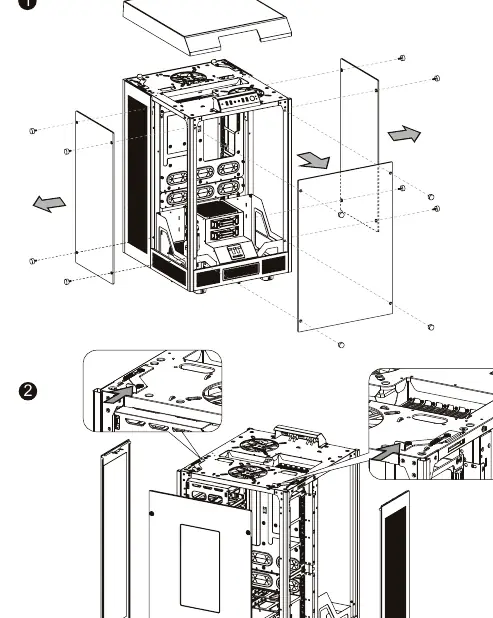
- Parts Disassembly: Remove necessary panels to access the interior for component installation.
- PSU Installation: Place the PSU in the designated location, adjust the supporting bridge, and secure with screws.
- Motherboard Installation: Mount the motherboard in the appropriate position and secure it with screws.
- 5.25" Device Installation: Install optical drives or other 5.25" devices into the front bay.
- HDD Installation: The case supports 3.5" and 2.5" drives. Use the HDD cage or trays to secure drives. 3.5" drives are secured with locking clips, while 2.5" drives are secured with screws from the bottom.
- PCI Card Installation: Insert PCI cards into the slots and secure them with screws.
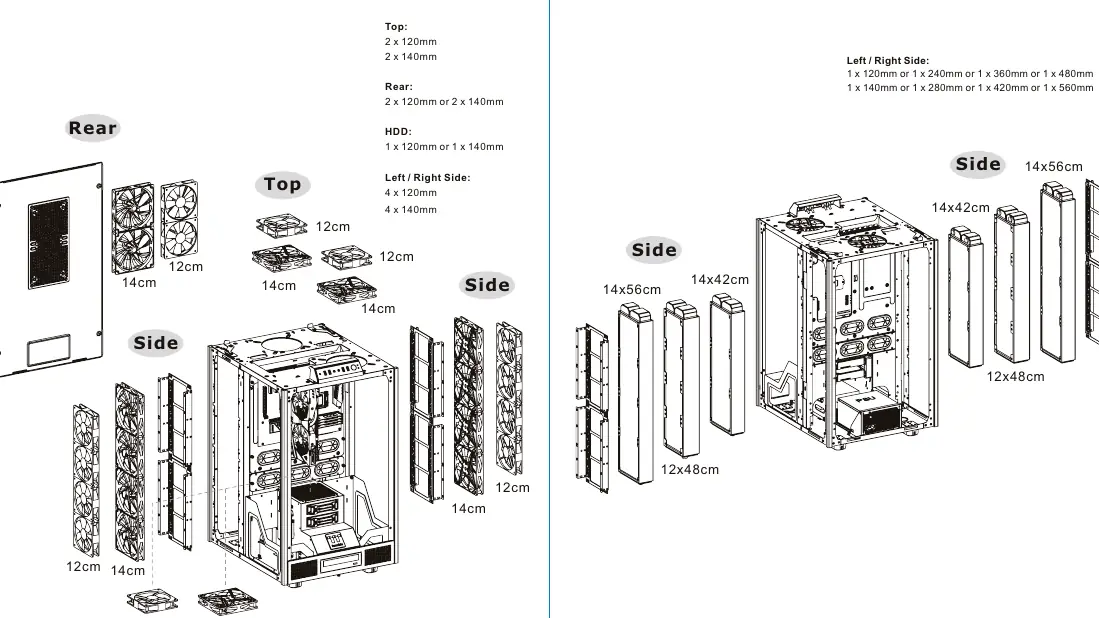
- Air and Liquid Cooling: The case supports extensive cooling configurations. Refer to the diagrams for specific fan and radiator mounting locations on the top, rear, and sides.
- Pump Installation: Dedicated space is provided for liquid cooling pump installation.
Leads Installation
Connect the front panel leads to the motherboard headers:
- Case LED/Switch: Consult your motherboard manual for the correct panel header pinout.
- USB 3.0: Connect the USB 3.0 cable to the available USB 3.0 port on your motherboard.
- Audio: Connect the audio cable to the motherboard header. Ensure you select the correct setting (AC'97 or HD Audio) in your motherboard BIOS/settings if required.
Manufacturer information
Thermaltake
Practical help
Common problems
CPU cooler does not fit
Ensure the CPU cooler height does not exceed 260mm.
Graphics card (VGA) does not fit
Ensure the VGA card length does not exceed 400mm.
Audio device damage
Verify if your motherboard uses AC'97 or HD Audio (Azalia) and connect accordingly to avoid damage.
Before use
- Check CPU cooler height limit (260mm)
- Check VGA card length limit (400mm)
- Check PSU length limit (220mm)
- Verify motherboard audio header type (AC'97 or HD Audio)
- Ensure all necessary screws and stand-offs are available
Show more Show less
Specs in practice
- CPU Cooler Height Limitation
- Maximum allowed height for the CPU cooler is 260mm.
- VGA Length Limitation
- Maximum allowed length for graphics cards is 400mm.
- PSU Length Limitation
- Maximum allowed length for the power supply unit is 220mm.
Images and diagrams
- Parts disassembly sequence
- HDD cage and tray installation
- Air and liquid cooling radiator support locations
- Audio and USB 3.0 header pinout diagrams
Model compatibility
- Supports Mini ITX, Micro ATX, ATX, and E-ATX motherboards.
- Supports standard PS2 PSUs.

Manual page author
Emily Carter
User documentation editor