Electronics / Sim Racing Equipment
User Manual for Thermaltake Frio Silent 12 CPU Cooler
Quick installation guide for the Thermaltake Frio Silent 12 CPU cooler. Includes step-by-step instructions for Intel and AMD socket mounting, thermal paste application, and fan connection.
Table of contents
Manual images
Click an image to enlargeQuick Guide for Installation
Before beginning, identify your CPU socket type. The Thermaltake Frio Silent 12 supports a wide range of Intel and AMD sockets. Note that LGA 2011 installations have a specific procedure that skips the standard backplate steps.
Parts List
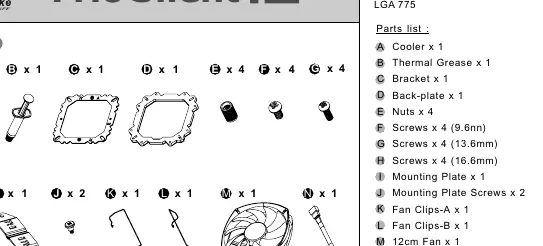
- Cooler (A)
- Thermal Grease (B)
- Bracket (C)
- Back-plate (D)
- Nuts (E)
- Screws (F, G, H)
- Mounting Plate (I) & Screws (J)
- Fan Clips (K, L)
- 12cm Fan (M)
- Low-Noise Cable (N)
Installation Preparation
Verify your CPU platform and select the appropriate holes on the mounting hardware:
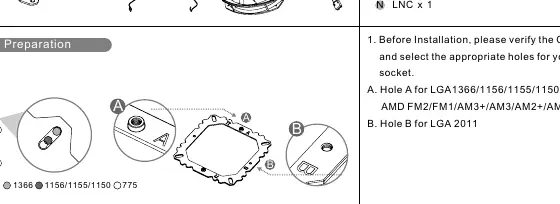
- Hole A: LGA1366, 1156, 1155, 1150, 775, and AMD FM2, FM1, AM3+, AM3, AM2+, AM2.
- Hole B: LGA 2011.
Step-by-Step Installation
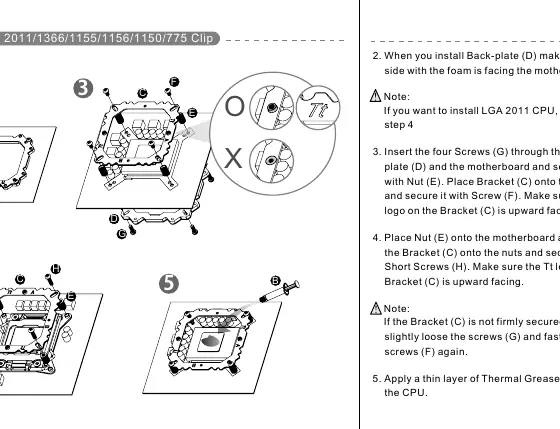
- Back-plate: Install the back-plate (D) ensuring the side with the foam faces the motherboard.
- LGA 2011 Note: If installing on LGA 2011, skip to step 4.
- Bracket Mounting: Insert screws (G) through the back-plate and motherboard. Secure with nuts (E). Place bracket (C) onto the nuts and secure with screws (F). Ensure the Tt logo on the bracket faces upward.
- Thermal Grease: Apply a thin layer of thermal grease (B) onto the CPU.
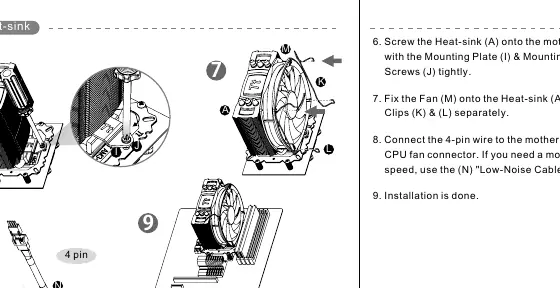
- Heatsink Mounting: Screw the heatsink (A) onto the motherboard using the mounting plate (I) and screws (J).
Fan Installation and Connection
Attach the fan (M) to the heatsink (A) using the fan clips (K & L). Connect the 4-pin wire to the motherboard's CPU fan connector. If you require quieter operation, use the included Low-Noise Cable (LNC).
Manufacturer information
Thermaltake
Practical help
Common problems
Bracket (C) is not firmly secured.
Slightly loosen the screws (G) on the back-plate and re-tighten the screws (F) on the bracket.
Installing on LGA 2011 socket.
Skip the standard back-plate installation steps and proceed directly to step 4.
Before use
- Verify your CPU platform (Intel or AMD).
- Select the correct mounting holes (A or B) based on your socket.
- Ensure the foam side of the back-plate faces the motherboard.
- Apply a thin layer of thermal grease to the CPU.
- Ensure the Tt logo on the bracket faces upward.
Specs in practice
- Low-Noise Cable (LNC)
- An optional adapter cable that reduces fan speed for quieter operation.
- 4-pin connector
- Standard PWM connector for motherboard CPU fan control.
Images and diagrams
- Hole A is used for most Intel and AMD sockets.
- Hole B is exclusively for LGA 2011 sockets.
Model compatibility
- Supports Intel LGA 2011, 1366, 1155, 1156, 1150, 775.
- Supports AMD FM2, FM1, AM3+, AM3, AM2+, AM2.

Manual page author
Michael Turner
Technical manual editor
Reviews PDF manuals for structure, safety notes, and practical product details so readers can find the right information quickly.