HVAC / Water Heaters
User Manual for Thermex Spot 1000M, 1500M, 2000M Electric Convector Heater
Quick guide for the Thermex Spot electric convector heater. Learn about installation, operation, safety precautions, and technical specifications for models 1000M, 1500M, and 2000M.
Table of contents
Manual images
Click an image to enlargeQuick Guide
The Thermex Spot electric convector heater is designed for indoor heating. Before use, ensure the device is properly installed either on the floor using the provided legs or mounted on a wall using the included brackets. To operate, plug the device into a grounded outlet, set the power switch to position I or II, and adjust the thermostat knob to your desired temperature. The device features automatic overheating protection.
Safety Precautions
- IP24 Protection: The heater is splash-proof but must not be placed near water sources like bathtubs, sinks, or pools.
- Clearance: Maintain a distance of at least 1 meter from furniture, curtains, and other textiles.
- No Covering: Never cover the heater or use it to dry clothes.
- Ventilation: Ensure free air circulation around the unit. Do not block the space between the wall and the heater.
- Power Cord: Do not wrap the cord around the heater. Do not use extension cords.
- Supervision: Keep children away from the device.
Installation

Floor Installation
- Turn the convector upside down.
- Attach the legs to the bottom of the unit using the provided screws.
- Turn the unit upright and ensure it stands stably on a flat surface.
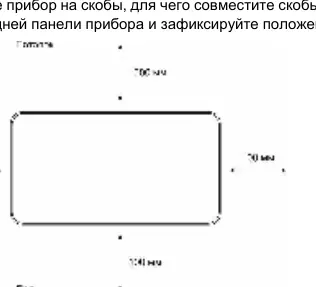
Wall Installation
- Determine the mounting location, ensuring minimum distances from the floor and ceiling.
- Mark the wall for the mounting brackets.
- Drill holes, insert plastic dowels, and secure the brackets with screws.
- Attach the rubber supports to the bottom of the rear panel to maintain the required distance from the wall.
- Hang the heater on the brackets and secure it.
Operation
The control panel is located on the side of the unit:
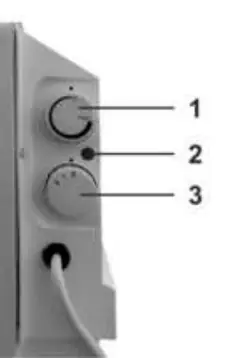
- Power Switch: Use to select power levels (I or II).
- Thermostat Knob: Turn clockwise to increase temperature. The heater will cycle on and off automatically to maintain the set temperature.
- Indicator Light: Illuminates when the heating element is active.
To turn off the device, set the power switch to 0 and unplug the power cord.
Maintenance
- Always unplug the device and let it cool down completely before cleaning.
- Clean the surface with a soft, damp cloth.
- Do not use abrasive cleaners, gasoline, solvents, or other chemicals.
- Allow the unit to dry for 24 hours before plugging it back in.
Practical help
Common problems
Heater turns off automatically
The overheating protection sensor has triggered. The heater will resume operation automatically once it cools down.
Plug gets hot
It is normal for the plug to get slightly warm. If it becomes significantly hot, check the wall outlet for issues.
Device not heating
Ensure the power switch is set to I or II and the thermostat knob is turned clockwise past the click point.
Before use
- Inspect the power cord and plug for any visible damage.
- Ensure the wall outlet has a grounding terminal.
- Verify that the heater is installed on a stable surface or securely mounted to the wall.
- Ensure there is at least 1 meter of clearance from furniture and curtains.
- Check that the power supply parameters match the technical label on the device.
Specs in practice
- Heating Area
- Recommended room size: 5-15m² (1000M), 10-20m² (1500M), 15-25m² (2000M).
Images and diagrams
- The control panel features a power switch (positions 0, I, II) and a mechanical thermostat knob.
- The indicator light shows when the heating element is active.
Model compatibility
- Do not use the heater in rooms smaller than 2.5 square meters.
- Not intended for outdoor use.

Manual page author
David Miller
Documentation analyst
Organizes user manual content into clear summaries, with attention to model details, product context, and everyday usability.