Home Appliances / Space Heaters
User Manual for Thermex ER 100F Electric Water Heater
Comprehensive user guide for the Thermex ER 100F and ER 120F electric water heaters. Includes installation, safety, operation, maintenance, and troubleshooting instructions.
Table of contents
Manual images
Click an image to enlargeQuick Guide
This manual covers the installation and operation of the Thermex ER 100F and ER 120F electric water heaters. Before using the device, ensure it is properly grounded and filled with water. Never switch on the power if the tank is empty. The device is designed for indoor use in heated premises and is not intended for continuous flow operation.
Product Description
The water heater consists of an inner tank with a bio-glass porcelain coating for corrosion protection, a thermal insulation layer made of polyurethane, a magnesium anode for electrochemical corrosion protection, and a heating element (thermostat and thermal switch).
Installation
Installation must be performed by qualified personnel. Ensure the wall or floor can support the weight of the filled heater. Maintain at least 0.5 meters of clearance from the removable panel for maintenance.
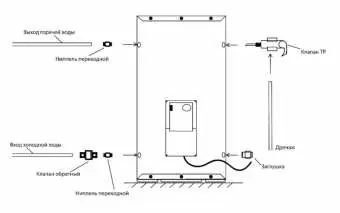

- Plumbing: Connect cold water supply using a pre-filter (min 200 microns). Install the provided safety valve on the cold water inlet. If the water pressure exceeds 0.8 MPa, install a pressure reducing valve. Connect a drain hose to the safety valve outlet to handle pressure relief drips.
- Electrical: Ensure the power supply matches the specifications (230V, 50Hz). The device must be grounded. If a power cord is not included, use a 3-wire copper cable (min 1.5 mm² for 80-150L models). Install an external switch for power disconnection.
Operation
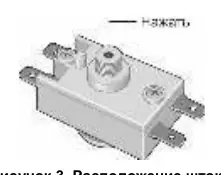
Use the temperature control knob located under the removable panel to adjust the water temperature up to +75°C. If the water temperature exceeds +95°C, the thermal switch will trigger. To reset it, remove the protective cover and press the thermal switch button until it clicks.
Maintenance
Periodic maintenance is mandatory for the warranty. Replace the magnesium anode at least once a year. If the water contains many impurities, replace it more frequently. To perform maintenance: disconnect power, drain the water, remove the protective cover, extract the flange, replace the anode, clean the heating element of scale, and reassemble.
Troubleshooting
- Low hot water pressure: The safety valve inlet may be clogged. Clean the valve.
- Increased heating time: The heating element is covered in scale. Clean the element.
- Thermal switch trips frequently: The temperature is set too high or the thermostat tube is covered in scale. Adjust the temperature lower or clean the thermostat tube.
- No heating: Check if the thermal switch has tripped or if there is no power supply.
Technical Specifications
- Max Pressure: 0.8 MPa
- Min Pressure: 0.05 MPa
- Voltage: 230V ~ 50Hz
- Protection Class: IPX4
- Service Life: 5 years
Practical help
Common problems
Low hot water pressure
The safety valve inlet is likely clogged. Remove and clean the valve.
Increased heating time
The heating element is covered in scale. Remove the flange and clean the element.
Thermal switch trips frequently
The temperature setting is too high or the thermostat tube is scaled. Lower the temperature or clean the thermostat tube.
Water heater does not heat
Check if the thermal switch has tripped (press the reset button) or if there is no power in the outlet.
Before use
- Ensure the water heater is filled with water before connecting to power.
- Verify that the electrical supply is grounded and matches the 230V specification.
- Check that the safety valve is installed on the cold water inlet.
- Ensure the installation location is heated and protected from freezing.
- Verify that the wall/floor can support the weight of the filled unit.
Images and diagrams
- Figure 1: Shows the connection scheme including the safety valve, drain, and piping.
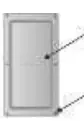
- Figure 2: Illustrates how to remove the protective cover to access electrical components.
- Figure 3: Shows the location of the thermal switch reset button.
Model compatibility
- Not intended for continuous flow operation.
- Requires a pre-filter with at least 200 microns filtration.
- If water pressure is >0.8 MPa, a pressure reducing valve must be installed.

Manual page author
Emily Carter
User documentation editor
Prepares concise manual descriptions and highlights the most useful setup, operation, and maintenance information for readers.