HVAC / Heaters & Fireplaces
Installation Guide for Thermogroup Thermorail 12V Vertical Bar Heated Towel Rail
Comprehensive installation and safety guide for the Thermogroup 12V Vertical Bar Heated Towel Rail. Includes wiring diagrams, mounting instructions, safety precautions, and maintenance tips for a successful installation.
Table of contents
Manual images
Click an image to enlargeImportant Information
This 12V heated towel rail must be installed by a qualified electrician. It requires connection to the supplied transformer. Connecting the rail directly to the mains power supply will cause irreparable damage to the element, which cannot be replaced.
What's in the Box
- Thermorail Single Vertical Bar Rail
- 12V Transformer
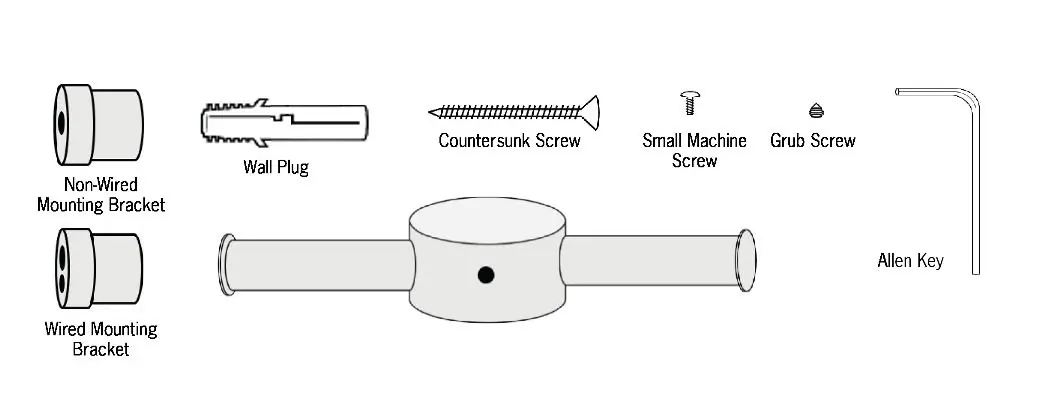
- Screw Kit (includes 1x Non-Wired Mounting Bracket, 1x Wired Mounting Bracket, 2x Wall Plugs, 2x Countersunk Screws, 1x Small Machine Screw, Grub Screws, 1x Hook, 1x Allen Key)
Installation
- Switch off mains power: Ensure the electrical circuit is off before starting.
- Install the transformer: Place the transformer in the ceiling or wall cavity, no further than 2m from the rails. Ensure it has adequate ventilation and is accessible.
- Install wall brackets: Measure and mark bracket positions, ensuring they are level. Drill 6mm holes for the brackets and an extra hole for the cable. Fix the mounting brackets in place.
- Electrical Connections: Push the cable through the hole in the wall bracket and connect to the transformer. If installing multiple rails, connect each to its own transformer and wire in parallel to the switch/timer.
- Fix the rail: Fit the rail to the mounting brackets and tighten the grub screws using the provided Allen key.
- Optional Hook: Slide the hook onto the top of the vertical bar and secure it with the small machine screw.
Safety and Care
Install the base of the rail at least 600mm above the floor to avoid hazards for young children. Maintain a 300mm clearance from permanent fixtures. Do not use harsh scrubbing, scratching, or acid-based cleaning products. Clean the stainless steel finish with a soft cloth and a non-abrasive cleaning agent.
Technical Specifications
Supply Voltage: 240V 50HzTransformer Voltage: 12VWiring Method: HardwiredTransformer Warranty: 1 Year
Practical help
Common problems
Unit not heating
Ensure the transformer is connected correctly and the mains power is switched on.
Installation distance issues
The transformer must be located no further than 2m from the rails.
Multiple rail installation
Each rail should be connected to its own individual transformer; multiple transformers can be wired in parallel to a single switch/timer.
Before use
- Ensure mains power is switched off before starting installation.
- Verify the transformer is within 2m of the rail location.
- Check that the wall is flat and uniform.
- Confirm you have all parts: rail, transformer, brackets, and screws.
- Ensure a qualified electrician is performing the hardwire installation.
Specs in practice
- Supply Voltage
- 240V 50Hz
- Transformer Voltage
- 12V
- Wiring Method
- Hardwired
Images and diagrams
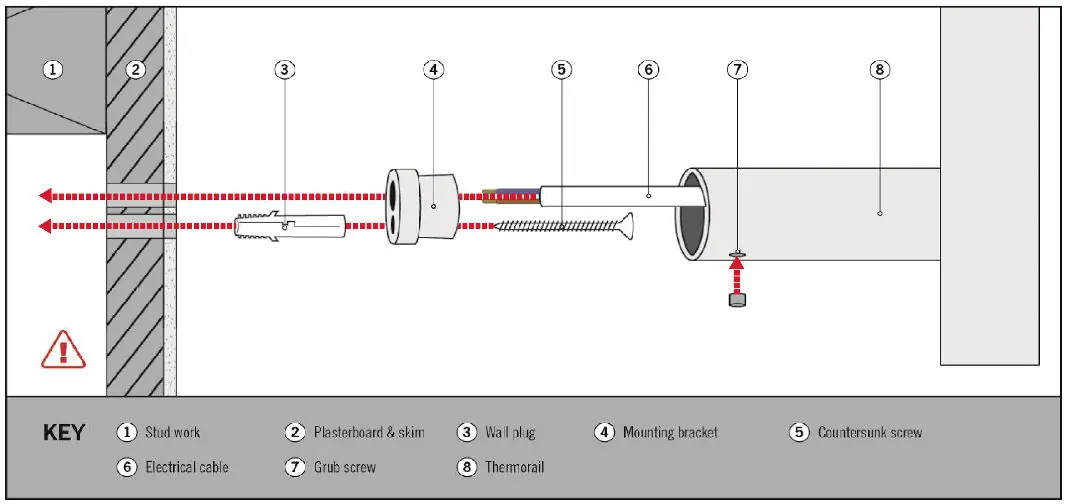
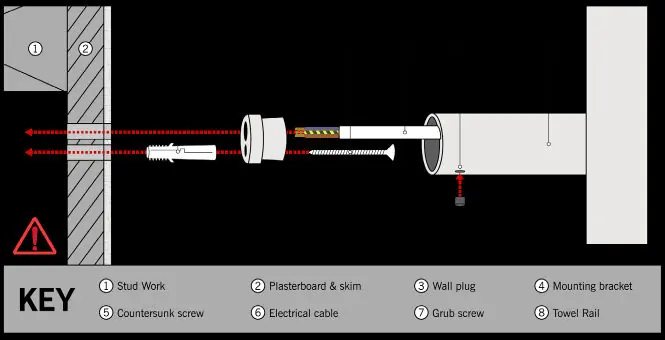
- The installation diagram illustrates the sequence of mounting: wall plug, bracket, screw, and cable routing through the wall.
Model compatibility
- Must be wired to the supplied transformer.
- Multiple rails must be wired in parallel to the switch/timer.

Manual page author
Michael Turner
Technical manual editor
Reviews PDF manuals for structure, safety notes, and practical product details so readers can find the right information quickly.