Home Appliances / Washing Machines
User Manual for Thrustmaster T-LCM Pedals
Quick guide for Thrustmaster T-LCM Pedals, covering mechanical adjustments, brake resistance customization, calibration software, and connection instructions for PC and consoles.
Table of contents
Manual images
Jump to the sectionQuick guide from the manual
This document provides instructions for the Thrustmaster T-LCM Pedals. It covers mechanical customization, software calibration, and connection methods for various platforms. Always use the provided calibration software when changing the brake pedal's resistance to ensure proper functionality.
Technical features and components
The pedal set includes:
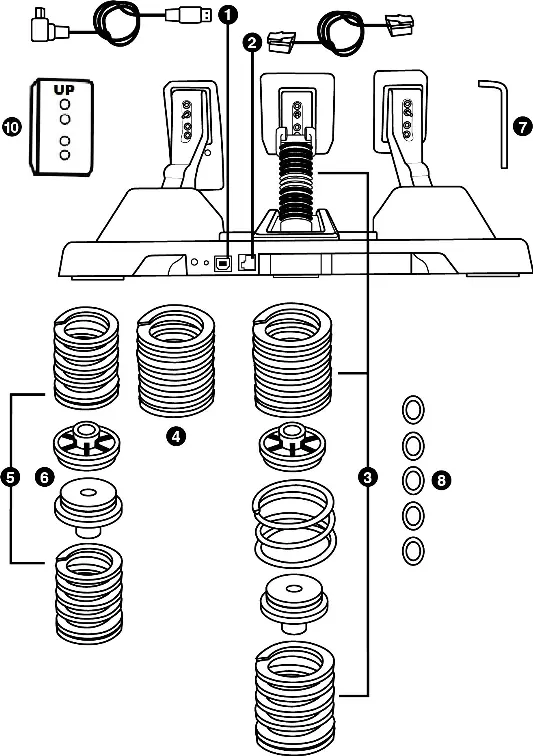
- Removable USB and RJ12 cables.
- Various springs (F10, F15, F20, F30) for brake resistance adjustment.
- Spacers (with and without color markings) for spring configuration.
- Flat washers for adjusting the preloading effect of the central spring.
- 2.5 mm Allen key for mechanical adjustments.
- Adjustable metal pedal arms and heads.
Mechanical settings
You can customize the pedal set to your preference:
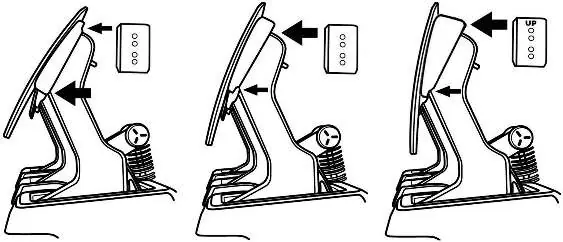
- Height: Adjust using the 2.5 mm Allen key to unscrew the pedal head and support.
- Spacing: Reposition the pedal heads to the left, center, or right.
- Inclination: Rotate the plastic pedal head support 180° to change the angle.
- Alignment: Install or remove the plastic pedal head support to move pedals forward or backward.
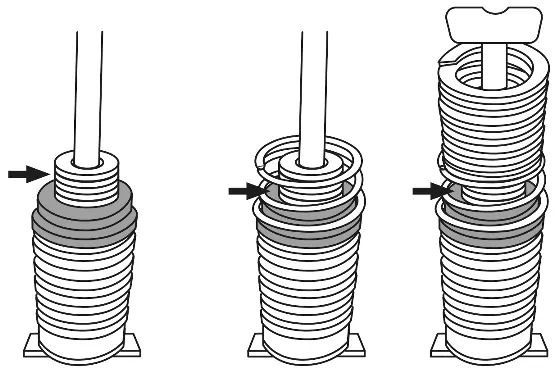
Changing the brake pedal's resistance
To modify the brake resistance, disconnect the pedal set, remove the upper retaining head, and swap the main springs (F10, F15, F20, F30) and corresponding spacers on the holding rod. Important: Never remove the Load Cell force sensor from the holding rod. After changing springs, you must recalibrate the pedals using the official software.
Calibration software
The calibration software allows you to:
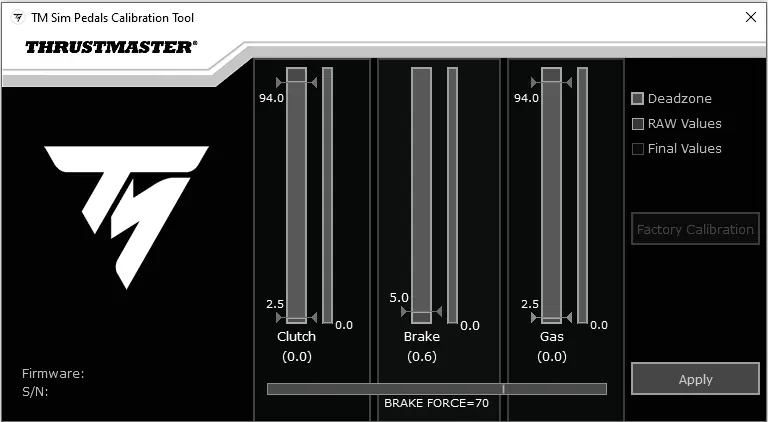
- Adjust dead zones at the beginning and end of pedal travel.
- Configure the electronic Brake Force.
- Save settings directly to the pedal set's internal memory for use on PC and consoles.
Connection and compatibility
- Thrustmaster Racing Wheel Base: Use the RJ12 cable. Ensure the wheel base firmware is updated via the official support website.
- Non-Thrustmaster Racing Wheel: Use the USB cable. Connect directly to a PC.
Safety and maintenance
- Always wear shoes while using the pedals to prevent injury.
- Keep the device in a dry location, away from dust and direct sunlight.
- Avoid pinching hazards by keeping fingers away from pedal arms during use.
- Take 10-15 minute breaks after every hour of play to avoid muscle or joint pain.
Practical help
Common problems
Brake pedal not functioning correctly after changing springs.
You must recalibrate the brake pedal using the calibration software on a PC after any physical change to the springs.
Pedal set not recognized as high-precision T-LCM Pedals when connected to a Thrustmaster wheel base.
Update the racing wheel base firmware to the latest version via the Thrustmaster support website.
Muscle or joint pain during gaming.
Take 10-15 minute breaks after each hour of play and rest for a few hours if pain persists.
Before use
- Ensure you are wearing shoes.
- Check that the correct cable (USB or RJ12) is used for your specific setup.
- Verify that the racing wheel base firmware is updated if connecting via RJ12.
- Ensure the pedal set is placed on a stable surface or attached to a cockpit.
- Close the Game Controllers window and calibration software before starting a game.
Specs in practice
- F10, F15, F20, F30 Springs
- Different resistance levels for the brake pedal; F10 is weakest, F30 is strongest.
Images and diagrams
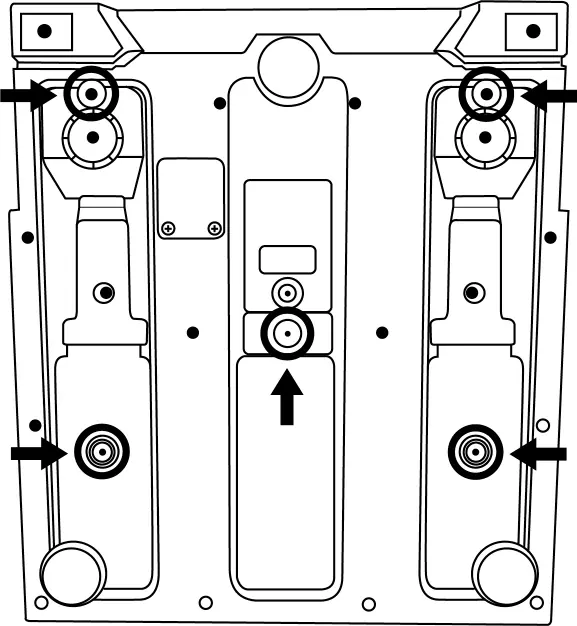
- The pedal set base features five M6 screw threads for secure mounting to cockpits.
- The brake pedal resistance column consists of a holding rod, springs, spacers, and a retaining head.
- The calibration software interface displays real-time values for Clutch, Brake, and Gas pedals.
Model compatibility
- Direct connection to Thrustmaster wheel bases requires the RJ12 cable.
- Connection to non-Thrustmaster wheels or PC-only setups requires the USB cable.
- Calibration settings are saved to internal memory and work on both PC and consoles.

Manual page author
Emily Carter
User documentation editor
Prepares concise manual descriptions and highlights the most useful setup, operation, and maintenance information for readers.