Electronics / Televisions
User Manual for Thrustmaster T-Pedals Stand
Quick guide for the Thrustmaster T-Pedals Stand. Includes assembly instructions, parts list, and warranty information to help you set up your racing equipment.
Table of contents
Quick guide from the manual
This document provides the necessary information to assemble the Thrustmaster T-Pedals Stand. Ensure you have all the parts listed below before beginning the assembly process. The stand is designed to provide a stable base for your pedals. If you encounter any issues, please refer to the technical support section.
Parts list
Before starting, verify that your package contains the following components:
- A: 2x metal bars
- B: 10x screws
- C: 26x screws
- D: 12x screws
- E: 2x metal bars
- F: 3x metal bars
- G: 2x metal bars
- H: 2x metal bars
- I: 4x metal bars
- J: 2x metal bars
Note: Tools required for assembly (10mm and 5mm) are indicated in the manual.
Assembly instructions
Follow these steps to assemble your T-Pedals Stand:
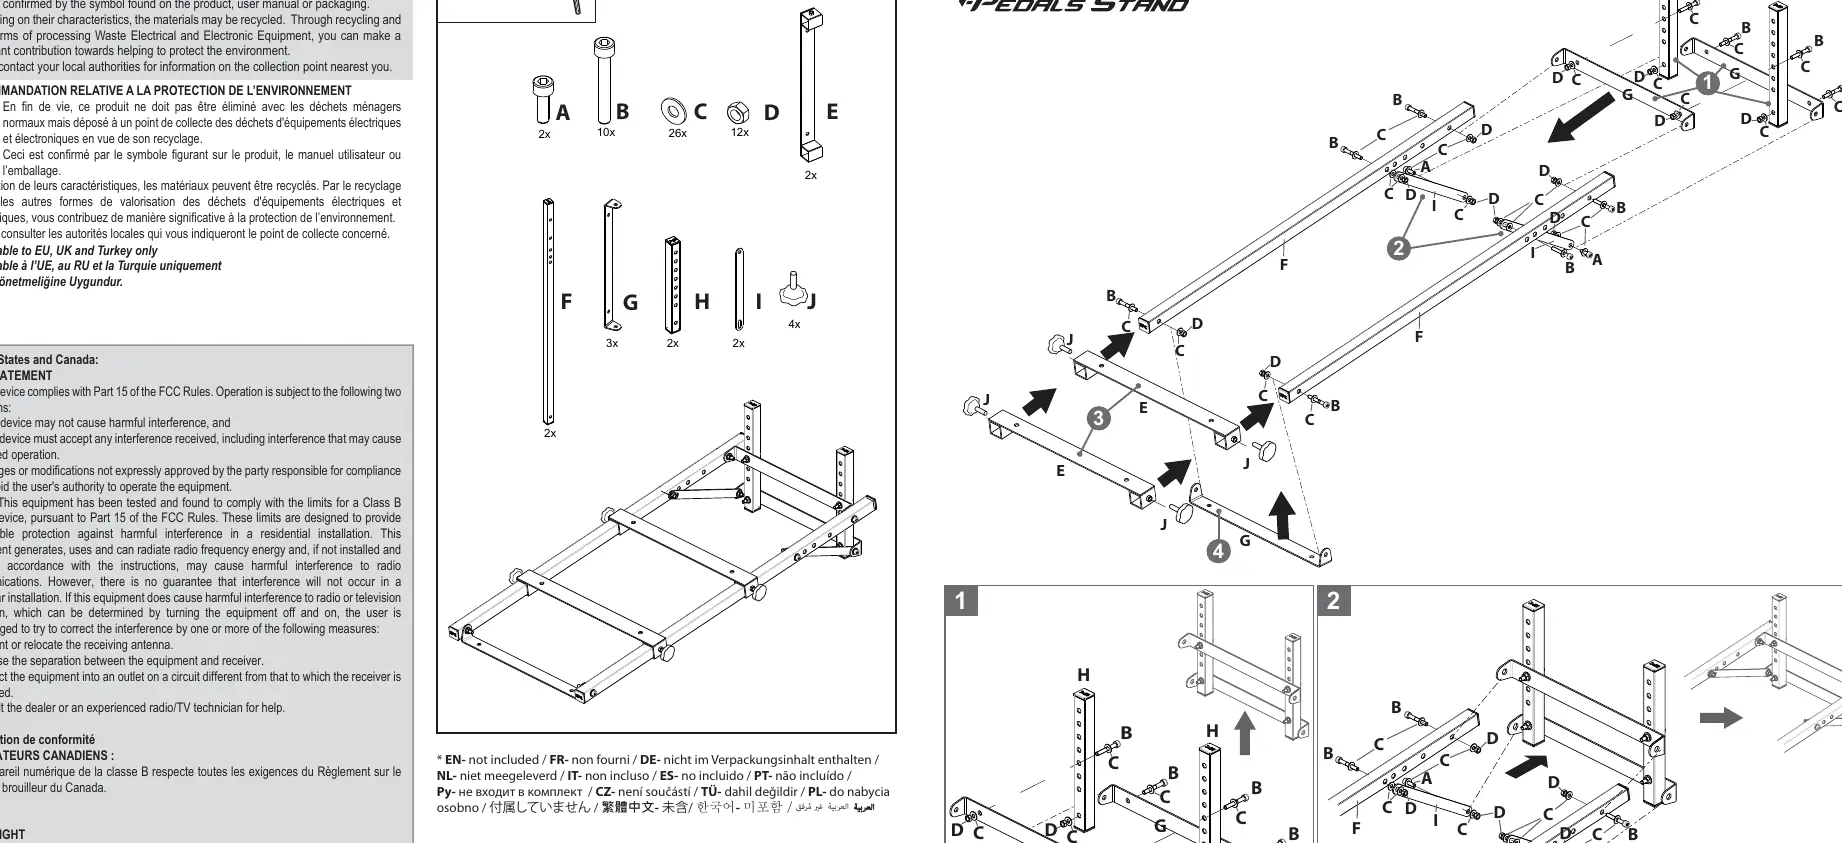
- Step 1: Connect the base frame components using the provided screws (B, C, D) as shown in the diagram. Ensure all connections are tight.
- Step 2: Attach the vertical support bars (F, G, H) to the base frame using screws (B, C, D).
- Step 3: Secure the pedal mounting plate (E) to the support structure using screws (J).
- Step 4: Finalize the assembly by attaching any remaining support bars (I) and ensuring all screws are fully tightened.
Technical support
If you experience any technical issues or require assistance, please visit the official support website at https://support.thrustmaster.com.
Warranty information
The Thrustmaster T-Pedals Stand is covered by a warranty against defects in materials and workmanship. The warranty period corresponds to the time limit for bringing an action for conformity in the country of purchase (typically 2 years in the European Union). This warranty does not cover damage resulting from inappropriate use, negligence, accidents, or normal wear and tear. For detailed warranty terms, please refer to the full warranty section provided in the manual.
Official resources from the manual
Practical help
Common problems
Unstable stand
Ensure all screws (B, C, D, J) are fully tightened and the stand is placed on a flat, level surface.
Missing parts
Verify the contents of the box against the parts list (A-J). If parts are missing, contact Thrustmaster technical support.
Before use
- Unpack all components and verify against the parts list.
- Ensure you have the necessary tools (10mm and 5mm) available.
- Clear a sufficient workspace for assembly.
- Check that all screws are included in the package.
- Read the assembly diagrams carefully before starting.
Images and diagrams
- Step 1: Initial base frame assembly.
- Step 2: Attaching vertical support bars.
- Step 3: Mounting the pedal plate.
- Step 4: Final structural reinforcement.
Model compatibility
- The stand is designed for use with Thrustmaster pedal sets.
- Not intended for professional or commercial use (e.g., game rooms, training centers).

Manual page author
David Miller
Documentation analyst
Organizes user manual content into clear summaries, with attention to model details, product context, and everyday usability.