Lighting / Fixtures
Timeguard Weathersafe Vision TGV105NP 13A Outdoor RCD Fused Spur
Quick guide for the Timeguard Weathersafe Vision TGV105NP 13A Outdoor RCD Fused Spur. Includes installation steps, wiring diagrams, technical specifications, and testing procedures.
Table of contents
Manual images
Click an image to enlargeQuick guide from the manual
The Timeguard Weathersafe Vision TGV105NP is a 13A outdoor RCD fused spur designed for safety. Before installation or maintenance, ensure the mains supply is switched off at the fuse box. This device is IP66 rated, meaning it is protected against dust and water jets, but it is recommended that a qualified electrician performs the installation in accordance with current IEE wiring and Building Regulations.
Technical Specifications
- Mains supply: 230V AC 50Hz
- IP Rating: IP66
- Rated trip current: 30mA
- Operating temperature: -5°C to 55°C
- Classification: Latching (Passive)
- Protection: Class I (must be earthed)
Installation
Follow these steps to install the unit:

- Switch off electricity at the fuse box.
- Use a Philips screwdriver to remove the four corner screws and separate the faceplate from the back box.
- Use the back plate as a template to mark hole positions. Ensure the 'TOP' marking is oriented correctly.
- If mounting on an uneven surface, use a sheet of marine ply as a base.
- Drill the wall using a 4mm drill bit.
- Select the cable entry point by knocking out the appropriate hole. If not using conduit, use waterproof 20mm cable glands to maintain IP66 rating.
- If top or side entry is used, drill out the drain feature (5mm drill) at the lowest point.
- Secure the back box to the wall.
- Pass the 230V AC supply cable through and connect to the terminals (see Connection Diagram).
- Mount the faceplate back onto the back box and tighten the screws.
Connection Diagram
Ensure correct polarity is observed:
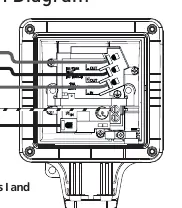
- 230V AC Mains Supply: Connect Live (Brown or Red) to L IN and Neutral (Blue or Black) to N IN.
- Load: Connect Live (Brown or Red) to L OUT and Neutral (Blue or Black) to N OUT.
- Earth: Ensure the unit is properly earthed.
Testing and Usage
Always test the RCD before use:
- To Test: Press the Red Test button (T). The status indicator should show Green, indicating power is disconnected.
- To Reset: Press the grey Reset button (R). The status indicator should show Red.
If the test procedure does not complete satisfactorily, do not use the RCD and seek professional advice. In applications like hand dryers, it is suggested to perform the test routine twice a day.
Support
If you experience problems, do not return the unit to the store immediately. Contact the Timeguard Customer Helpline at 020 8450 0515 or email [email protected].
Practical help
Common problems
RCD trips frequently
Check the connected appliance for faults. If the appliance continues to trip the RCD, switch off the appliance and seek professional advice.
Test button fails
If the test procedure is not completed satisfactorily, do not use the RCD and seek professional advice.
Uneven mounting surface
Use a sheet of marine ply as a base plate before fitting the back box.
Before use
- Ensure mains supply is switched off at the fuse box.
- Verify total circuit load does not exceed cable, fuse, or circuit breaker rating.
- Ensure the back box is mounted in the correct orientation using the 'TOP' marking.
- Test the RCD using the Test button before use.
- Ensure all bare conductors are sleeved.
Specs in practice
- Passive (Latching)
- The RCD retains its state after a power loss.
Images and diagrams
- The faceplate diagram identifies the Test button, Reset button, Status Indicator, and Lid clip.
- The connection diagram illustrates the wiring path for Live and Neutral supply to IN terminals and Load to OUT terminals.
Model compatibility
- Suitable for 2 and 3 wire applications.
- Compatible with 20mm cable glands for waterproof installation.

Manual page author
Emily Carter
User documentation editor
Prepares concise manual descriptions and highlights the most useful setup, operation, and maintenance information for readers.