Home / Electrical Accessories
User Manual for Timeguard NTDR1C16 16A Single Channel DIN Rail Digital Timer
A comprehensive guide for the Timeguard NTDR1C16 digital timer. Includes instructions for installation, wiring diagrams for mains and volt-free switching, programming schedules, manual override, and technical specifications.
Quick answers from the manual
Quick answer
- The NTDR1C16 is a 16A single-channel DIN rail digital timer. Before first use, charge the unit for 15 minutes (or 4 hours if the display is faint), press the reset button 'R', and wire according to the specific Mains or Volt Free diagram provided. p. 1
Key actions
- Resetting the unit p. 1, 2
- Programming ON/OFF times p. 2
First start
- Charge for 15 minutes, press reset button 'R', then set the clock. p. 1, 2
Problems and fixes
Display not visible or faint
Charge for 4 hours prior to pressing the reset 'R' button.
p. 1Maintenance and reset
- Press the reset 'R' button using a pointed object. p. 2
Technical specifications
| Parameter | Value | Meaning | Pages |
|---|---|---|---|
| Switch Rating | 16A Resistive | 16A Resistive, 2A Inductive at 230V AC, 400W LED. | p. 1 |
Where to find it in the PDF
- General Info, Safety, Specs, Installation, Wiring, Battery, Controls p. 1
- Reset, Clock, Programming, Override, Guarantee p. 2
Table of contents
Quick guide from the manual
The Timeguard NTDR1C16 is a 16A single-channel DIN rail digital timer. Before first use, the unit must be connected to the mains for at least 15 minutes to charge the internal battery. If the display is faint or not visible, charge for 4 hours. Always press the reset button (marked 'R') before initial programming.
Safety and Installation
Installation must be performed by a qualified electrician in accordance with current IEE wiring and Building Regulations. Ensure the mains supply is switched off and fuses are removed or the circuit breaker is turned off before starting.
- Mounting: Designed for DIN rail mounting (BS EN 60715).
- Wiring: Ensure correct polarity. All bare conductors must be sleeved.
- Mains Switching: Connect 230V 50Hz Mains Supply (Live to Terminal 1, Neutral to Terminal 2). Connect Load (Live In to Terminal 3, Switched Live to Terminal 4).
- Volt Free Switching: Connect 230V 50Hz Mains Supply (Live to Terminal 1, Neutral to Terminal 2). Connect Load (Common to Terminal 3, Volt Free Output to Terminal 4).
Battery and Reset
The unit features a factory-fitted rechargeable battery for clock operation and memory backup during power loss (up to 1000 hours). If the unit has been discharged for more than 5 days, it requires a 4-hour charge and a reset.
Setting the Clock
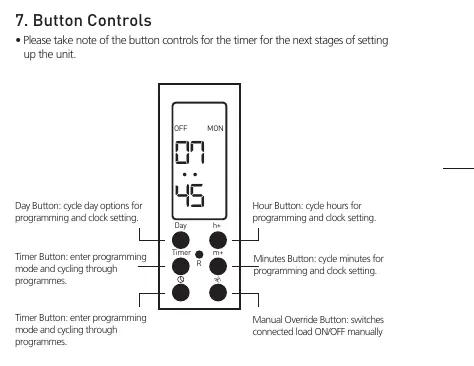
Press and hold the clock setting button. While holding, press the 'Day' button to select the current day. Continue holding the clock button while pressing the 'Hour' and 'Minute' buttons to set the current time. Release the clock button to finish.
Programming ON/OFF Times
The timer supports up to 6 programs. To set a program:
- Press the 'Timer' button to enter programming mode (Display shows '1' and 'ON').
- Use 'Day', 'Hour', and 'Minute' buttons to set the desired ON time.
- Press the 'Timer' button again to set the OFF time (Display shows '1' and 'OFF').
- Repeat the process for additional programs.
- Press the clock button to exit programming mode.
To cancel a program, press the 'Timer' button until the desired program is shown, then press the 'Hour' and 'Minute' buttons until dashes '--' appear on the display.
Manual Override
The manual override button allows you to switch the connected load ON or OFF at any time, bypassing the current programmed state. If configured to ON before a programmed ON time, the pre-programmed OFF time will still switch the load off as scheduled.
Technical Specifications
- Mains Supply: 220-240V AC 50Hz
- Switch Rating: 16A Resistive, 2A Inductive at 230V AC, 400W LED
- Operating Temperature: 0 to 40 degrees Celsius
- Programmable Slots: 6 Programs
- Dimensions: 90mm x 18mm x 60mm
- IP Rating: IP20
Practical help
Common problems
Display is not visible or very faint
Charge the unit for 4 hours before pressing the reset button.
Program is not running
Check if the program is cancelled (dashes '--' shown on display) or if it was unassigned.
Power loss
The unit has a 1000-hour battery reserve, but if discharged for more than 5 days, it requires a 4-hour charge.
Before use
- Ensure mains supply is switched off
- Connect unit to mains for 15 minutes (or 4 hours if display is faint)
- Press the reset button 'R' using a pointed object
- Verify wiring polarity before turning power on
Specs in practice
- Switch Rating
- 16A Resistive, 2A Inductive, 400W LED at 230V AC.
- Power Reserve
- Up to 1000 hours of battery backup for clock and memory.
- Installation Type
- DIN Rail mount (BS EN 60715).
Images and diagrams
- Mains Switching: Live/Neutral to terminals 1 & 2; Load Live/Switched Live to terminals 3 & 4.
- Volt Free Switching: Live/Neutral to terminals 1 & 2; Common to terminal 3; Output to terminal 4.
Model compatibility
- Requires DIN rail mounting.
- Compatible with 230V 50Hz mains supply.

Manual page author
Michael Turner
Technical manual editor
Reviews PDF manuals for structure, safety notes, and practical product details so readers can find the right information quickly.