Toys / RC Components
Traxxas TQ 2.4GHz Radio System Owner's Manual
Comprehensive owner's manual for the Traxxas TQ 2.4GHz Radio System. Includes setup, battery installation, binding instructions, steering trim adjustments, and LED code troubleshooting.
Quick answers from the manual
Quick answer
- The Traxxas TQ 2.4GHz radio system is a remote control system for RC models. It requires 4 AA batteries for the transmitter. The system comes pre-bound from the factory, but can be re-bound if necessary. p. 1, 7
Key actions
- Binding the transmitter and receiver p. 7
- Installing transmitter batteries p. 5
First start
- Install 4 AA batteries in the transmitter, turn on the transmitter, then turn on the receiver/model. p. 5, 6
Problems and fixes
Link Failure / Error (Flashing fast red LED)
Turn the system off and then back on to resume normal operation. Find source of the link failure (i.e., out of range, low batteries, damaged antenna).
p. 8Error codes
| Code | Meaning | Action | Pages |
|---|---|---|---|
| Flashing fast red (Transmitter) | Link Failure / Error | Turn system off and back on. Check for range, batteries, antenna. | p. 8 |
Technical specifications
| Parameter | Value | Meaning | Pages |
|---|---|---|---|
| Operating Frequency | 2406~2453 MHz | Radio frequency range | p. 2 |
Where to find it in the PDF
- Transmitter and Receiver Components p. 3
- Getting Started p. 4, 5
- Using the Radio System p. 6, 7, 8
Table of contents
Manual images
Click an image to enlargeQuick guide from the manual
The Traxxas TQ 2.4GHz radio system is designed for use with Traxxas RC models. This manual provides instructions for setting up the transmitter and receiver, binding the system, and performing basic adjustments. Always turn the transmitter on first and off last to prevent the model from receiving stray signals.
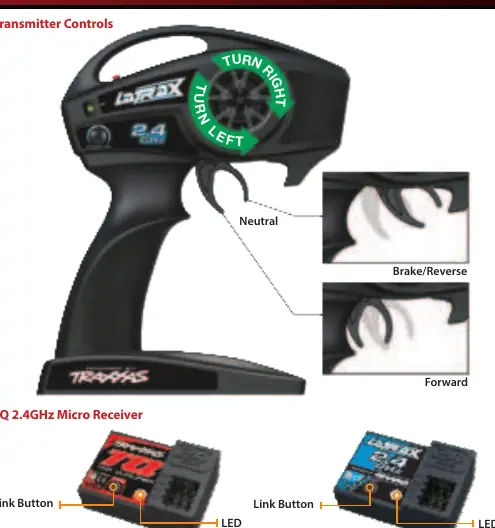
Transmitter and Receiver Components
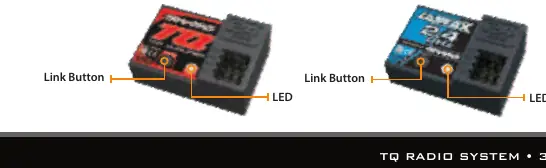
The transmitter features a steering wheel, throttle trigger, steering trim knob, set button, and power switch. The receiver includes a link button and LED indicator for status updates.
Getting Started
Installing Transmitter Batteries
The transmitter requires 4 AA batteries. To install:
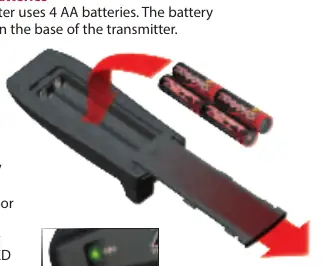
- Press the tab on the battery compartment door and slide it open.
- Insert 4 AA batteries according to the polarity indicated in the compartment.
- Reinstall the battery door and ensure it is snapped closed.
- Turn on the transmitter and verify the status LED is solid green.
Receiver Installation
Use double-sided adhesive foam tape to secure the receiver into the receiver box. Once installed, plug the wires into the receiver.
Basic Adjustments
Steering Trim
If the model pulls to the left or right when the steering wheel is centered, adjust the steering trim knob on the face of the transmitter until the model drives straight.
Channel Reversing
The system is pre-programmed with correct servo directions. Only use channel reversing if you have accidentally reset the direction. To reverse a channel:
- Press and hold the SET button for two seconds until the LED flashes green.
- Move the steering wheel or throttle trigger to the full position (left/right or forward/brake).
- While holding the position, press the SET button to reverse the channel.
Using the Radio System
Binding Instructions
The system is bound at the factory. If re-binding is necessary:
- Press and hold the SET button on the transmitter.
- Turn on the transmitter and release the SET button; the LED will flash red slowly.
- Press and hold the LINK button on the receiver.
- Turn on the speed control by pressing the EZ-Set button, then release the LINK button.
- When both LEDs turn solid green, the system is bound.
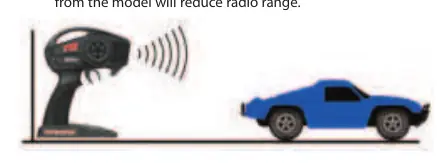
Range Testing
Before each session, walk away from the model with the transmitter to the farthest distance you plan to operate. Ensure the model responds correctly to all controls.
Troubleshooting
The status LED on the transmitter and receiver provides diagnostic information. A solid green light indicates normal operation. A flashing red light indicates issues such as low batteries or a link failure. Refer to the LED codes chart in the manual for specific error identification.
Practical help
Common problems
Transmitter LED flashes red
Batteries may be weak, discharged, or installed incorrectly. Replace with new or freshly charged batteries.
Link Failure / Error (Flashing fast red LED)
Transmitter and receiver are no longer bound. Turn the system off and back on. Check for range issues, low batteries, or a damaged antenna.
Model pulls to the left or right
Adjust the steering trim knob on the transmitter until the model drives straight.
Before use
- Check transmitter batteries
- Ensure receiver antenna is properly installed
- Turn on transmitter first, then receiver
- Range-test the radio system before driving
Specs in practice
- Operating Frequency
- 2406~2453 MHz
- Maximum Radio Frequency Power
- Maximum Peak Power -1 dBm
Images and diagrams
- Transmitter controls: Steering wheel, throttle trigger, steering trim, set button, power switch.
- Receiver: Link button and LED indicator.
Model compatibility
- Compatible with Traxxas models 3047, 6516, 6517, 6567, 6568.

Manual page author
Emily Carter
User documentation editor
Prepares concise manual descriptions and highlights the most useful setup, operation, and maintenance information for readers.