Toys / RC Components
RadioMaster Boxer Remote Control Quick Start Guide
Quick start guide for the RadioMaster Boxer remote control. Includes setup, battery charging, binding instructions, gimbal adjustments, and safety information.
Quick answers from the manual
Quick answer
- The RadioMaster Boxer is a 2.4GHz remote control system. Setup involves installing the antenna, inserting compatible batteries, and binding the receiver. p. 1, 2
Key actions
- Binding the receiver p. 2
- Charging batteries p. 2
First start
- Install antenna before powering on p. 2
Problems and fixes
Receiver not binding
Cycle receiver power 3 times and use ExpressLRS LUA menu.
p. 2Technical specifications
| Parameter | Value | Meaning | Pages |
|---|---|---|---|
| Size | 235*178*77mm | Physical dimensions | p. 1 |
| Weight | 532.5g | Device weight | p. 1 |
Where to find it in the PDF
- Front Panel Controls p. 1
- Gimbal Adjustments p. 1
- Binding Instructions p. 2
Table of contents
Manual images
Click an image to enlargeQuick Guide from the Manual
The RadioMaster Boxer is a versatile 2.4GHz remote control system. Before first use, ensure the antenna is installed. The system uses EdgeTX firmware. Always check battery voltage and ensure the area is free of 2.4GHz interference before operation.

Safety Information
- Do not operate in severe weather or limited visibility.
- Keep away from high-voltage lines, public roads, and animals.
- Disconnect power and remove propellers during maintenance.
- Do not operate if the radio or model appears damaged.
Batteries and Charging
The Boxer features a built-in USB-C charging function for 3.7V lithium batteries. It is designed for 2x 3.7V Li-ion 18650 or 2x 3.7V Li-Poly (2s 7.4V) batteries. Do not use LiFE battery packs or 18650 batteries with a nominal voltage of 3.6V. Always charge in a safe area and never leave unattended.
Antenna and Firmware
Install the antenna in the top of the radio before installing batteries or turning on the radio. Operating without the antenna will damage the internal RF module and void the warranty. The radio comes pre-installed with EdgeTX firmware.
Model and Protocol Selection
The Boxer comes with either a 4in1 or CC2500 multi-protocol internal RF module. To select a protocol:
- Long press the MDL button to enter model settings.
- Select MULTI in the SETUP page.
- Select the desired protocol in the sub-options.
Binding Instructions
- Turn off the transmitter.
- Cycle power to the receiver 3 times; the receiver LED will flash twice indicating bind mode.
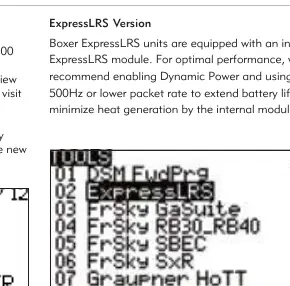
- Turn on the transmitter, long press the SYS button, and choose ExpressLRS LUA under the TOOLS menu.
- Scroll to [Bind] and press enter. The receiver LED should become solid.
Gimbal Adjustments
The gimbals can be adjusted for tension and travel:
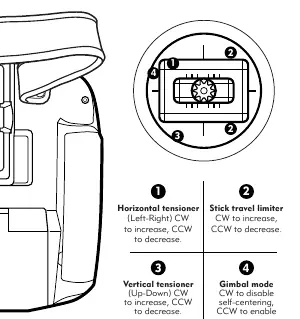
- Horizontal/Vertical tensioner: Clockwise (CW) to increase, Counter-clockwise (CCW) to decrease.
- Stick travel limiter: CW to increase, CCW to decrease.
- Gimbal mode: CW to disable self-centering, CCW to enable.
Practical help
Common problems
Receiver not binding
Ensure transmitter is off, cycle receiver power 3 times, then use ExpressLRS LUA menu to bind.
Internal RF module damage
Never power on the radio without the antenna installed.
Battery charging issues
Ensure correct polarity and use only 18650 Li-ion or 2s 7.4V Li-Po batteries.
Before use
- Install the antenna before powering on.
- Check battery voltage and condition.
- Ensure the area is free of 2.4GHz interference.
- Verify propellers are removed from models during maintenance.
Specs in practice
- Battery Options
- 2x 3.7V 18650 Li-ion or 2s 7.4V Li-Po
- Control distance
- Max 2km
Images and diagrams
- Gimbal adjustments allow tuning of tension and stick travel.
- The front panel layout shows all switches, dials, and buttons including S1/S2 dials and trim buttons.
Model compatibility
- Supports JR compatible external modules.
- Firmware is pre-installed with EdgeTX.

Manual page author
David Miller
Documentation analyst
Organizes user manual content into clear summaries, with attention to model details, product context, and everyday usability.