Furniture / Home Furnishing
Installation Guide for Trinity Barnwood Mirror
Step-by-step installation guide for the Trinity Barnwood Mirror. Includes parts list, mounting instructions, care tips, and warranty information for models 20x27MIR-NAT and 20x27MIR-WW.
Quick answers from the manual
Quick answer
- The Trinity Barnwood Mirror is installed by marking the desired height, drilling pilot holes for anchors, and hanging the mirror on screws spaced 16 inches apart. p. 3, 4, 5
Key actions
- Mark the mounting screw height 1 inch below the desired mirror height. p. 3
- Drill pilot holes 16 inches apart. p. 4
- Leave 1/4 inch of the screw head exposed. p. 5
Problems and fixes
Missing parts
Contact Trinity Customer Service at 800.985.5506.
p. 2Show 2 more answers Show less
Maintenance and reset
- Clean with a damp cloth and mild dish soap. Dry completely. p. 6
Where to find it in the PDF
- Parts List p. 2
- Installation Steps p. 3, 4, 5
- Care and Maintenance p. 6
Table of contents
Manual images
Click an image to enlargeQuick Guide
This guide provides instructions for installing the Trinity Barnwood Mirror. Before starting, ensure you have all necessary tools and that you are mounting the mirror on a suitable surface. The installation involves marking the wall, drilling pilot holes, installing anchors, and hanging the mirror.
Parts List
- Mirror (A) - 1
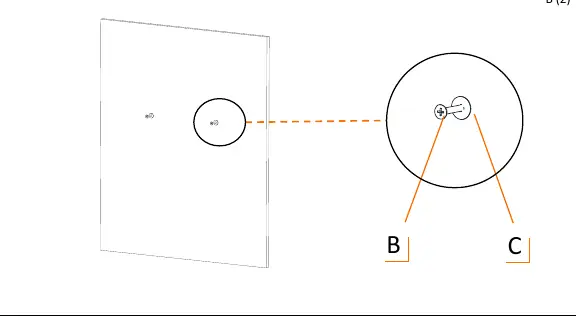
- Screws (B) - 2
- Drywall Anchors (C) - 2
Tools Required
The following tools are required for assembly but are not included:
- Pencil
- Level
- Drill
- 1/4-inch drill bit
- Phillips bit
Installation Steps

Step 1 & 2: Marking the Wall
Place the mirror against the wall and mark the top of the mirror at your desired height. Note that the mounting screw height must be 1 inch lower than the desired mirror height. Use a level to mark a horizontal line at this lower position.
Step 3 & 4: Drilling and Anchors
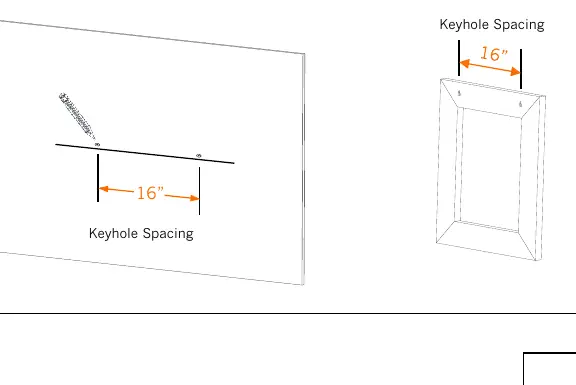
On the mounting screw line, mark two points 16 inches apart, corresponding to the keyholes on the back of the mirror. Use a 1/4-inch drill bit to drill pilot holes at these marks. Insert the drywall anchors (C) into the holes until they are flush with the wall.
Step 5 & 6: Hanging the Mirror
Insert the screws (B) into the anchors using a drill with a Phillips bit. Leave the screw head 1/4 inch exposed to allow room for the mirror to hang. Slide the mirror over the screws until they insert into the keyholes, then lower the mirror until it locks into place.
Care and Maintenance
To maintain the appearance of your mirror:
- Avoid using harsh, abrasive cleaners or corrosive chemicals.
- Do not use scouring pads.
- Clean with a damp cloth and mild dish soap.
- Dry completely with a dry sponge or cloth.
Warnings
Read and understand all instructions before use. Do not modify the product, as this will void the warranty. Check for damaged parts before installation and do not overload the product.
Practical help
Common problems
Missing parts
Contact Trinity Customer Service at 800.985.5506 or email [email protected].
Mounting on non-drywall surface
If mounting on a surface other than drywall, purchase specialty screws and anchors suitable for that specific surface type.
Before use
- Verify all parts (Mirror, 2 Screws, 2 Anchors) are present.
- Gather required tools: Pencil, Level, Drill, 1/4-inch bit, Phillips bit.
- Determine desired mirror height.
- Check wall surface type.
Show more Show less
Specs in practice
- Mounting screw height
- Must be exactly 1 inch lower than the desired top of the mirror height.
- Keyhole spacing
- The mounting screws must be spaced 16 inches apart.
- Screw exposure
- Leave 1/4 inch of the screw head exposed to ensure the mirror can hang securely.
Images and diagrams
- Step 1: Mark the top of the mirror height.
- Step 2: Mark the mounting screw line 1 inch below the mirror height.
- Step 3: Mark two points 16 inches apart on the screw line.
- Step 4: Drill pilot holes and install anchors.
- Step 5: Install screws leaving 1/4 inch exposed.
Model compatibility
- Designed for drywall installation.
- Requires specialty hardware for non-drywall surfaces.

Manual page author
Emily Carter
User documentation editor