Lighting / Fixtures
User Manual for TRIO Kagawa LED Ceiling Light 625815031
Quick guide for the TRIO Kagawa LED Ceiling Light (625815031). Includes installation steps, remote control operation, memory function, and troubleshooting.
Quick answers from the manual
Quick answer
- The TRIO Kagawa LED Ceiling Light (625815031) is operated via a wall switch or the included remote control. It features adjustable brightness, color temperature (warm/cold white), and specific lighting modes. It includes a memory function to recall the last setting. p. 4
Key actions
- Pairing the remote: Switch on the light via the wall switch and immediately press button 1. p. 4
- Resetting the light: Switch on the light via the wall switch, then press the 'ON' (1) button 5 times within 3 seconds. p. 4
First start
- Install the fixture to the ceiling, connect the power, and pair the remote control. p. 2, 4
Problems and fixes
Remote control not responding
Perform the reset procedure (press ON 5 times within 3 seconds) and re-pair the remote.
p. 4Maintenance and reset
- Reset the light by switching it on and pressing the 'ON' (1) button 5 times within 3 seconds. p. 4
Technical specifications
| Parameter | Value | Meaning | Pages |
|---|---|---|---|
| Voltage | 230V~50Hz | Operating voltage | p. 2 |
| Power | 40W | LED power consumption | p. 2 |
Where to find it in the PDF
- Safety Instructions p. 1
- Installation Diagram p. 2
- Remote Control Diagram p. 3
- Operation Instructions p. 4, 5, 6, 7
Table of contents
Manual images
Click an image to enlargeQuick guide from the manual
The TRIO Kagawa LED Ceiling Light (625815031) is a modern lighting fixture controlled via a wall switch or the included remote control. It features adjustable brightness, color temperature (warm to cold white), and specific lighting modes. The light includes a memory effect, meaning it will return to the last configured setting when switched on.
Installation
The installation should be performed by a qualified person. Ensure the power supply is disconnected before starting.
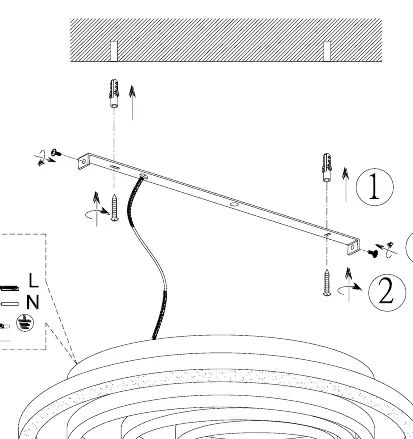
- Mounting: Use the provided hardware to secure the mounting bracket to the ceiling.
- Wiring: Connect the power supply wires to the terminal block (L = Live, N = Neutral, Ground symbol).
- Assembly: Secure the light fixture to the mounting bracket as shown in the diagram on page 2.
Operation without remote control
The light can be switched on and off using the standard wall switch. When switched on, the light defaults to 100% brightness. Previous settings are reset if the power is cut completely.
Operation with remote control
The remote control allows for advanced settings:
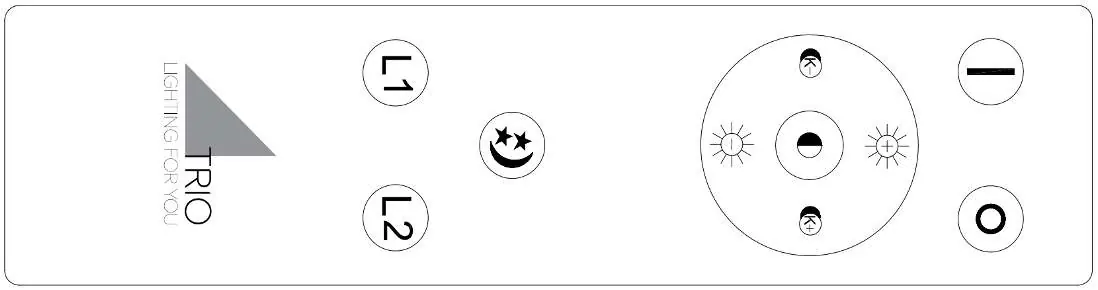
- Brightness: Adjustable in stages. Press briefly to change stages, or hold the button for maximum/minimum brightness.
- Color Temperature: Adjustable from warm white to cold white.
- Modes: Cyclical switching between 5 modes: 4000K, 2700K, 6000K, L1 2700K & L2 6000K, and L1 6000K & L2 2700K.
- Night Light: Dedicated button for low-light mode.
- Ring Control: Independent control of the inner and outer rings.
Remote control setup and reset
If the remote is not responding, it may need to be paired or reset.
- Pairing: Switch on the light using the wall switch and immediately press button 1 on the remote. Successful coding is confirmed by the light flashing.
- Reset: Switch on the light using the wall switch, then press the "ON" (1) button 5 times within 3 seconds. The light will confirm the reset by flashing.
Technical Specifications
- Voltage: 230V~50Hz
- Power: 1 x LED / 40W
- Protection: IP20 (Indoor use only)
Practical help
Common problems
Remote control not responding
Perform the reset procedure (switch on, press 'ON' button 5 times within 3 seconds) and then re-pair the remote by pressing button 1 immediately after switching on.
Light settings not saved
The light uses a memory effect. Ensure the light is not completely disconnected from power at the wall switch for an extended period, or use the remote to turn it off to maintain settings.
Before use
- Ensure the main power supply is switched off before installation.
- Verify the ceiling structure can support the weight of the fixture.
- Insert batteries into the remote control.
- Check that the wiring (L, N, Ground) is correctly connected to the terminal block.
Images and diagrams
- Page 2 illustrates the mounting process: 1. Drill holes, 2. Insert wall plugs, 3. Connect wires to the terminal block, 4. Secure the fixture to the bracket.
Model compatibility
- Designed for indoor use only (IP20).
- Compatible with standard wall switches.

Manual page author
Michael Turner
Technical manual editor
Reviews PDF manuals for structure, safety notes, and practical product details so readers can find the right information quickly.