Home Appliances / Commercial Kitchen Equipment
User Manual for Trufrost Breadwinner Electric Deck Oven
Quick guide for the Trufrost Breadwinner series electric deck oven. Learn about installation, operation, steam function, maintenance, and troubleshooting for models 1-2E, 2-4E, and 3-6E.
Table of contents
Manual images
Click an image to enlargeQuick guide from the manual
This manual covers the operation and safety of the Trufrost Breadwinner series electric deck ovens. Key points include:
- Installation: Must be performed by professional technicians. Ensure proper grounding and leakage protection. Maintain at least 10cm clearance on sides and 50cm at the back from combustible materials.
- Operation: Set top and bottom temperatures independently. Use the timer for baking.
- Steam Function: Requires a 20-minute heat-up time. Limit steam spray to 3 seconds with a 5-minute interval between sprays.
- Safety: Do not open the door during steam spray to avoid scalding. Always turn off the power after use.
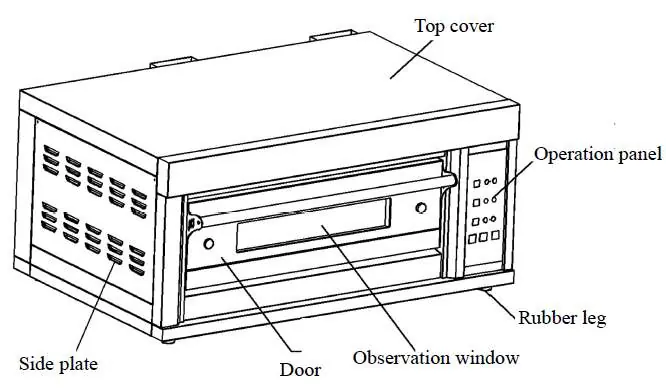
Product Overview
The Breadwinner series is a commercial electric deck oven featuring stainless steel construction, tempered glass windows, and intelligent computer-controlled temperature management. It includes leakage protection circuit breakers and independent temperature control for top and bottom heating elements.
Operation Panel
The control panel allows for precise management of the oven:
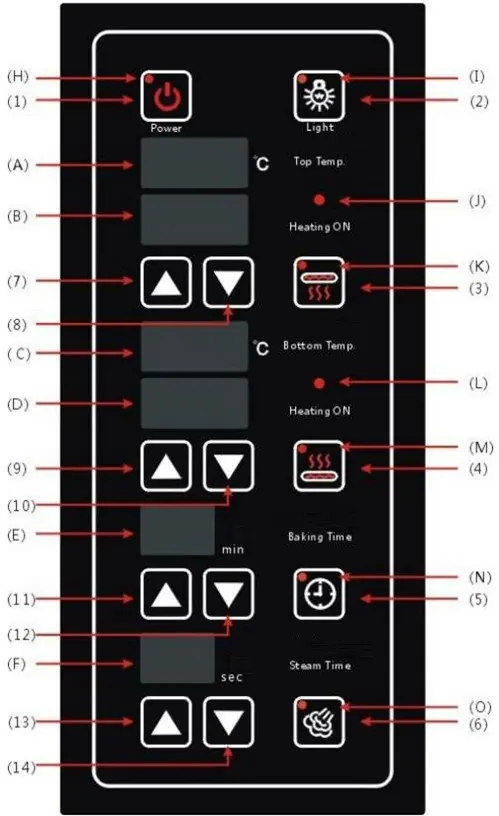
- Power: Turns the unit on/off.
- Top/Bottom Temp: Displays actual and set temperatures. Use the arrow buttons to adjust.
- Baking Time: Sets the duration for the baking cycle.
- Steam Time: Controls the steam injection duration.
- Indicators: LEDs show heating status, power, and steam/time activity.
Operation Instructions
Follow these steps for daily operation:
- Ensure the power supply voltage is correct and the unit is properly grounded.
- Press the Power button to activate the control panel.
- Set the desired Top and Bottom fire temperatures using the respective adjustment buttons.
- Set the baking time using the timer controls.
- For steam usage, ensure the steam switch is on. Wait approximately 20 minutes for the steam indicator to light up before initiating steam spray.
- After baking, turn off the heating elements and then the main power.
Steam Function
The steam system uses a steam drum heated by electric tubes. When the heat exchanger reaches the set temperature, the steam indicator turns green. Press the steam switch to inject steam into the oven. Safety Warning: Do not open the door while steam is spraying to prevent scalding. Ensure water supply is sufficient.
Cleaning and Maintenance
Regular maintenance is essential for longevity:
- Cut off power before cleaning.
- Clean the oven plate and surface daily with a wet towel and non-corrosive cleaner. Do not rinse with water.
- Lubricate door bushings monthly with high-temperature lubricating oil or engine oil.
- Inspect the machine daily for tilted positioning, damaged panels, or worn power cords.
Troubleshooting
If issues arise, refer to the following:
- No response on power-up: Check main power supply or control panel.
- Temperature not reaching set point: Temperature probe or control panel may be faulty.
- Er01/Er02: Thermocouple failure; check wiring connections.
- Er03: Excessively high ambient temperature.
Practical help
Common problems
No response when pressing Power button
Check if the main power supply is connected or if the control panel is damaged.
Temperature does not reach the set value
The temperature probe or control panel may be broken. Cut off power and contact a technician.
Display code Er01 or Er02
Thermocouple failure. Check if the thermocouple is connected or if wiring is loose.
Display code Er03
Excessively high ambient temperature. Ensure the area is well-ventilated.
Before use
- Ensure the machine is not tilted.
- Inspect the control panel for damage.
- Check the power cord for aging, cracks, or damage.
- Verify the power supply voltage matches the equipment requirements.
- Ensure the unit is properly grounded.
- Check that the installation area is well-ventilated and free of flammable materials.
Specs in practice
- Top/Bottom Fire Temperature
- Allows independent control of heating elements for precise baking results.
- Steam Function
- Requires 20-minute heat-up; 3-second spray limit; 5-minute interval between sprays.
- Leakage Protection
- Built-in circuit breaker to automatically cut power in case of electrical faults.
Images and diagrams
- Operation Panel: Shows buttons for Power, Light, Top/Bottom Temp, Timer, and Steam, along with their respective indicators.
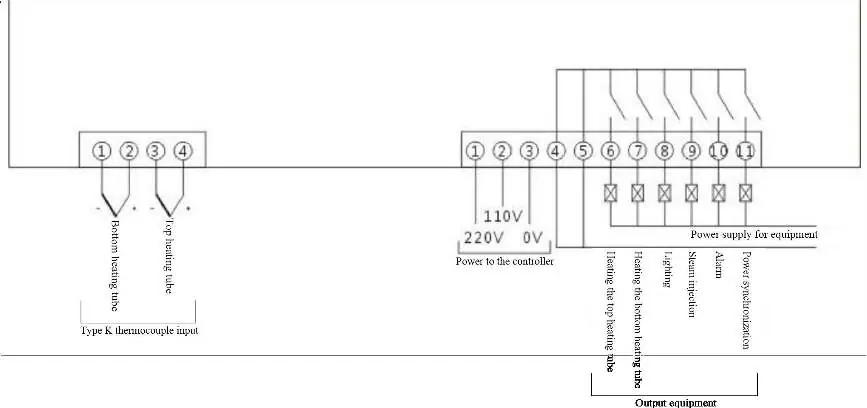
- Wiring Diagram: Illustrates the connections for thermocouple inputs, power supply, and heating elements.
Model compatibility
- Requires professional installation.
- Must be connected to a leakage protection switch.
- Not for use on flammable floors or near flammable materials.

Manual page author
Michael Turner
Technical manual editor
Reviews PDF manuals for structure, safety notes, and practical product details so readers can find the right information quickly.