Home Appliances / Commercial Kitchen Equipment
Vollrath 0644N Tomato Pro Tomato Slicer Instruction Manual
Quick guide for blade replacement and adjustment for the Vollrath 0644N Tomato Pro, Econo Pro, and Tomato King slicers. Learn how to safely change blades, align the pusher head, and maintain proper blade tension.
Table of contents
Manual images
Click an image to enlargeImportant Information
This manual provides instructions for blade replacement and adjustment for Vollrath Tomato Pro, Econo Pro, and Tomato King slicers. Warning: Blades are extremely sharp and can cause severe injury or amputation. Only trained personnel should perform maintenance. Always wash new blades with warm, soapy water to remove the protective oil film before installation.
Replacing Blade Assembly
It is recommended to change the complete blade assembly rather than individual blades to prevent breakage. Never mix old and new blades in the same assembly.
- Prepare a flat, dry workspace.
- For Tomato King: Close the pusher head so fingers rest against the pin stop.
- For Tomato Pro and Econo Pro: Pull the pusher head assembly back against the back stop.
- Remove the four blade block screws (two at each end). Retain the rubber seals mounted on the screws between the blade blocks and the casting.
- Dispose of used blades and assemblies properly.
Adjustments
Pusher head fingers must never contact the blades. If fingers are nicked or burred, smooth them with a small flat file. Ensure spaces between fingers are uniform.

Pusher Head Finger Alignment
If fingers are not aligned between blades:
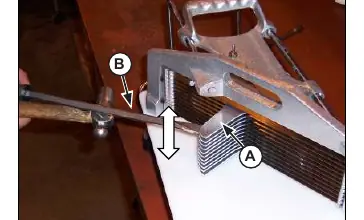
- Insert a screwdriver between the slots in the Pusher Head Assembly.
- Gently tap the screwdriver up or down to shift the fingers until they slide effortlessly through the blades.
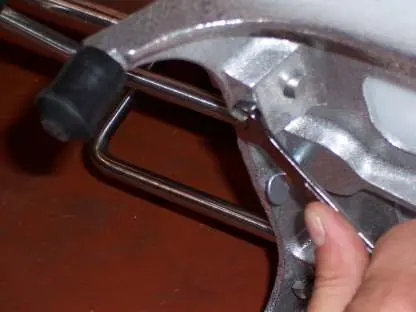
- Repeat this process from the back side of the equipment if necessary.
Pusher Head Assembly Adjustment
If further adjustment is needed, loosen the set screws on the guide rods. Push or pull the guide rod to relocate the assembly, then tighten the set screws.
Tightening the Blades
Blades must be tightened in an alternating sequence to ensure even tension:
- Center the blade assembly between the casting end-posts, leaving a gap of air space between the blade block and post.
- Tighten screws one-half turn at a time in this order: Top Right, Bottom Left, Bottom Right, Top Left.
- Repeat until tight. Check tension by strumming the dull side of the blade to ensure uniform vibration.
Practical help
Common problems
Pusher head fingers touching blades
Adjust pusher head assembly using a screwdriver to align fingers between blades so they slide effortlessly.
Excessive blade breakage
Never mix old and new blades in the same assembly; replace the complete assembly.
Rough or nicked pusher head fingers
Smooth rough edges with a small flat file and straighten any bent fingers.
Before use
- Ensure work area is flat and dry
- Familiarize yourself with the parts diagram
- Wash new blades with warm, soapy water
- Remove protective oil film from new blades
- Verify rubber seals are present on screws
Images and diagrams
- Figure 1: Adjusting pusher head fingers using a screwdriver between slots.
- Figure 2: Adjusting pusher head fingers from the back side of the equipment.
- Figure 3: Adjusting pusher head assembly location via guide rods.
Model compatibility
- Instructions apply to Tomato Pro, Econo Pro, and Tomato King models.

Manual page author
Michael Turner
Technical manual editor
Reviews PDF manuals for structure, safety notes, and practical product details so readers can find the right information quickly.