Tools / Welding Equipment
VEVOR Gas Welding and Cutting Torch Kit User Manual
Comprehensive user guide for the VEVOR Gas Welding and Cutting Torch Kit (Model 1C016-0061). Includes safety instructions, assembly, leak testing, operation, and maintenance procedures.
Quick answers from the manual
Quick answer
- This manual provides instructions for the VEVOR Gas Welding and Cutting Torch Kit (1C016-0061), covering assembly, leak testing, operation, and maintenance. p. 1, 11, 20
Key actions
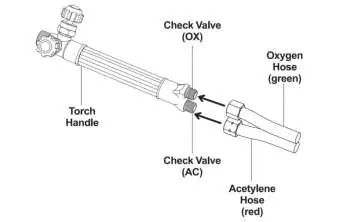
- Assemble the torch kit by connecting regulators and hoses to the cylinders and torch handle. p. 11, 12, 13
- Perform leak tests using soapy water and gauge monitoring before operation. p. 14, 15, 16
- Adjust the flame to a neutral state by balancing oxygen and acetylene flow. p. 23, 24
First start
- Secure cylinders, crack valves, attach regulators and hoses, perform leak tests, and ignite using a striker. p. 11, 12, 14, 22
Problems and fixes
Gas odor
Tighten connections, replace cracked hoses, check cylinder neck.
p. 28
Irregular flame
Clean tip, check gas levels.
p. 28Maintenance and reset
- Periodically clean the cutting tip and welding nozzle with a tip cleaner. Wipe the outer body with a clean, dry cloth. p. 27
Technical specifications
| Parameter | Value | Meaning | Pages |
|---|---|---|---|
| Max Acetylene Pressure | 15 PSI | Do not exceed to prevent explosion. | p. 8, 14, 22 |
| Hose Length | 15 FT | Length of the twin hose. | p. 3 |
Where to find it in the PDF
- Safety Instructions p. 2, 3, 4, 5
- Assembly p. 10, 11, 12, 13
- Leak Testing p. 13, 14, 15, 16
- Operation p. 20, 21, 22, 23
Table of contents
Manual images
Click an image to enlargeQuick Guide
This manual provides instructions for the VEVOR Gas Welding and Cutting Torch Kit. Before use, ensure you have read all safety warnings, inspected the equipment for damage, and performed the required leak tests. Always wear appropriate personal protective equipment (PPE) including welding goggles, gloves, and a respirator.
Safety Instructions
Warning: Welding and cutting produce toxic fumes. Use in well-ventilated areas or use a NIOSH-approved respirator. Keep the work area clean, well-lit, and free of combustible materials. Keep a fire extinguisher nearby.
- Personal Safety: Wear fire-resistant clothing, leather leggings, work boots, and dry, insulating leather welding gloves.
- Cylinder Safety: Secure cylinders to a cart or wall in an upright position. Do not use dented or damaged cylinders.
- Equipment Safety: Use only with oxygen and acetylene. Do not use oil, grease, or thread seal tape on any connector.
Specifications
- Regulators: Oxygen (CGA540), Acetylene (CGA200)
- Hose Size: 15 ft length, 3/16 in inside diameter
- Welding Capacity: 1/32 in to 1-1/4 in (with appropriate nozzle)
- Max Acetylene Pressure: 15 PSI
Assembly
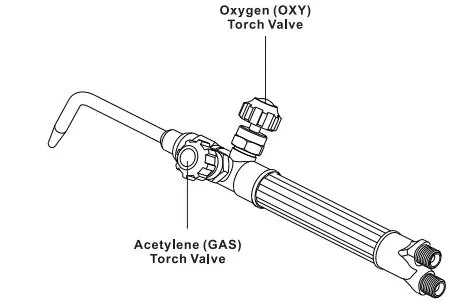
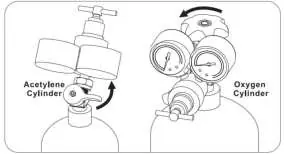
1. Secure cylinders to a cart or wall. 2. "Crack" each cylinder valve to clear debris. 3. Attach the green-labeled Oxygen Regulator to the Oxygen cylinder and the red-labeled Acetylene Regulator to the Acetylene cylinder. 4. Connect the green oxygen hose and red acetylene hose to their respective regulators. 5. Connect the hoses to the Torch Handle, ensuring check valves are in place. Tighten connections counter-clockwise as threads are reversed.
Leak Testing
Before operation, perform two leak tests:
- Soapy Water Test: Apply soapy water to connections to detect major leaks.
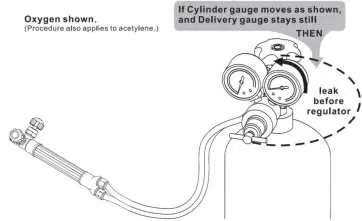
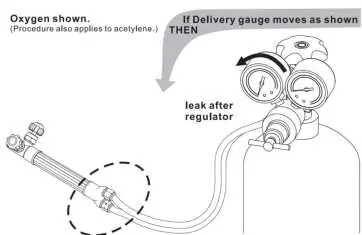
- Gauge Monitoring Test: Close cylinder valves and monitor gauges for five minutes. If readings change, a leak is present.
Operation
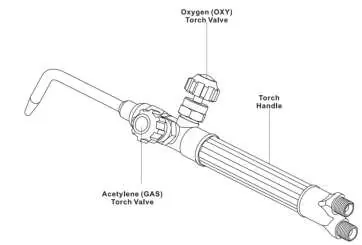
1. Hold the torch and striker. 2. Open the Acetylene valve 1/4 turn and ignite with the striker. 3. Slowly open the Acetylene valve until the flame feathers. 4. Slowly open the Oxygen valve to adjust the flame to a neutral state (white core, little to no halo). 5. After welding, close the Oxygen valve first, then the Acetylene valve. 6. Close cylinder valves and bleed the lines.
Maintenance
Inspect the tool before every use for loose connections, cracked hoses, or damage. Periodically clean the cutting tip and welding nozzle with a tip cleaner. Wipe the outer body with a clean, dry cloth. Do not use solvents.
Manufacturer information
VEVOR
Practical help
Common problems
Gas odor noticed before turning on torch
Tighten all connections. Check hoses for cracks; replace if damaged. Check cylinder neck for leaks.
Irregular flame
Close gas valves, let torch cool, remove tip, check for debris, and clean with tip cleaner. Check gas levels.
Flashback (shrill hissing/squealing)
Immediately close torch handle valves (oxygen first, then acetylene). Repair clogged tip or valves before relighting.
Before use
- Inspect general condition of the kit
- Check for loose hose connections
- Check hoses for cracks, burns, or worn areas
- Ensure proper ventilation
- Wear fire-resistant clothing and welding goggles
- Ensure fire extinguisher is nearby
Specs in practice
- Acetylene Pressure
- Must not exceed 15 PSI to prevent explosion.
- Hose Fitting Threads
- Oxygen is Right-Hand, Acetylene is Left-Hand (reversed).
- Welding Nozzle (VM-W)
- Included size 0 nozzle welds up to 1/16 in thick metal.
Images and diagrams
- Assembly diagrams show the correct connection of hoses to the torch handle and regulators.
- Leak test diagrams illustrate how to close valves and monitor pressure gauges.
- Flame adjustment diagrams show the visual difference between carbonizing, neutral, and oxidizing flames.
Model compatibility
- Use with oxygen and acetylene gas only.
- Welding thicker metals requires special techniques outside the scope of this manual.
- Use only accessories recommended by the manufacturer.

Manual page author
Emily Carter
User documentation editor
Prepares concise manual descriptions and highlights the most useful setup, operation, and maintenance information for readers.