Tools / Welding Equipment
User Manual for Vevor Gas Welding and Cutting Torch Kit 1C016-0020 B
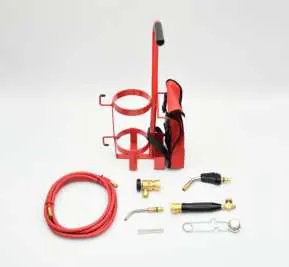
Quick guide for the Vevor Gas Welding and Cutting Torch Kit (1C016-0020 B). Includes assembly instructions, operation steps, safety warnings, and technical specifications for various tips.
Quick answers from the manual
Quick answer
- The Vevor Gas Welding and Cutting Torch Kit is designed for brazing and soldering. Assembly involves connecting the regulator to the gas cylinder, attaching the hose, and connecting the torch handle. Always perform a leak test with soapy water before use. p. 5, 6
Key actions
- Assemble the torch p. 5
- Ignite the torch p. 7
First start
- Check for leaks p. 6
Problems and fixes
Weak flame
Clean orifice or filter screen.
p. 7Technical specifications
| Parameter | Value | Meaning | Pages |
|---|---|---|---|
| Gas Flow | Varies by tip | Gas consumption rate | p. 8 |
Where to find it in the PDF
- Safety Instructions p. 3, 4
- Assembly p. 5
- Operation p. 6, 7
- Specifications p. 8, 9
Table of contents
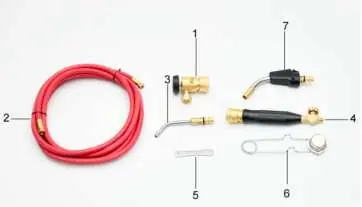
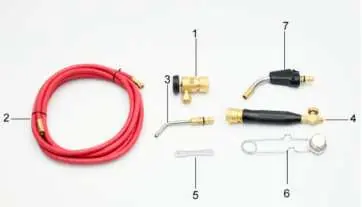
Manual images
Click an image to enlargeQuick guide from the manual
This manual provides instructions for the Vevor Gas Welding and Cutting Torch Kit (Model 1C016-0020 B). Always operate in a well-ventilated area and wear appropriate safety gear, including gloves and eye protection.
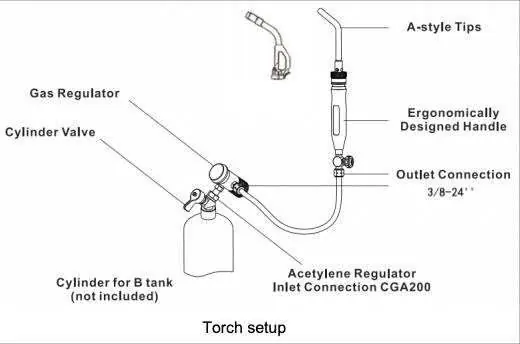
Assembly
1. Inspect the cylinder valve and regulator inlet for contamination. Clean if necessary.


2. Attach the regulator inlet to the cylinder valve.
3. Connect the hose to the regulator outlet. Note that hose fittings are left-hand threaded.
4. Attach the torch handle to the hose. Use two wrenches to tighten securely without overtightening.
Operation
1. Check O-rings on the torch and handle for damage. Replace if necessary.
2. Insert the torch base into the quick disconnect until secure.
3. Open the cylinder valve no more than 3/4 of a turn.
4. Open the torch handle valve at least one turn.
5. Press the trigger button to ignite. If it fails, release and press again.
Maintenance and Troubleshooting
Leak Testing: Always test connections with a soapy-water solution. Never use a flame to check for leaks.
Weak Flame: If the flame is weak, shut off fuel, remove the torch, and clean the orifice or filter screen using an air hose or mild solvent.
Manufacturer information
VEVOR
Practical help
Common problems
Weak flame
Clean the orifice or filter screen using an air hose or mild solvent.
Gas leak
Test all connections with soapy water. Do not use a flame to test for leaks.
Before use
- Check cylinder valve and regulator for contamination.
- Wear gloves and eye protection.
- Ensure work area is well-ventilated.
- Check O-rings for damage.
- Test connections for leaks with soapy water.
Specs in practice
- Soft Solder/Silver Braze
- Capacity range for different soldering/brazing tasks.
Images and diagrams
- Torch setup diagram shows the connection sequence: Cylinder -> Regulator -> Hose -> Torch Handle -> Tip.
Model compatibility
- Ensure the regulator is compatible with the gas type used (Propane, MAPP, or Acetylene).
- Use only the specified tip sizes for the intended soldering or brazing task.

Manual page author
David Miller
Documentation analyst
Organizes user manual content into clear summaries, with attention to model details, product context, and everyday usability.