Tools / Welding Equipment
User Manual for Vevor Gas Welding and Cutting Torch Kit (Model 1C016-0044)
Comprehensive user guide for the Vevor Gas Welding and Cutting Torch Kit (Model 1C016-0044). Includes assembly instructions, operating procedures, safety guidelines, maintenance tips, and parts diagrams.
Quick answers from the manual
Quick answer
- This kit is for acetylene gas use only. Always connect the green regulator to the oxygen cylinder and the red regulator to the acetylene cylinder. Never use oil or grease on connections. Always shut off oxygen first during shutdown. p. 9, 10, 11
Key actions
- Connect regulators p. 10, 11
- Light the torch p. 14, 15
First start
- Assembly p. 10, 11
Problems and fixes
Backfire/Flashback
Close valves (oxygen first) immediately. Find cause before relighting.
p. 9Maintenance and reset
- Clean nozzles p. 17
Technical specifications
| Parameter | Value | Meaning | Pages |
|---|---|---|---|
| Max Acetylene Pressure | 15 PSI | Never exceed this pressure. | p. 8, 13 |
Where to find it in the PDF
- Safety Instructions p. 3, 4, 5, 6
- Assembly and Operating Instructions p. 9, 10, 11, 12
- Inspection, Maintenance, and Cleaning p. 16, 17
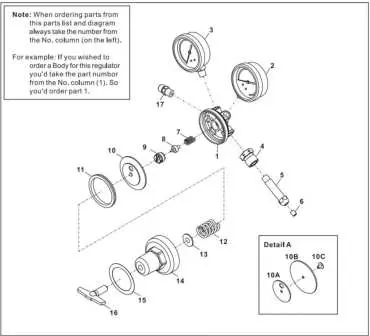
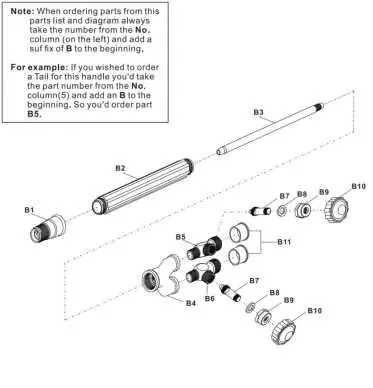
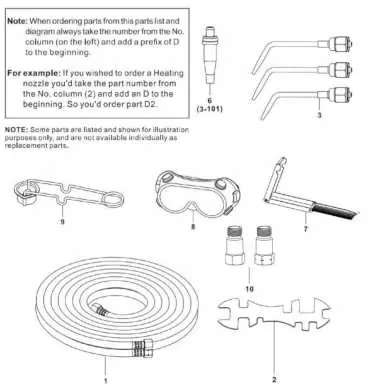
- Parts List p. 17, 18, 19, 20
Table of contents
Manual images
Click an image to enlargeQuick guide from the manual
This kit is designed for gas welding and cutting using acetylene. Important: Always connect the green regulator to the oxygen cylinder and the red regulator to the acetylene cylinder. Never use oil or grease on any connections. Always shut off the oxygen valve first during the shutdown procedure to prevent damage to the torch handle.
Safety Instructions
- Personal Protective Equipment: Always wear ANSI-approved welding goggles or a welding helmet (shade 10+), fire-resistant gloves, and protective clothing.
- Fire Prevention: Keep the work area free of combustibles. Keep a fire extinguisher (Type A, B, C) nearby and know how to use it.
- Gas Handling: Secure cylinders in an upright position. Never use oil or grease on connectors.
- Backfire/Flashback: If a backfire or flashback occurs, immediately close the torch handle valves (oxygen first).
Assembly and Setup
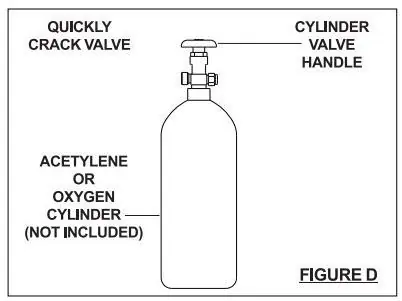
1. Cylinder Preparation: Stand to the side and "crack" each cylinder valve (open and close quickly) to clear out foreign material.
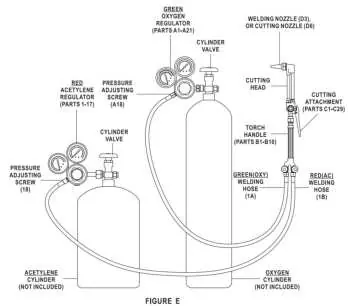

2. Regulator Installation: Attach the green oxygen regulator to the oxygen cylinder and the red acetylene regulator to the acetylene cylinder. Tighten in the correct direction (clockwise for oxygen, counter-clockwise for acetylene). Do not use thread sealing tape.
3. Hose Connection: Connect the green and red welding hoses to the proper connections on the torch handle.
4. Cutting Attachment: Connect the cutting attachment to the torch handle. Ensure the two O-rings (C24, C25) are present and undamaged on the cone end to prevent gas mixing.
Operating Instructions
1. Lighting: Hold the torch handle in one hand and the flint lighter in the other. Open the acetylene control valve about 1/4 turn and ignite the gas.
2. Flame Adjustment: Slowly open the acetylene valve further until smoke subsides. Then, slowly open the oxygen control valve until a brilliant neutral flame is achieved.
3. Shutdown: Turn off the oxygen control valve first, then the acetylene control valve. Close cylinder valves and bleed the gas from the regulators.
Inspection, Maintenance, and Cleaning
- Before Each Use: Inspect the kit for loose screws, damaged hoses, or misaligned parts. Do not use damaged equipment.
- Cleaning: Periodically use the tip cleaner (D7) to remove dirt from nozzles. Use a clean cloth for cleaning; do not immerse parts in liquid or use flammable solvents.
Manufacturer information
VEVOR
Practical help
Common problems
Backfire or Flashback
Immediately close the torch handle valves (oxygen first). Find and remedy the cause (e.g., clogged tip, low pressure, overheating) before relighting.
Leaks
Use an approved leak detection solution on hoses and cylinder connections. If leaks persist, discontinue use and contact your gas supplier.
Before use
- Wear ANSI-approved goggles or welding helmet (shade 10+)
- Wear fire-resistant clothing and gloves
- Ensure work area is well-ventilated and free of combustibles
- Check hoses for cuts, burns, or wear
- Ensure cylinders are secured in an upright position
- Verify O-rings are present and undamaged on the cutting attachment
Specs in practice
- Acetylene Pressure
- NEVER set above 15 PSI.
- O-Rings (C24, C25)
- Must be present on the Cone End (C23) to prevent gas mixing and flashback.
Images and diagrams
- Figure E: Assembly diagram showing regulator and hose connections.
- Figure L: Torch handle controls (Oxygen/Acetylene valves).
- Figure M: Lighting procedure with flint lighter.
Model compatibility
- For acetylene gas use only.
- Do not use other fuel gases.

Manual page author
Michael Turner
Technical manual editor
Reviews PDF manuals for structure, safety notes, and practical product details so readers can find the right information quickly.