Home Appliances / Cooktops Hobs
User Manual for Vevor Ice Cream Machine
Quick guide for the Vevor Ice Cream Machine. Includes installation, operation, ice cream making instructions, maintenance, and troubleshooting.
Quick answers from the manual
Quick answer
- This manual provides instructions for the Vevor Ice Cream Machine, covering installation, operation, maintenance, and troubleshooting. p. 1
Key actions
- Clean the refrigerating cylinder daily. p. 6, 8
- Mix 1kg of ice cream material with 2.5-3kg of purified water. p. 7
- Wait 4 hours before using the machine after transport. p. 3
First start
- Place machine, check voltage, clean with disinfectant, and ensure proper ventilation. p. 3, 5, 6
Show 4 more answers Show less
Problems and fixes
Machine cannot start
Check power switch, power line connection, protection circuit, and control board.
p. 10
Ice cream is too soft
Check mixing ratio, reset hardness, adjust voltage, adjust belt, or reduce discharge frequency.
p. 12Error codes
| Code | Meaning | Action | Pages |
|---|---|---|---|
| JJ | Current of the stirring motor is too high. | Check belt's tightness, stirring motor, and capacitance. | p. 12 |
| UH | Too high voltage. | Check the power voltage. | p. 12 |
| UL | Too low voltage. | Check the power voltage. | p. 12 |
| Cb | Material discharge switch closes in succession over 3 minutes. | Restore the material discharge switch or replace it. | p. 12 |
Technical specifications
| Parameter | Value | Meaning | Pages |
|---|---|---|---|
| Ambient temperature | 5-40°C | Operating temperature range | p. 5 |
| Supply voltage | 100-120V | Required input voltage | p. 5 |
| Supply frequency | 60±1 Hz | Required frequency | p. 5 |
Where to find it in the PDF
- Product structure diagram p. 4
- Operating instructions p. 6, 7
- Troubleshooting p. 10, 11, 12
Table of contents
Manual images
Click an image to enlargeQuick guide from the manual
This document provides essential instructions for operating and maintaining the Vevor Ice Cream Machine. Key requirements include a 100-120V power supply, proper grounding, and a daily cleaning routine to ensure hygiene and machine longevity. Always wait at least 4 hours after transporting the machine before turning it on.
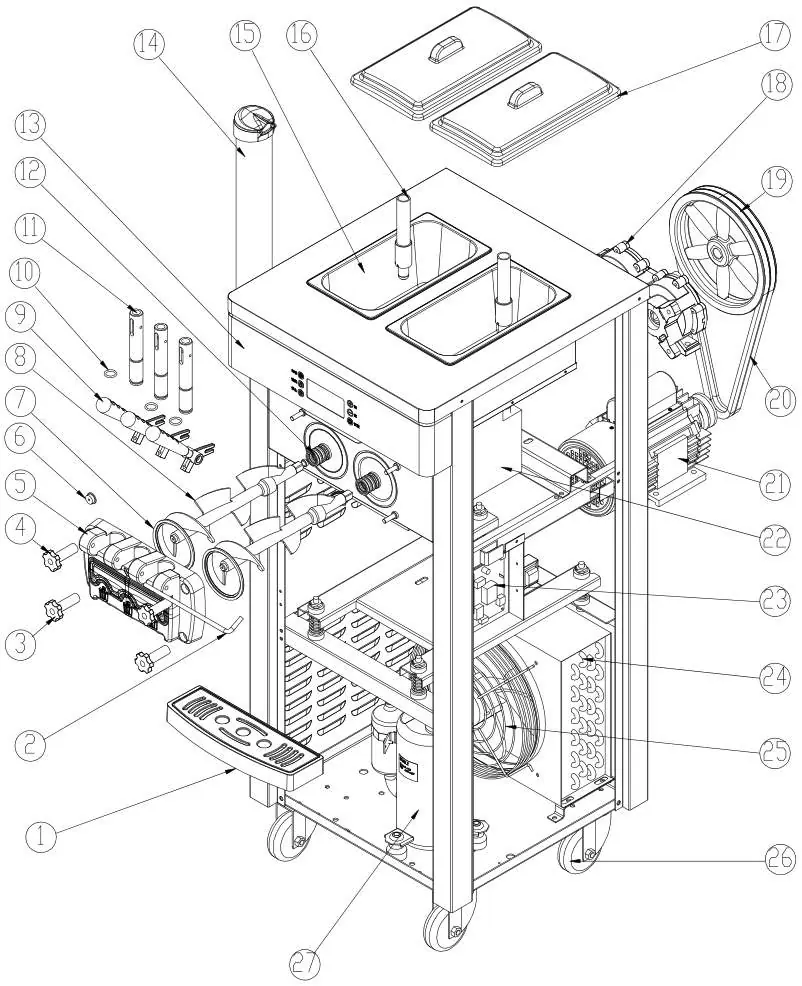
Safety precautions
- Do not tilt the machine more than 45° during transport.
- Place the machine in a cool, ventilated location with at least 1m clearance on the air exhausting side and 0.3m on other sides.
- Ensure the power supply is grounded and equipped with short-circuit and earth leakage protection.
- Do not switch on the machine if the stirring shaft is in an empty cylinder or if there is water in the cylinder.
- Cut off power before cleaning or dismantling parts.
Installation
Place the machine on a stable surface and lock the front wheel brakes. Install the handle to the liquid outlet valve and secure the valve to the machine using the fixing nuts. Ensure the power line is at least 4mm² (copper core) to prevent voltage drops.
Operating instructions
The control panel allows you to manage the machine's state:
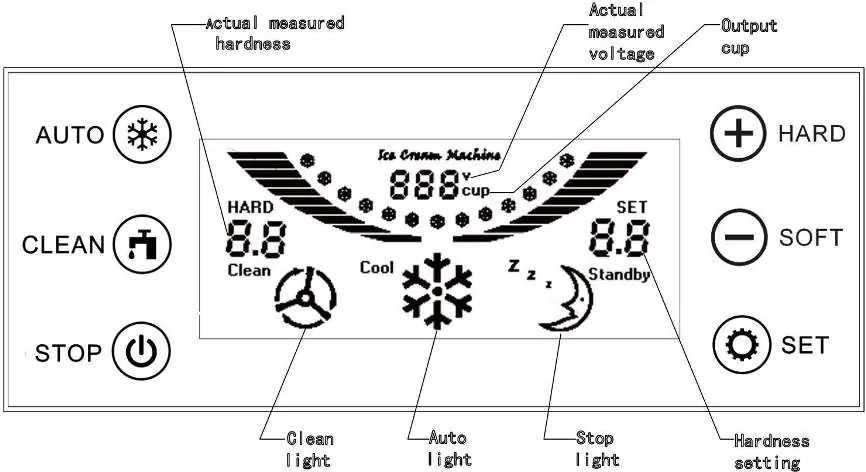
- Auto: Starts the automatic working state. The machine runs the stirring motor, and after 10 seconds, the refrigeration system starts.
- Clean: Initiates the cleaning state.
- Stop: Stops the current operation and returns to standby.
- Time: Sets the restart time cycle (3-9 minutes).
- Hardness: Adjusts the ice cream hardness.
Ice cream making
Mix ice cream material with purified water in a ratio of 1kg material to 2.5-3kg water. Let the mixture sit for 15 minutes before pouring it into the material cylinders. Ensure the pulp does not cake to allow smooth flow into the refrigerating cylinder.
Maintenance and cleaning
Clean the refrigerating cylinder daily:
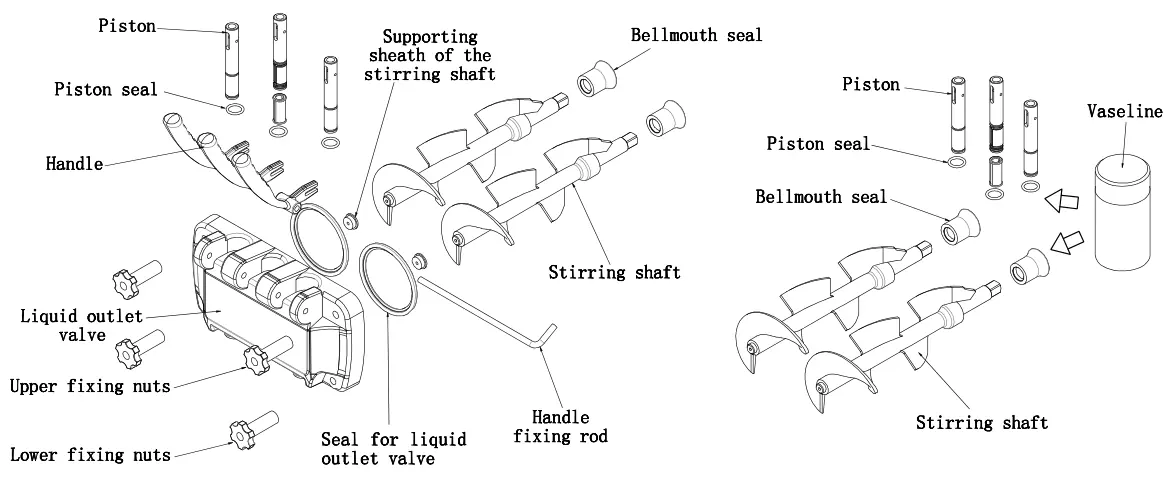
- Discharge all pulp using the 'Cleaning' key, then stop the machine.
- Pour warm water (40-50°C) mixed with food-grade cleaning solution into the cylinders.
- Run the 'Cleaning' cycle for 5 minutes and discharge.
- Rinse 2-3 times with clear water.
- Dismantle components, clean them, and apply vaseline to seals and shafts before reassembling.
Clean the condenser every three months (or monthly in poor environments) to maintain cooling efficiency.
Troubleshooting
If the machine fails to start, check the power connection and circuit protection. If the compressor does not run, check the voltage and connections. For 'JJ' alarms, check the stirring motor and belt tightness. For 'UH' or 'UL' alarms, check the power voltage.
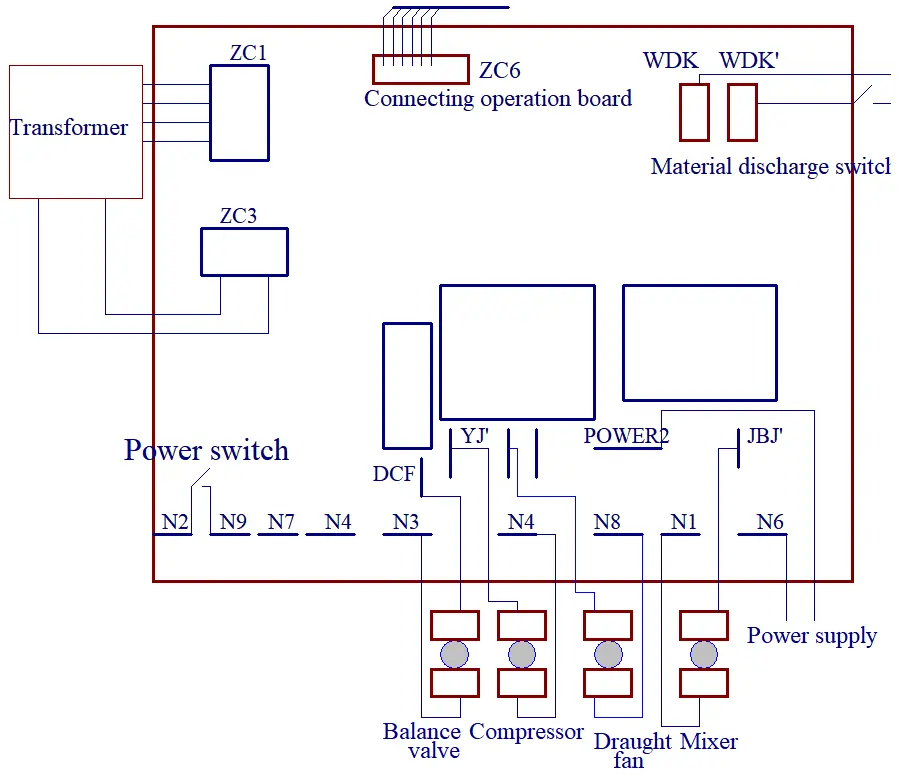
Electric principle diagram
The manual includes a wiring diagram illustrating connections for the transformer, control board, compressor, draught fan, and mixer.
Manufacturer information
VEVOR
Practical help
Common problems
Machine cannot start
Check power switch, ensure power line is connected, check circuit protection, or inspect control board.
Compressor doesn't run
Check connection lines, verify power voltage, or inspect contactor and compressor capacitance.
Ice cream is too soft
Check mixing ratio, reset hardness, adjust belt tension, or check voltage.
Leaky material
Replace liquid outlet valve, piston seal, or bellmouth seal.
Before use
- Ensure tilting angle was less than 45° during transport.
- Place machine for at least 4 hours before first use.
- Verify nameplate voltage matches local power supply (100-120V).
- Ensure power socket is grounded.
- Perform initial cleaning and disinfection before first use.
Show more Show less
Specs in practice
- Ambient temperature
- 5-40°C (Operating range)
- Material feeding temperature
- 2-35°C
- Supply voltage
- 100-120V
- Supply frequency
- 60±1 Hz
Images and diagrams
- Product structure diagram identifies 27 parts including the stirring motor, compressor, and control panel.
- Electric principle diagram shows wiring for the compressor, draught fan, and mixer.
Model compatibility
- Requires 100-120V power supply.
- Requires short-circuit and earth leakage protection devices.

Manual page author
David Miller
Documentation analyst