Home Appliances / Cooktops Hobs
User Manual for Vevor Industrial Concrete Sprayer 21014S/21014ST/21018ST
Comprehensive user guide for the Vevor Industrial Concrete Sprayer (models 21014S, 21014ST, 21018ST). Includes assembly instructions, safety warnings, operation, and maintenance.
Quick answers from the manual
Quick answer
- The Vevor Industrial Concrete Sprayer is a manual pressure sprayer. To operate, fill the tank, lock the pump, pressurize by pumping, and use the handle switch to spray. p. 3, 9, 10
Key actions
- Assembly p. 6, 7, 8
- Pressurizing p. 10
- Releasing Pressure p. 11
First start
- Assemble the main body and cart, perform a pre-use check with water, fill with solution, lock the pump, and pressurize. p. 6, 7, 8, 9
Show 4 more answers Show less
Problems and fixes
Unit leaks
Check hose connections and seals.
p. 9Maintenance and reset
- Periodically oil the pump by dropping 10-12 drops of light oil down the pump rod through the opening in the cover. p. 13
Technical specifications
| Parameter | Value | Meaning | Pages |
|---|---|---|---|
| Working Pressure | 25-60 PSI | Operating pressure range | p. 12 |
| Capacity | 3.5gal / 4.5gal | Tank capacity | p. 12 |
Where to find it in the PDF
- Safety Instructions p. 2
- Parts List p. 3, 4
- Assembly p. 6, 7, 8
- Care and Maintenance p. 13
Table of contents
Manual images
Click an image to enlargeQuick Guide
This manual provides instructions for the Vevor Industrial Concrete Sprayer. Before using the device, ensure you have read all safety warnings. The sprayer is designed for industrial use; do not use it with flammable, caustic, acidic, or corrosive chemicals. Always wear appropriate protective gear, including safety goggles, gloves, long-sleeved shirts, long pants, and full-foot protection.
Parts List
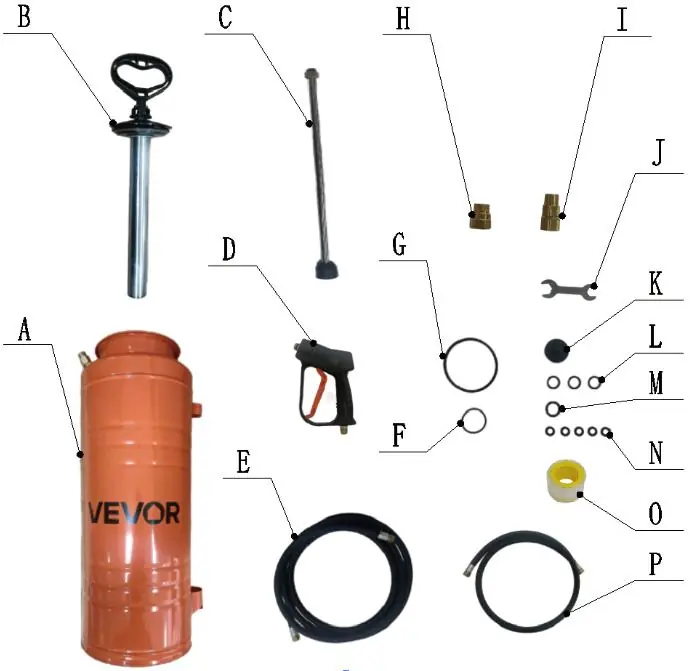
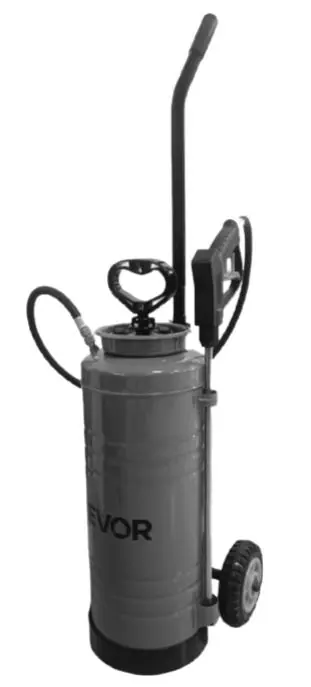
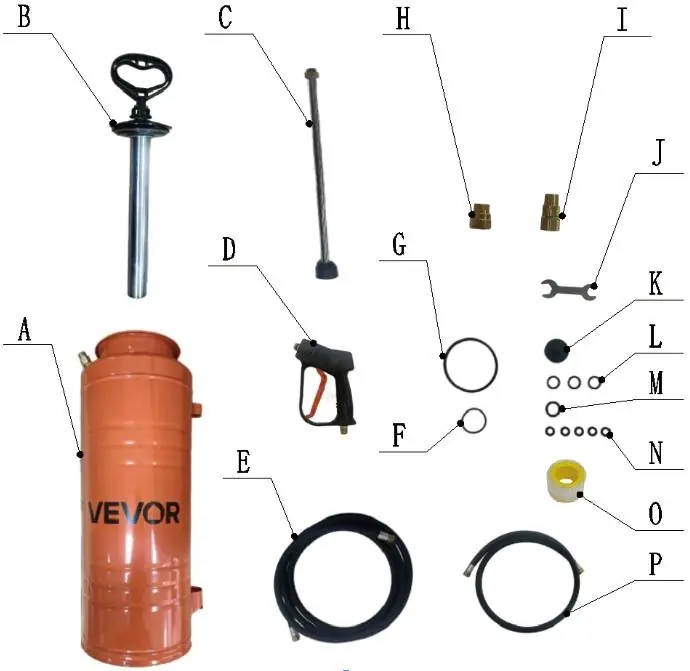
The sprayer consists of the main body (tank, pump assembly, spray wand, spray gun, hose, nozzles, and seals) and the cart assembly (frame, handle, wheels, and hardware). Refer to the parts list diagrams for identification of all components.
Assembly
Main Body Assembly
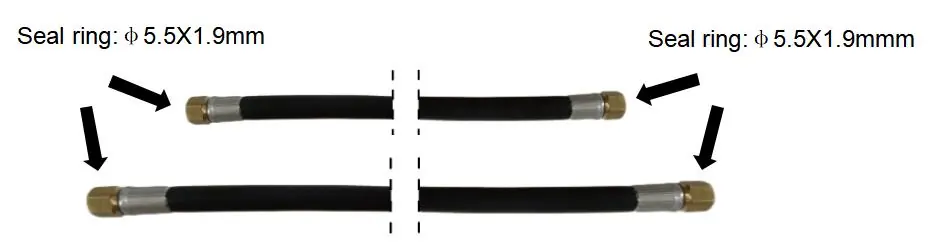
- Hose to Tank: Wrap seal tape around the brass screw 1-2 times, then attach the hose by screwing the swivel nut clockwise.
- Spray Gun: Wrap seal tape around the brass screw 1-2 times, insert the switch handle into the hose, and screw the nut tightly.
- Lance: Insert the lance into the switch handle and screw the nut tightly.
- Nozzle: Connect the nozzle to the lance or spray gun and screw the nut tightly.
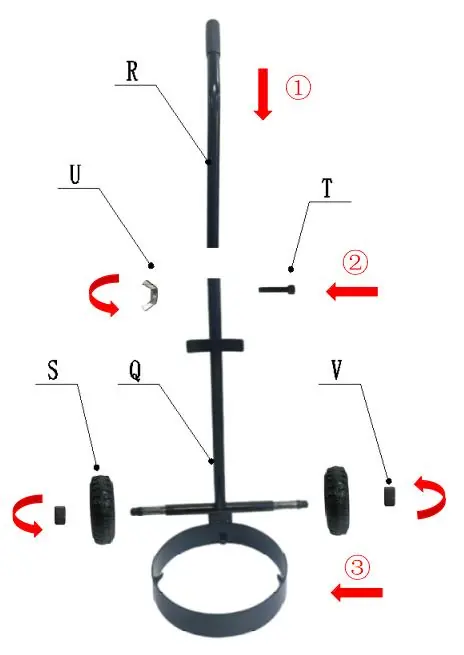
Cart Assembly
- Remove the protective cover from the frame.
- Insert the cart handle into the frame.
- Pass the bolt through the mounting holes of the handle and frame, then manually tighten with the wing nut.
- Install the wheels onto the axle positions of the frame and tighten the nut with the spanner to an appropriate torque.
- Fix the hook of the main body to the bracket of the cart.
Usage
Pre-Use Check
- Check the tightness of the hose nut.
- Inspect the hose for deterioration, cracks, or brittleness.
- Inspect the interior and exterior of the tank for signs of deterioration.
- Perform a test with water only (pump 10-20 strokes) to check for leaks.
- Ensure the discharge is not clogged.
- Inspect all metal parts for rust or corrosion.
Filling and Operation
- Turn the pump handle counterclockwise to remove the pump.
- Prepare the spray solution according to the chemical manufacturer's instructions.
- Fill the tank to the proper gallon marker; do not overfill.
- Replace the pump and tighten securely.
- Locking the Pump: Place pump prongs into the funnel slots, turn the clamp clockwise to the furthest position, then turn the handle clockwise until locked.
- Pressurizing: Unlock the pump, then pump until you feel resistance.
- Spraying: Press and hold the handle switch to spray; release to stop.
Releasing Pressure
With the pump facing away, turn the locked handle counterclockwise until air begins to escape. Stay away from the sprayer until all air has escaped.
Care and Maintenance
- After use, remove the solution and rinse the tank, hose, pump, and spray tube with clean water.
- Spray with clean water for 3 minutes to prevent chemical reactions.
- Store the tank upside down with the pump removed in a warm, dry location.
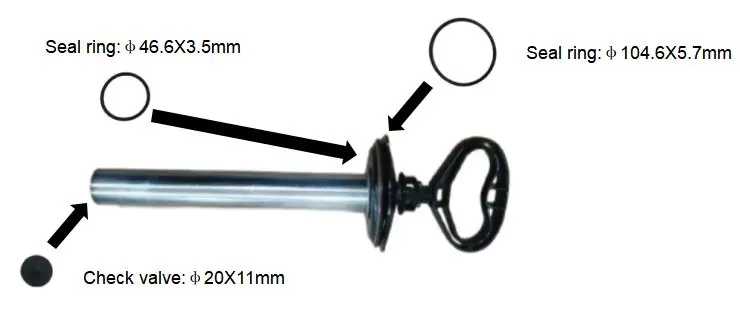
- Periodically oil the pump by dropping 10-12 drops of light oil down the pump rod through the opening in the cover.
Technical Specifications
The sprayer is available in three models with varying capacities and features. All models operate at a working pressure of 25-60 PSI.
Manufacturer information
VEVOR
Practical help
Common problems
Sprayer not holding pressure
Check hose tightness, inspect seals for damage, and ensure the pump is locked correctly.
Discharge is clogged
Clean the nozzle and discharge assembly thoroughly.
Tank shows signs of deterioration
Discard the tank immediately and replace it. Do not attempt to patch leaks.
Before use
- Check hose nut tightness.
- Inspect hose for cracks or deterioration.
- Inspect tank for signs of damage or corrosion.
- Test with water only first.
- Ensure nozzle is not clogged.
Show more Show less
Specs in practice
- Working Pressure
- 25-60 PSI; do not exceed this range.
Images and diagrams
- Parts list diagrams show the assembly order for the main body and cart components.
Model compatibility
- Use only original manufacturer parts.
- Do not use flammable, caustic, acidic, or corrosive chemicals.

Manual page author
Michael Turner
Technical manual editor