Tools / Hose Reels
User Manual for VEVOR Retractable Hose Reel
Quick guide for the VEVOR Retractable Hose Reel. Includes installation steps, usage instructions, maintenance tips, and troubleshooting for models HL-XW20, HL-XW30, and HL-XW40.
Quick answers from the manual
Quick answer
- To install the VEVOR Retractable Hose Reel, mount the bracket to a wall or post using the provided bolts, then attach the reel using the mounting tube and securing pin. To operate, pull the hose out (stopping before the sticker) and retract by turning off the tap and releasing pressure via the spray gun. p. 3, 4, 6, 7
Key actions
- Mounting the bracket p. 4, 5, 6
- Retracting the hose p. 10
First start
- Check hose reach and mount bracket p. 3, 4
Problems and fixes
Hose not retracting
Grip hose near guide hole and pull gently to unlock wheel.
p. 11Maintenance and reset
- Release water pressure before retracting p. 10
Technical specifications
| Parameter | Value | Meaning | Pages |
|---|---|---|---|
| Max Working Pressure | 150psi | Maximum pressure the hose can handle. | p. 9, 10 |
| Rotation Angle | 180° | Range of motion for the bracket. | p. 9, 10 |
Where to find it in the PDF
- Overview and Parts p. 3
- Installation p. 4, 5, 6, 7
- Technical Specifications p. 9, 10
- Care and Troubleshooting p. 10, 11
Table of contents
Manual images
Click an image to enlargeQuick guide from the manual
This manual provides instructions for the VEVOR Retractable Hose Reel. Important Safety Note: Always turn off the tap after use and release excess pressure by pressing the spray gun lever before retracting the hose back into the housing.
Overview
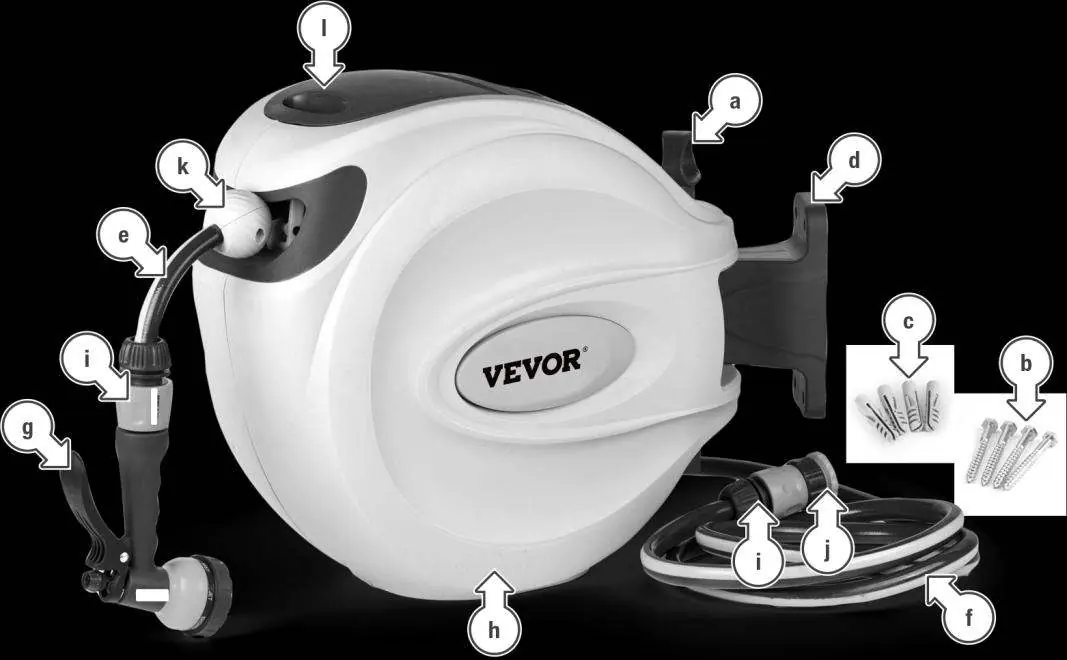
The package includes the hose reel housing, 180° wall bracket, mounting tube, garden hose, tap-to-reel hose, multi-function spray gun, and necessary mounting hardware (wall plugs and hexagonal coach bolts).
Installation
Preparation
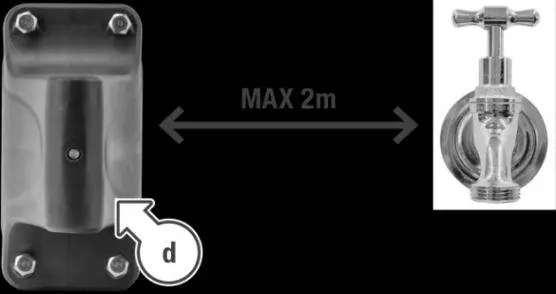
Before installing the wall bracket, ensure the tap-to-reel hose can comfortably reach your water source.
Mounting the Bracket
- Place the wall bracket against the wall or wooden post.
- Mark the center of the four holes.
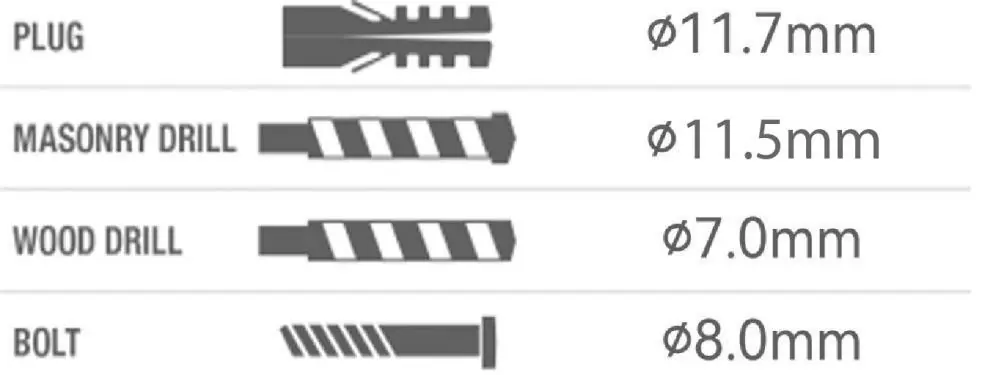
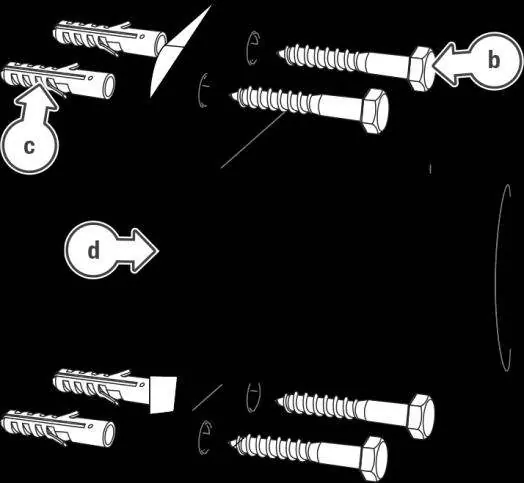
- Drill the holes. Use an 11.5mm drill bit for masonry or a 7.0mm drill bit for wood.
- If mounting to a wall, hammer the wall plugs into the holes.
- Secure the bracket using the provided hexagonal coach bolts.
Attaching the Reel
- Remove the securing pin at the base of the mounting tube.
- Remove the mounting tube from the hose reel.
- Slot the mounting tube over the wall bracket and align the holes.
- Insert the mounting tube back through the bracket and housing, then replace the securing pin.
- Connect the tap-to-reel hose to your garden tap.
Operation
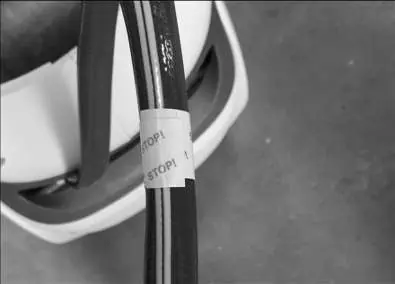
Pull the garden hose out to the desired length. An indication sticker is located 1 meter before the maximum length; do not pull the hose past this point.
To retract the hose: Turn off the tap, then press the lever on the watering gun to release water pressure. This makes retraction easier and prolongs the life of the reel. Always guide the hose back into the housing; do not let it retract freely.
Troubleshooting
If the hose is fully extended and will not retract, the retraction wheel may be stuck. Grip the garden hose close to the guide hole and pull gently. This movement should unlock the wheel, allowing you to slowly guide the hose back into the unit.
Maintenance and Warnings
- Do not attempt to pull the hose reel apart.
- Always turn off the water and drain the hose after use.
- Do not leave the hose under pressure when not in use.
Manufacturer information
VEVOR
Practical help
Common problems
Hose will not retract when fully extended
Grip the hose close to the guide hole and pull gently to unlock the retraction wheel.
Before use
- Check that the tap-to-reel hose reaches your water source.
- Ensure the wall or post is suitable for mounting.
- Use an 11.5mm drill bit for masonry.
- Use a 7.0mm drill bit for wood.
- Ensure the tap is turned off and pressure is released before retracting.
Specs in practice
- Max Working Pressure
- 150psi
- Rotation Angle
- 180 degrees
- Reel Hose Length
- 2m
Images and diagrams
- The parts diagram identifies the mounting tube, wall bracket, and hose connectors.
- The installation diagram shows the correct drill bit sizes for masonry and wood.
- The retraction diagram shows the 'STOP' sticker location.
Model compatibility
- Models include HL-XW20, HL-XW30, and HL-XW40.
- Wall plugs are not required for wooden posts.

Manual page author
David Miller
Documentation analyst
Organizes user manual content into clear summaries, with attention to model details, product context, and everyday usability.