Home Appliances / Food Processing Equipment
User Manual for Vevor 1A-SS715 Sausage Stuffer
Quick guide for the Vevor 1A-SS715 Sausage Stuffer. Includes assembly, cleaning, stuffing instructions, and maintenance tips.
Quick answers from the manual
Quick answer
- The Vevor 1A-SS715 is a vertical sausage stuffer. Assembly involves preparing the plunger, attaching the handle to the desired gear, and mounting the canister. Always clean immediately after use and lubricate with food-grade lubricant. p. 4, 6, 7, 8
Key actions
- Clean all parts immediately after use. p. 7
- Lubricate the canister, shaft, and valve components with food-grade lubricant. p. 8, 10
First start
- Assemble the plunger, attach the handle, mount the canister, and lubricate the interior before filling. p. 4, 5, 6
Problems and fixes
Handle spins back
Release the handle slowly.
p. 8Maintenance and reset
- Clean and lubricate all parts after every use. p. 7, 8
Where to find it in the PDF
- Assembly p. 4, 5, 6
- Cleaning p. 7, 8
Table of contents
Manual images
Click an image to enlargeQuick guide from the manual
This manual provides instructions for the Vevor 1A-SS715 Sausage Stuffer. It covers essential safety, assembly, operation, and maintenance procedures. Always read the full manual before use.
Safety Regulations
- Do not allow children under 14 to use the machine.
- Food acids will corrode the metal; clean immediately after every use.
- Wear ANSI Z87.1 compliant safety glasses during operation.
- Ensure the stuffer is stable during use.
- Never operate with the gear housing cover open or removed.
- Do not use outdoors.
Assembly and Installation
Plunger Assembly:
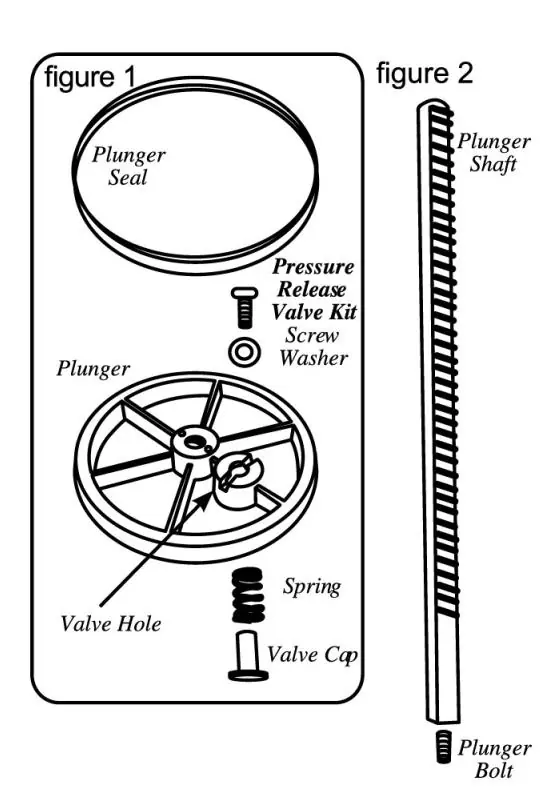

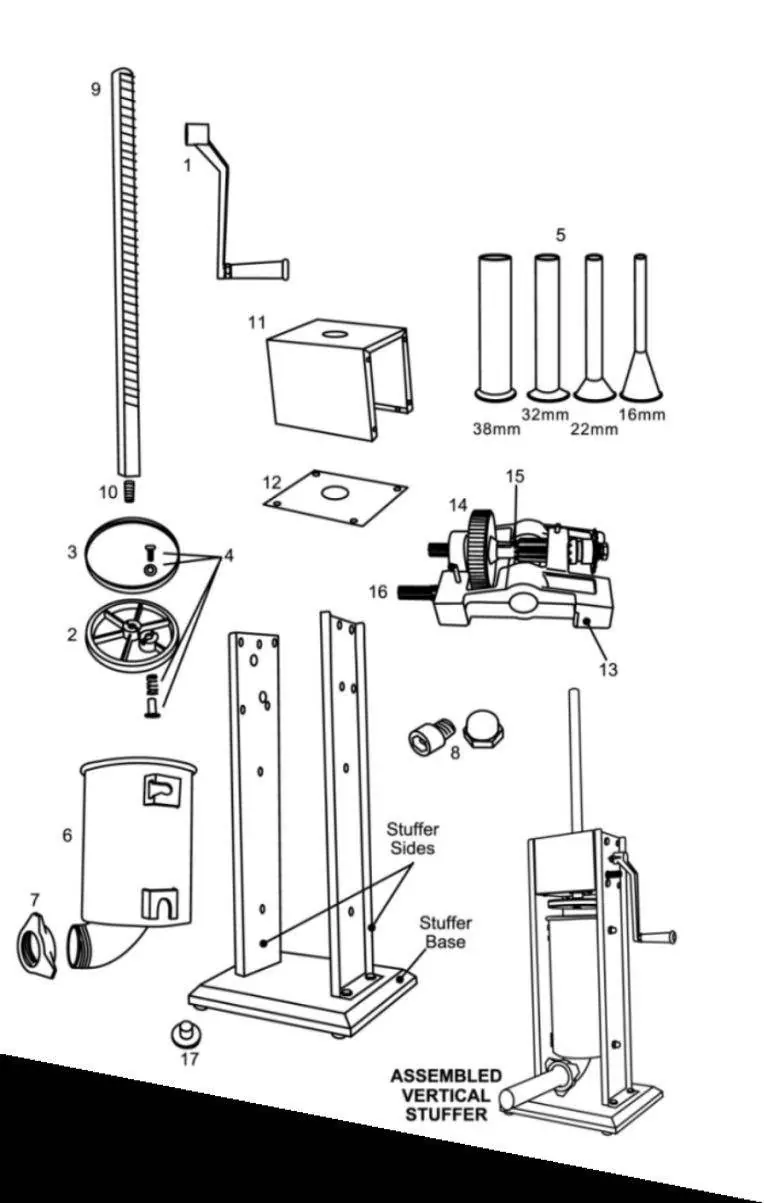
- Slide the Plunger Seal onto the Plunger.
- Assemble the Pressure Release Valve Kit onto the Plunger (Washer, Screw, Spring, Valve Cap).
- Screw the Plunger Bolt onto the Plunger Shaft.
- Place the assembled Plunger onto the end of the Plunger Shaft.
Stuffer Assembly:
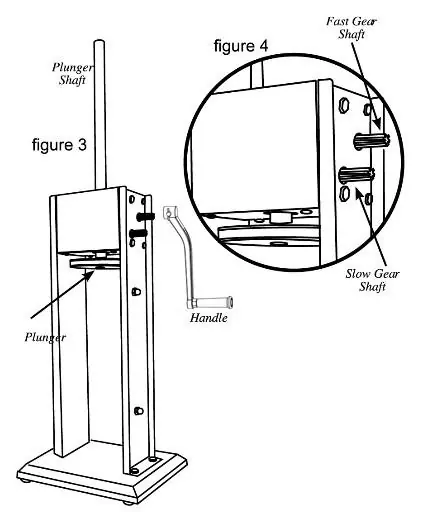
- Attach the Handle to either the Fast or Slow Gear.
- Crank the Handle to bring the Plunger to the top.
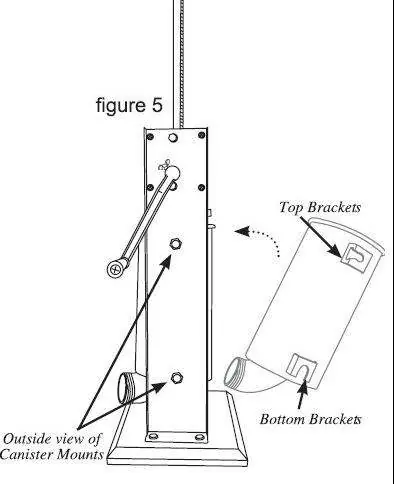
- Rest the Canister's Bottom Brackets onto the Canister Mounts inside the housing.
- Pivot the Canister fully into the housing and snap the Top Brackets into the mounts.
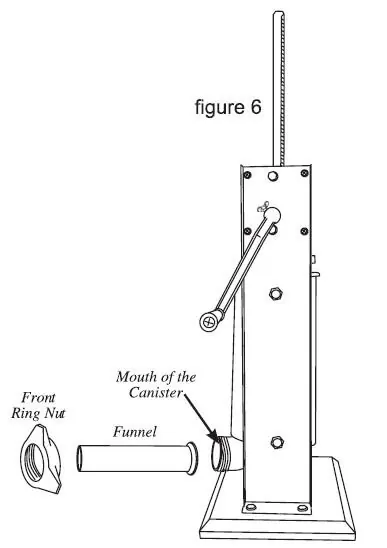
- Insert the desired Stuffing Funnel through the Front Ring Nut and screw onto the canister mouth. Do not overtighten.
- Coat the inside of the Canister with food-grade lubricant.
Stuffing Instructions
- Tilt out the Canister and fill with meat mixture.
- Press the mixture down to release trapped air.
- Pivot the Canister back to the upright position and snap into place.
- Turn the Handle until the Plunger contacts the meat.
- Slip the casing onto the Funnel.
- Turn the Handle to extrude the mixture into the casing.
- Apply pressure around the casing near the funnel for best results.
Disassembly and Cleaning
Note: Clean all parts immediately after use.
- Remove the Stuffing Funnel.
- Turn the Handle to raise the Plunger out of the Canister.
- Pivot the Canister outward and remove it from the housing.
- Unscrew the Plunger from the shaft and disassemble the valve and seal.
- Wash all parts that contacted meat in hot, soapy water.
- Rinse, dry, and sterilize as needed.
- Lubricate the shaft, canister, valve components, and ring nut with food-grade lubricant before and after use.
Stuffing Tips
- To reduce resistance with the 13 mm funnel: Add up to 1.5 cups (400mL) of water per 2.3 kg of seasoned meat.
- Add 0.25 cup (60mL) of vegetable or olive oil per 2.3 kg of seasoned meat for better flow.
Manufacturer information
VEVOR
Practical help
Common problems
Handle spins back
Release the handle slowly after pulling the plunger out of the canister to prevent injury from pressure or gravity.
Corrosion
Clean all parts immediately after every use, as food acids will corrode the metal.
Before use
- Check for damaged parts
- Ensure the stuffer is stable
- Coat the inside of the canister with food-grade lubricant
- Wear ANSI Z87.1 compliant safety glasses
Specs in practice
- 13 mm Stuffing Funnel
- Standard funnel size for stuffing.
- Fast/Slow Gear
- Different speeds for raising/lowering the plunger.
Images and diagrams
- Figure 1: Plunger assembly components
- Figure 4: Gear shaft operation
- Figure 5: Canister mounting procedure
Model compatibility
- Use only factory original parts and accessories.

Manual page author
Michael Turner
Technical manual editor
Reviews PDF manuals for structure, safety notes, and practical product details so readers can find the right information quickly.