Home Appliances / Food Processing Equipment
User Manual for Avantco 177SS20VKIT and 177SS30VKIT Sausage Stuffer
Complete user guide for the Avantco stainless steel sausage stuffer. Includes assembly instructions, motor installation, operation steps, cleaning, maintenance, and troubleshooting.
Quick answers from the manual
Quick answer
- The Avantco 177SS20VKIT/177SS30VKIT is a stainless steel sausage stuffer. This manual covers assembly, motor installation, operation with a crank or motor, cleaning, and troubleshooting. p. 1
Key actions
- Assemble the plunger p. 3
- Install the motor p. 5
- Clean the unit p. 8
First start
- Hand wash all parts in warm soapy water and dry before first use. p. 8
Problems and fixes
Stuffer is hard to crank
Add water to mix or add lubricant to piston gasket and cylinder interior.
p. 9
Motor stops working
Reset the circuit breaker on the underside of the stuffer motor.
p. 9Maintenance and reset
- Reset circuit breaker on the underside of the motor. p. 9
Where to find it in the PDF
- Assembly p. 3, 4
- Motor Assembly p. 5, 6
- Cleaning p. 8
- Troubleshooting p. 9
- Parts List p. 10
Table of contents
Manual images
Click an image to enlargeQuick Guide
This manual provides instructions for the Avantco 177SS20VKIT and 177SS30VKIT sausage stuffers. Key operations include proper assembly of the plunger and canister, motor installation, and maintenance. Always ensure the unit is stable during use and do not operate for more than 15-20 minutes at a time to prevent overheating.
Assembly and Installation
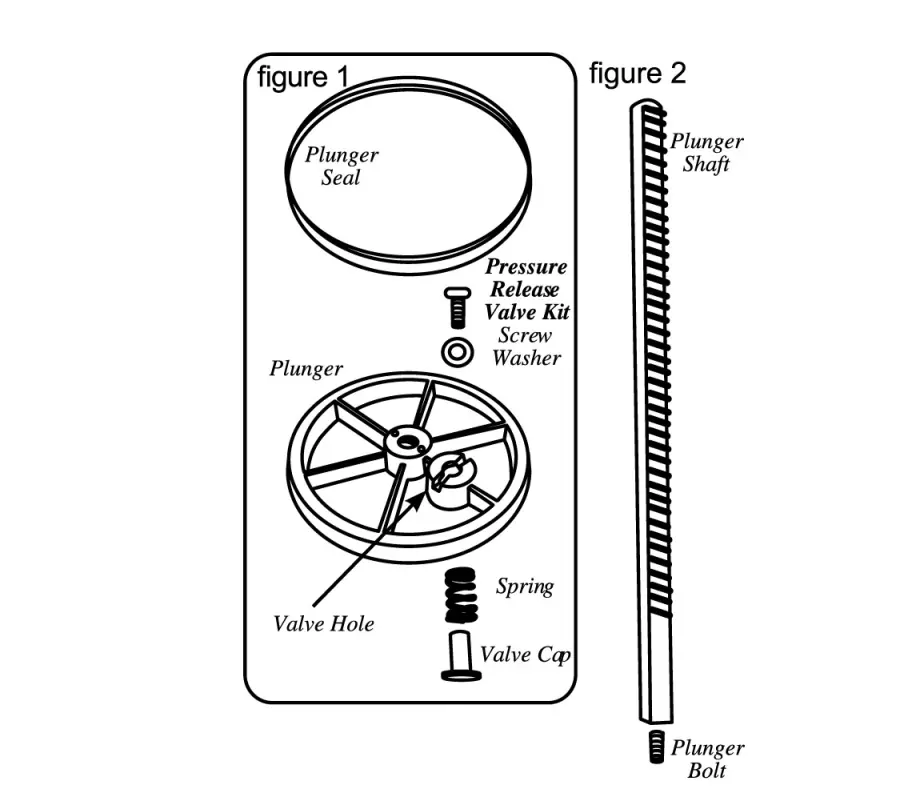
Plunger Assembly: Slide the Plunger Seal onto the Plunger. Assemble the Pressure Release Valve Kit (Washer, Screw, Spring, Valve Cap) onto the Plunger. Screw the Plunger Bolt onto the Plunger Shaft and attach the assembled Plunger to the shaft.
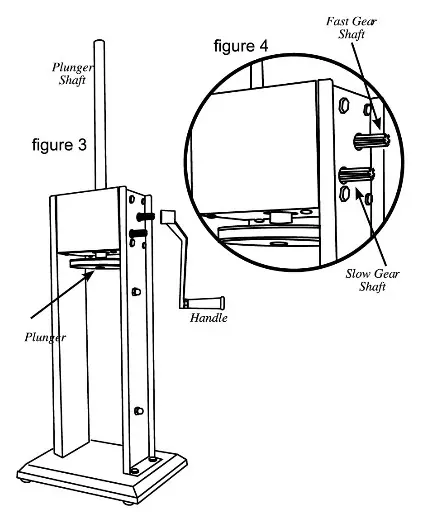
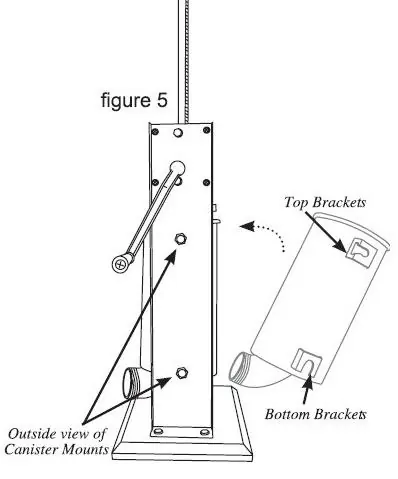
Stuffer Assembly: Attach the Handle to the Fast or Slow Gear. Rest the Canister's Bottom Brackets onto the Canister Mounts inside the housing and pivot the canister until the Top Brackets snap into place. Insert the Stuffing Funnel through the Front Ring Nut and screw it onto the canister mouth (do not overtighten).
Motor Assembly
Remove the handle before installing the motor. Insert the motor plug into the socket and slide the motor onto the slow drive shaft, aligning the mounting thumbscrews with the holes. Tighten the three thumbscrews securely.
Operation
Sausage Making: Fill the canister with the meat mixture and press down to release air. Use the crank handle or the motor attachment to extrude the mixture into the casing. When using the motor, use the "UP" and "DOWN" buttons to control the piston. The foot pedal can also be used to control the downward movement of the piston.
Cleaning and Maintenance
Hand wash all parts in warm soapy water and dry thoroughly. Do not use a dishwasher. Coat the inside of the canister with food-grade lubricant before use. Always unplug the motor before cleaning and never immerse the motor in water.
Troubleshooting
If the stuffer is hard to crank, add water to the mixture or lubricate the piston gasket. If the motor stops, check the circuit breaker on the underside of the motor.
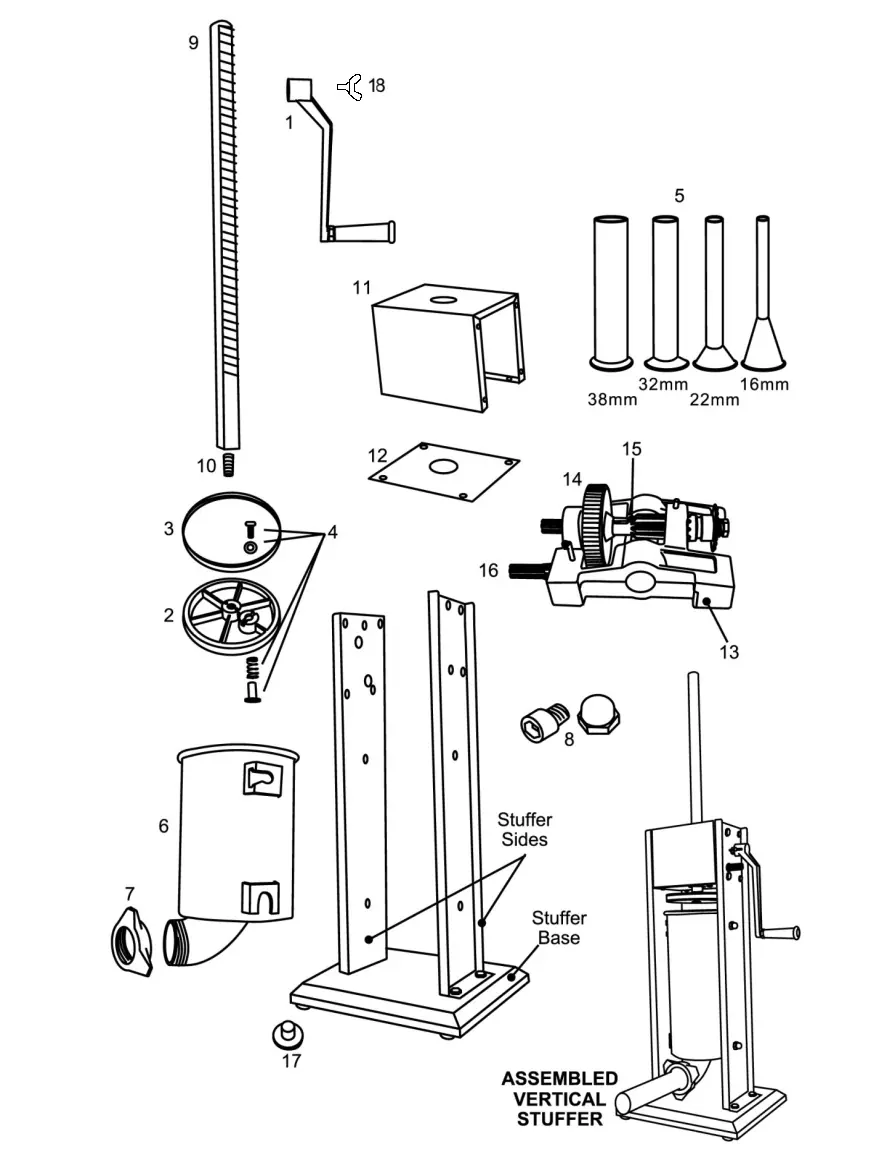
Parts List
Refer to the exploded diagram for part identification, including the handle, plunger, canister, funnels, and gear housing components.
Manufacturer information
Avantco Equipment
Practical help
Common problems
Stuffer is hard to crank
Add water to the mixture or apply lubricant (mineral oil or vegetable oil) to the piston gasket and the interior of the cylinder.
Meat is passing by the piston
Ensure the gasket is installed and properly lubricated.
Casings are bursting
Check if casings are old, soaked incorrectly, filled too tightly, or if the stuffing tube has a burr.
Motor stops working
Check the circuit breaker on the underside of the stuffer motor and reset it if necessary.
Before use
- Hand wash all parts in warm soapy water before first use.
- Ensure the stuffer is stable during use.
- Coat the inside of the canister with food-grade lubricant.
- Check that all parts are operating properly.
- Wear ANSI Z87.1 compliant safety glasses.
Images and diagrams
- Figure 1-2: Plunger assembly components.
- Figure 3-4: Stuffer assembly and gear selection.
- Figure 5-7: Canister mounting and lubrication.
- Figure 3 (page 7): Foot pedal connection.
Model compatibility
- Indoor use only.
- Do not operate for longer than 15-20 minutes at a time.

Manual page author
David Miller
Documentation analyst
Organizes user manual content into clear summaries, with attention to model details, product context, and everyday usability.