Tools / Impact Wrenches
Operating Instructions for Hilti SID 2-A12 (02) Cordless Impact Wrench
A comprehensive guide for the Hilti SID 2-A12 (02) cordless impact wrench, covering safety, operation, maintenance, and troubleshooting.
Quick answers from the manual
Quick answer
- The Hilti SID 2-A12 is a cordless impact wrench designed for tightening and releasing nuts, bolts, anchors, and wood screws. It is intended for professional use and should only be operated by trained, authorized personnel. p. 20
Key actions
- Insert battery p. 22
- Remove battery p. 22
- Fit accessory tool p. 23
First start
- Charge the battery fully before using it for the first time. p. 22
Problems and fixes
The power tool does not work.
The battery is not fully inserted. Insert the battery.
p. 25Maintenance and reset
- Always remove the battery before carrying out care and maintenance tasks. p. 24
Technical specifications
| Parameter | Value | Meaning | Pages |
|---|---|---|---|
| Rated voltage | 10.8 V | Operating voltage | p. 21 |
Where to find it in the PDF
- Product Overview p. 3, 20
- Technical Data p. 10, 11, 21
Table of contents
Quick guide from the manual
This guide provides essential information for the safe and efficient operation of the Hilti SID 2-A12 (02) cordless impact wrench. Always read the full safety instructions provided in the original documentation before use.
Product Overview
The Hilti SID 2-A12 is a hand-held cordless impact wrench designed for tightening and releasing nuts, bolts, anchors, and wood screws. It is intended for professional use and should only be operated by trained, authorized personnel.
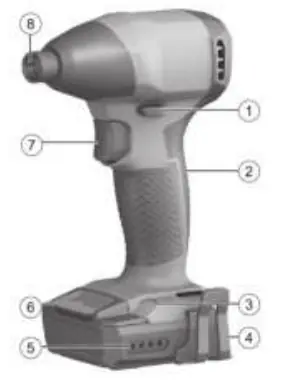
Key Components
- Forward/reverse switch
- Grip
- Illumination (LED)
- Belt hook (optional)
- Battery state of charge indicator
- Battery release button
- Control switch
- Hex socket
Operation
Battery Handling
Inserting the battery: Push the battery into the product until it engages with an audible click. Ensure the battery is seated securely.
Removing the battery: Press the battery release buttons and pull the battery out of the tool.
Charge state display: Press one of the release buttons lightly (until slight resistance is felt) to view the battery charge state on the LEDs.
Tool Operation
Fitting the accessory tool: Set the forward/reverse switch to the middle position or remove the battery. Insert the accessory tool into the chuck and check that it is held securely.
Setting rotation: Use the forward/reverse switch to select the desired direction. The control switch is locked when the switch is in the middle position.
Switching on/off: Press the control switch to turn the tool on. The speed is regulated by the depth to which the switch is pressed. Release the switch to turn the tool off.
Maintenance and Care
Care of the product: Remove stubborn dirt carefully. Clean air vents with a dry, soft brush. Use a slightly damp cloth to clean the housing; do not use silicone-based cleaning agents.
Care of Li-ion batteries: Keep the battery free of oil and grease. Clean with a dry, soft brush or clean, dry cloth. Never use a battery with clogged air vents.
Maintenance: Regularly check all visible parts and controls for signs of damage. Do not operate the product if parts are damaged or malfunctioning. Have the product repaired immediately by Hilti Service.
Manufacturer information
Hilti Corporation
Practical help
Common problems
The power tool does not work.
Ensure the battery is fully inserted.
The control switch cannot be pressed or is stuck.
Check if the forward/reverse switch is in the middle position.
Running speed drops suddenly.
The battery is discharged; charge the battery.
Battery runs down faster than usual.
Ambient temperature is very low; allow the battery to warm up slowly to room temperature.
The power tool or battery becomes very warm.
Switch off immediately, remove the battery, allow it to cool, and contact Hilti Service.
Before use
- Charge the battery fully before first use.
- Ensure battery contacts are clean and dry.
- Check that the tool is switched off before inserting the battery.
- Verify the belt hook is securely attached (if used).
- Ensure the forward/reverse switch is in the desired position.
Specs in practice
- Rated voltage
- 10.8 V
- Rated speed under no load
- 0 - 2,750 /min
Images and diagrams
- 1: Product overview (switch, grip, light, belt hook, battery indicator, release button, control switch, hex socket)
- 2: Forward/reverse switch settings
- 3: Fitting the accessory tool
- 4: Removing the accessory tool
Model compatibility
- Use only Hilti Li-Ion batteries of the B 12 series.
- Use only Hilti battery chargers of the C4/12 series.

Manual page author
David Miller
Documentation analyst
Organizes user manual content into clear summaries, with attention to model details, product context, and everyday usability.