Accessories / Mounts & Stands
WALI 1339LM TV Wall Mount Installation Manual
A comprehensive installation guide for the WALI 1339LM TV wall mount. This manual provides step-by-step instructions for mounting on brick or wood walls, attaching the VESA plate to various TV sizes, adjusting the tilt, and managing cables.
Table of contents
Manual images
Click an image to enlargeQuick Guide and Safety
The WALI 1339LM is a TV wall mount designed for secure installation on vertical walls. Before beginning, ensure you have all the necessary tools and that your wall type is suitable for mounting. Always use proper safety equipment during installation. If you are unsure about the wall structure or the installation process, consult a qualified installation contractor.
Tools Required
- 4mm Drill Bit (for wood)
- 10mm Masonry Bit (for brick)
- Phillips Screwdriver
- Carpenter's Level
Supplied Parts List
Before starting, verify that all components are present and undamaged:
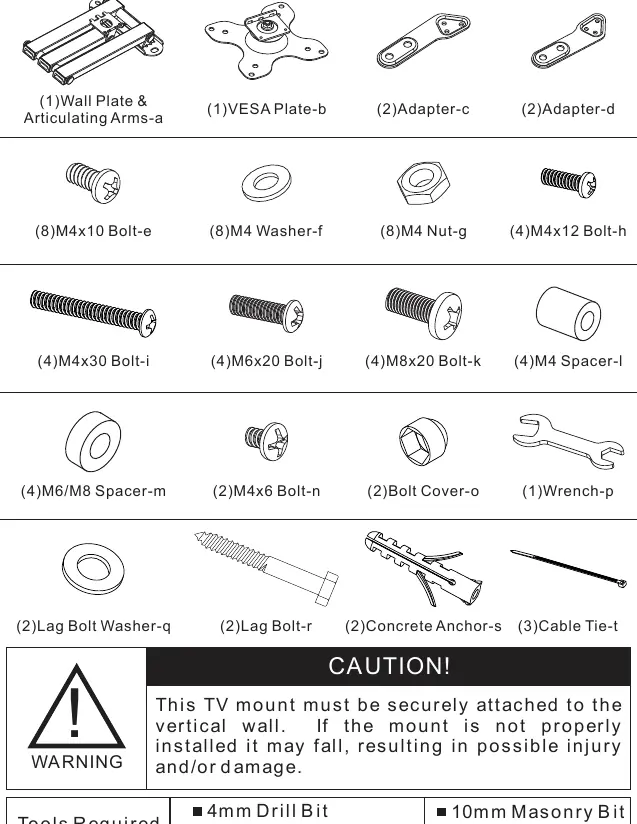
- Wall Plate & Articulating Arms (a)
- VESA Plate (b)
- Adapters (c, d)
- Various bolts (e, h, i, j, k, n) and nuts (g)
- Washers (f, q)
- Spacers (l, m)
- Lag Bolts (r) and Concrete Anchors (s)
- Bolt Cover (o), Wrench (p), and Cable Ties (t)
Step 1: Install the Wall Plate
The wall plate must be securely attached to a vertical wall.
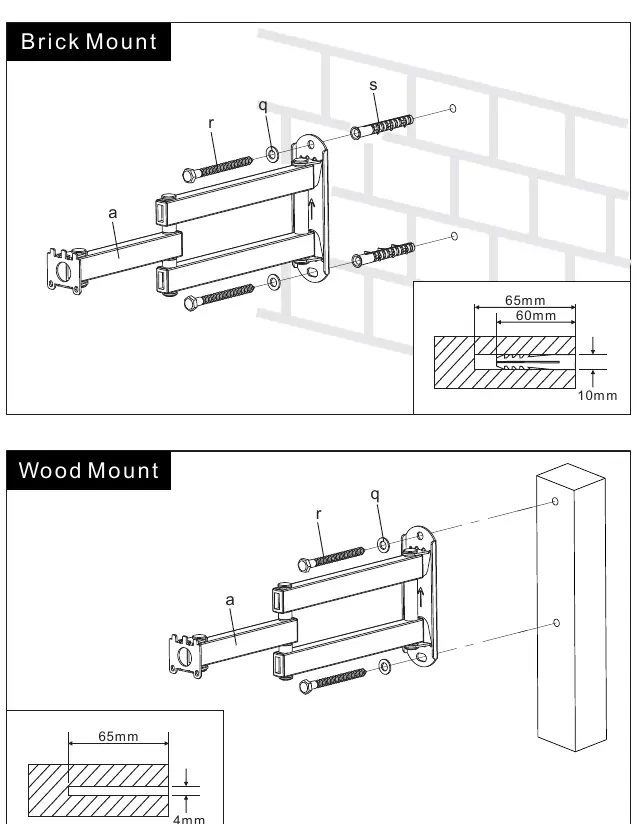
Brick Mount
- Mark the holes using the wall plate as a template.
- Drill holes using a 10mm masonry bit to a depth of 65mm.
- Insert concrete anchors (s) into the holes.
- Secure the wall plate using lag bolts (r) and washers (q).
Wood Mount
- Mark the holes on the wooden stud.
- Drill holes using a 4mm drill bit to a depth of 65mm.
- Secure the wall plate using lag bolts (r) and washers (q).
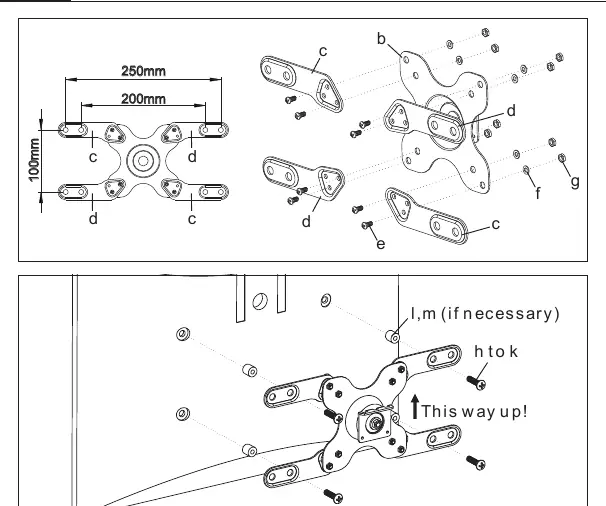
Step 2: Attach VESA Plate to TV
Choose the method that matches your TV's VESA pattern.
For VESA 75x75mm and 100x100mm
Attach the VESA plate (b) directly to the back of the TV using the appropriate bolts (h or i). If the TV back is curved, use the provided spacers (l) to ensure a flush fit.
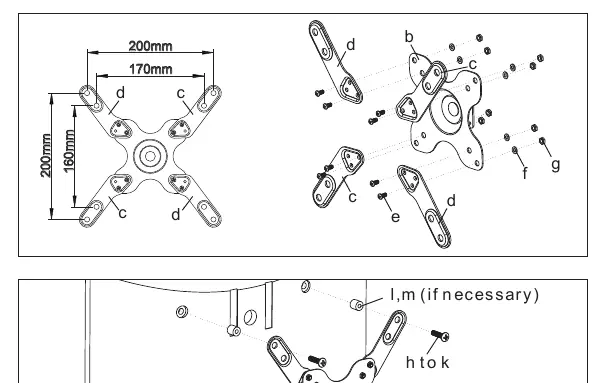
For VESA 200x100mm
Attach the adapter plates (c, d) to the VESA plate (b) using bolts (e), washers (f), and nuts (g). Then, attach the assembly to the TV using the appropriate bolts and spacers if necessary.
For VESA 200x200mm
Attach the adapter plates (c, d) to the VESA plate (b) in the 200x200 configuration using bolts (e), washers (f), and nuts (g). Secure the assembly to the TV.
Step 3: Attach VESA Plate to the Articulating Arm
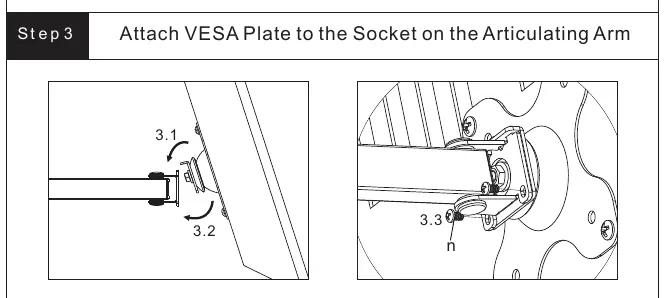
- Hook the VESA plate (with the TV attached) onto the socket of the articulating arm.
- Ensure the "This way up!" arrow is pointing upwards.
- Secure the connection using the provided bolt (n) and tighten with the wrench (p).
Step 4: Adjustments and Cable Management
Once the TV is mounted:
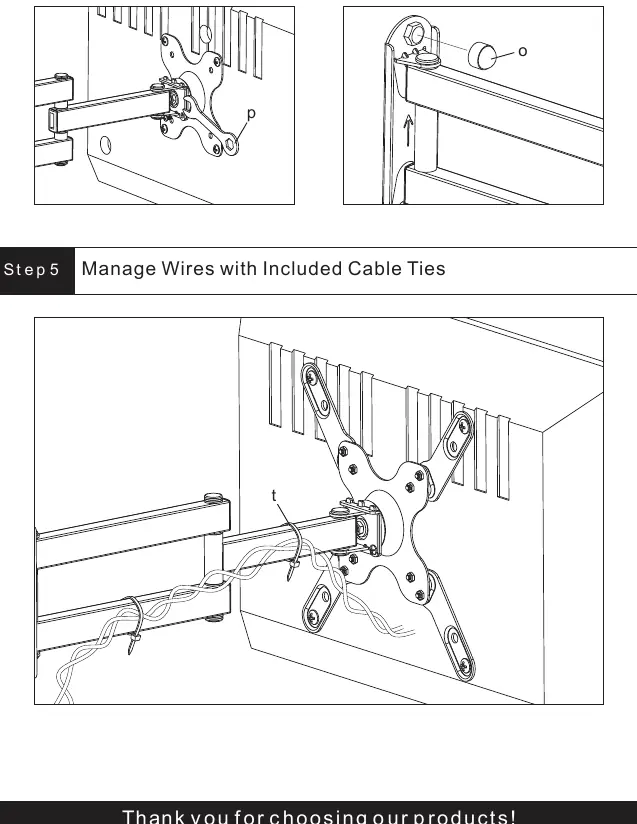
- Tilt Adjustment: Adjust the tilting angle to your preference.
- Bolt Cover: Attach the bolt cover (o) to the top of the arm joint for a clean look.
- Cable Management: Use the included cable ties (t) to secure and organize your cables along the articulating arm.
Practical help
Common problems
Mounting on a brick wall
Use a 10mm masonry bit to drill holes 65mm deep and insert the provided concrete anchors (s) before securing with lag bolts.
TV back is curved
Use the provided spacers (l or m) between the VESA plate and the TV to ensure the bolts can be tightened securely without damaging the TV.
VESA pattern does not match 75x75 or 100x100
Use the included adapter plates (c, d) to expand the VESA plate to 200x100 or 200x200 configurations.
Before use
- Verify all parts from the Supplied Parts List are present.
- Ensure you have a 4mm drill bit for wood or 10mm masonry bit for brick.
- Have a Phillips screwdriver and a carpenter's level ready.
- Confirm the wall is a vertical, solid surface.
- Check the VESA pattern of your TV to select the correct installation step.
Specs in practice
- VESA 75x75 / 100x100
- Standard mounting hole patterns for smaller TVs, attached directly to the VESA plate.
- VESA 200x100 / 200x200
- Larger mounting hole patterns requiring the use of adapter plates (c, d).
Images and diagrams
- Step 1 diagrams clearly distinguish between brick and wood mounting, highlighting the different drill bit sizes and anchor requirements.
- Step 2 diagrams show the specific bolt and spacer combinations required for flat versus curved TV backs.
Model compatibility
- Supports VESA patterns: 75x75, 100x100, 200x100, 200x200.
- Compatible with both flat and curved back TVs using provided spacers.

Manual page author
Emily Carter
User documentation editor
Prepares concise manual descriptions and highlights the most useful setup, operation, and maintenance information for readers.