Accessories / Mounts & Stands
WALI 1342LM TV Wall Mount Installation Manual
Installation guide for the WALI 1342LM TV Wall Mount. Includes mounting instructions for wood and brick walls, VESA plate attachment, and adjustment steps for optimal viewing.
Table of contents
Manual images
Click an image to enlargeQuick guide from the manual
The WALI 1342LM is an articulating TV wall mount designed for screens up to 39 inches and weighing up to 15kg (33lbs). Before installation, ensure your wall type is suitable (wood stud, solid concrete, or brick). Do not mount on drywall alone. Always verify that your TV's VESA pattern matches the supported configurations (75x75, 100x100, 100x200, or 200x200mm).
Supplied parts
Before starting, verify you have all components, including the Wall Plate & Articulating Arms, VESA Plate, various adapters, bolts (M4, M5, M6, M8), washers, concrete anchors, and the wrench. If any parts are missing or defective, do not proceed with installation.
Installing the wall plate
The wall plate can be mounted on brick or wood stud walls:
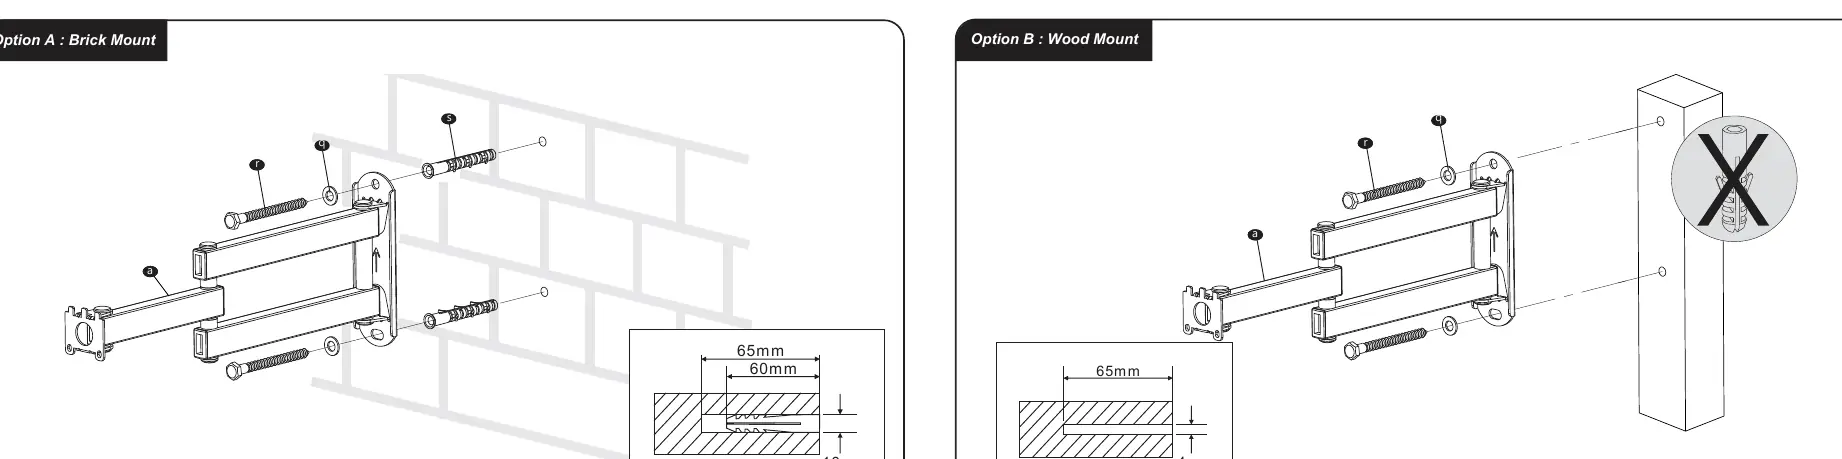
- Option A (Brick Mount): Drill holes into the brick wall, insert concrete anchors, and secure the wall plate using the provided lag bolts and washers.
- Option B (Wood Mount): Locate the wood stud, drill pilot holes, and secure the wall plate directly into the stud using the lag bolts and washers.
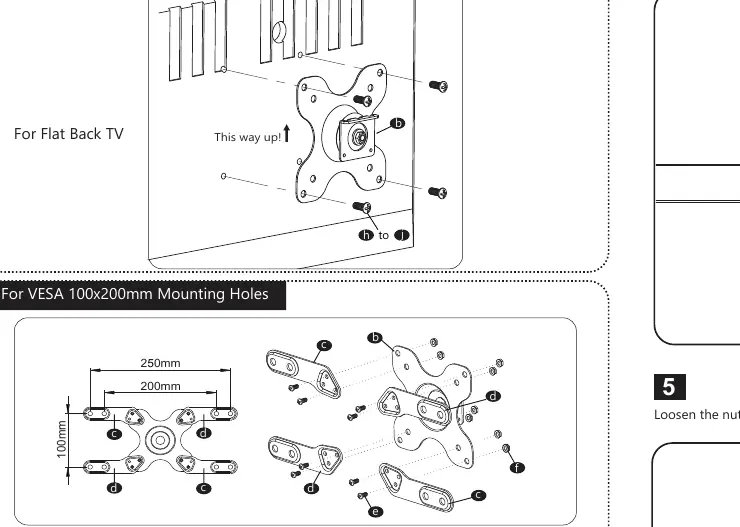
Attaching the VESA plate
Attach the VESA plate to the back of your TV using the appropriate bolts and washers based on your TV's mounting hole pattern. Use the provided adapters if your VESA pattern is larger than 75x75mm. Ensure the "This way up!" indicator is pointing correctly.
Mounting and adjustments
Once the wall plate is on the wall and the VESA plate is on the TV:

- Attach the VESA plate to the socket on the articulating arm and ensure stability.
- Tighten the VESA plate using the M4x6 bolt. Do not rotate the monitor before tightening.
- If the tilt angle is too stiff or loose, use the provided wrench to adjust the nut on the articulating arm.
- Install the bolt covers for a clean finish.
- Use the included cable ties to manage wires along the arm.
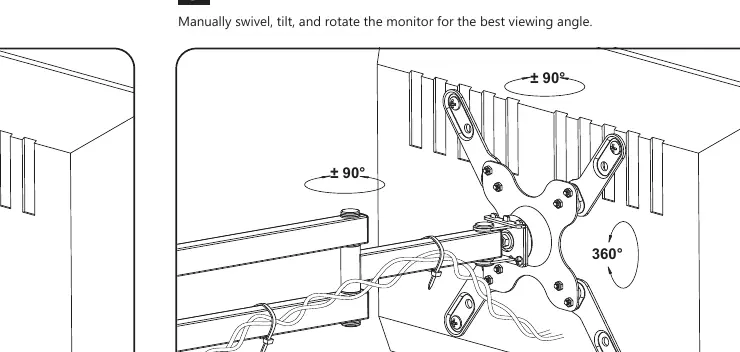
- Manually swivel, tilt, and rotate the monitor to achieve the best viewing angle.
Practical help
Common problems
Cannot adjust tilt angle smoothly
Use the provided wrench to loosen the nut on the articulating arm.
Mounting on drywall
Do not mount on drywall alone. The mount must be installed on wood studs, solid concrete, or brick walls.
Before use
- Verify wall type (wood stud, solid concrete, or brick).
- Check weight capacity (max 15kg/33lbs).
- Ensure VESA pattern matches your TV (75x75 to 200x200mm).
- Confirm all parts from the supplied parts list are present.
- Ensure you have a drill and appropriate drill bits for your wall type.
Specs in practice
- Weight Capacity
- 15kg (33lbs) - Do not exceed this limit.
- VESA Compatibility
- Supports 75x75, 100x100, 100x200, and 200x200mm patterns.
- Max Screen Size
- Designed for screens up to 39 inches.
Images and diagrams
- Option A (Brick Mount): Shows drilling into brick and using concrete anchors.
- Option B (Wood Mount): Shows drilling pilot holes into wood studs.
- VESA Attachment: Illustrates how to use adapters for larger VESA patterns.
Model compatibility
- Not suitable for drywall-only installation.
- Ensure the wall structure can support the combined weight of the mount and TV.

Manual page author
David Miller
Documentation analyst
Organizes user manual content into clear summaries, with attention to model details, product context, and everyday usability.