Accessories / Mounts & Stands
WALI 1330LM-PM Projector Wall Mount Installation Guide
Installation guide for the WALI 1330LM-PM projector wall mount. Includes step-by-step mounting instructions for wood studs and concrete walls, projector attachment, and safety warnings.
Table of contents
Manual images
Click an image to enlargeImportant Safety Information
Before beginning installation, please read all instructions carefully. Improper installation may cause damage or serious injury. If you have any doubts about the safety of the installation, please consult a qualified technician.
- Do not mount on drywall or vaulted ceilings.
- Do not exceed the weight capacity of the mount.
- Ensure there are no missing or defective parts before starting.
- Keep small parts away from children under 3 years old; adult supervision is required.
- Use tipover restraints or anchor stands to the wall to prevent serious or fatal crushing injuries.
Tools Required
The following tools are required for installation but are not included in the package:
- Stud finder
- Bubble level
- Pencil
- Electric drill
- Socket wrench
- Screwdriver
Wall Mounting
Wood Stud Installation
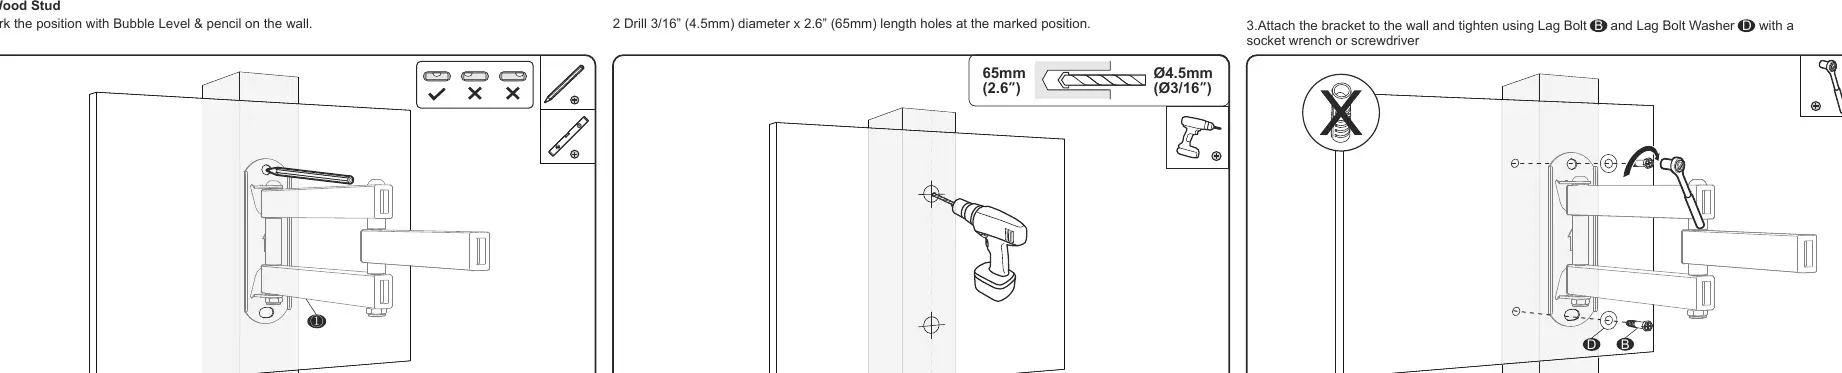
- Mark the desired position on the wall using a bubble level and pencil.
- Drill holes at the marked positions using a 3/16 inch (4.5mm) diameter drill bit to a depth of 2.6 inches (65mm).
- Attach the bracket to the wall using the provided Lag Bolt (B) and Lag Bolt Washer (D). Tighten securely with a socket wrench or screwdriver.
Concrete Wall Installation
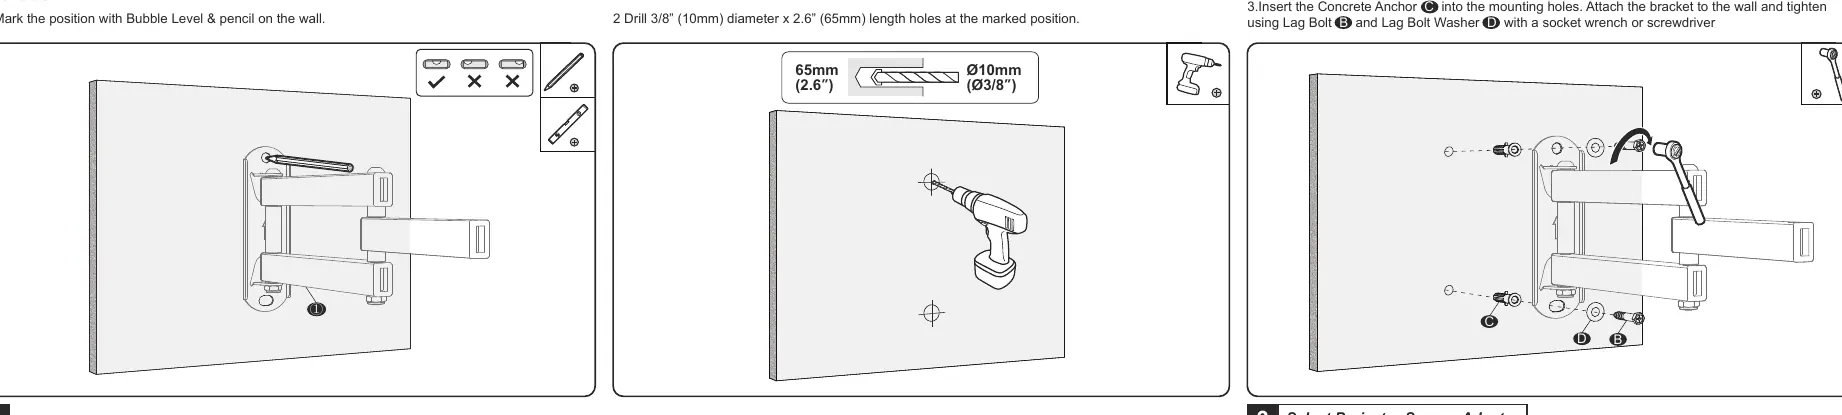
- Mark the desired position on the wall using a bubble level and pencil.
- Drill holes at the marked positions using a 3/8 inch (10mm) diameter drill bit to a depth of 2.6 inches (65mm).
- Insert the Concrete Anchor (C) into the mounting holes.
- Attach the bracket to the wall using the provided Lag Bolt (B) and Lag Bolt Washer (D). Tighten securely with a socket wrench or screwdriver.
Projector Assembly
Attaching the Universal Head
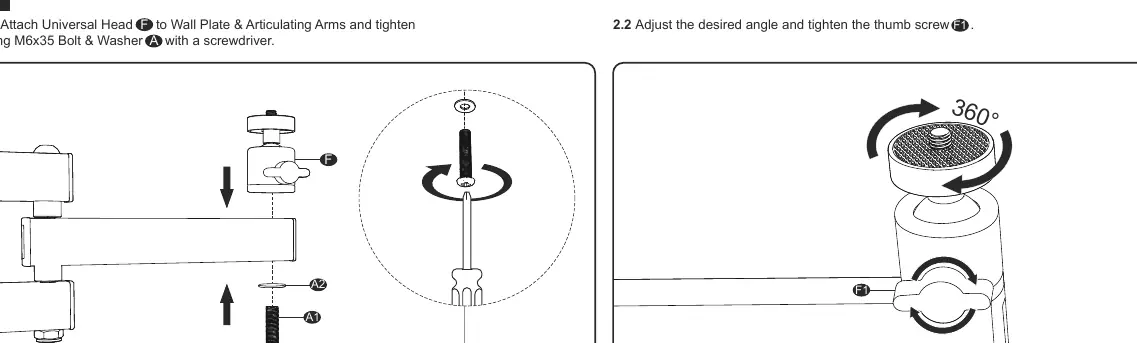
- Attach the Universal Head (F) to the Wall Plate & Articulating Arms (1).
- Secure the connection using the M6x35 Bolt & Washer (A) with a screwdriver.
- Adjust the desired angle and tighten the thumb screw (F1).
Attaching the Projector
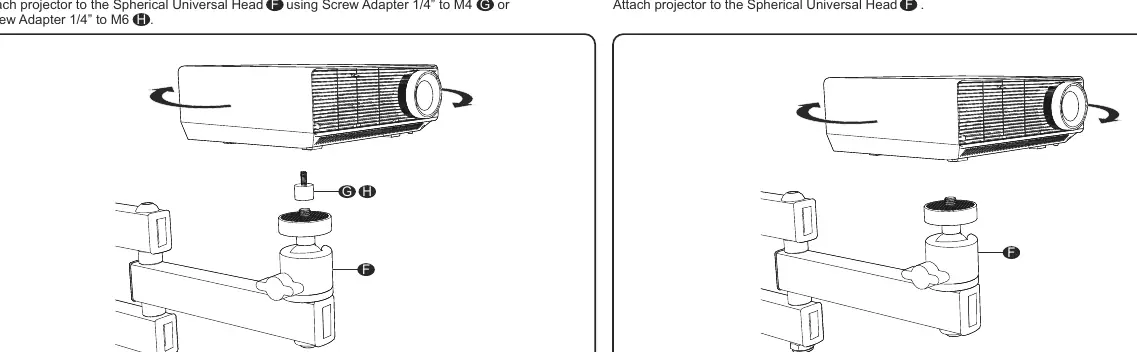
- Determine your projector's bolt type.
- If a screw adapter is required, use the provided Screw Adapter 1/4 inch to M4 (G) or 1/4 inch to M6 (H) to attach the projector to the Spherical Universal Head (F).
- If no adapter is required, attach the projector directly to the Spherical Universal Head (F).
- Attach the Bolt Cover (E) to finish the installation.
Practical help
Common problems
Mounting surface is drywall or a vaulted ceiling.
Do not install the mount on these surfaces as it may cause failure or injury.
Missing or defective parts.
Check all components against the supplied parts list before beginning installation. Do not proceed if parts are missing.
Before use
- Verify the wall type (wood stud or concrete).
- Ensure you have a stud finder, bubble level, drill, and socket wrench.
- Check the projector's bolt type to select the correct adapter (M4 or M6).
- Confirm the mounting location is not a vaulted ceiling or drywall.
Specs in practice
- Wood Stud Drill Bit
- 3/16 inch (4.5mm) diameter.
- Concrete Wall Drill Bit
- 3/8 inch (10mm) diameter.
Images and diagrams
- The manual provides specific drilling patterns for wood studs versus concrete walls.
- The universal head assembly requires the M6x35 bolt.
Model compatibility
- Includes adapters for M4 and M6 projector bolt types.
- Compatible with standard wood studs and concrete walls.

Manual page author
David Miller
Documentation analyst
Organizes user manual content into clear summaries, with attention to model details, product context, and everyday usability.