Lighting / Fixtures
Installation Guide for Wayfair 0818-LP Linear Pendant Light
A comprehensive installation guide for the Wayfair 0818-LP 5-light linear pendant. This guide covers recommended hanging heights for kitchen islands and dining tables, detailed wiring diagrams, and step-by-step assembly instructions.
Table of contents
Manual images
Click an image to enlargeQuick Guide to Installation
This document provides instructions for installing the Wayfair 0818-LP linear pendant light. Before beginning, ensure the power is turned off at the circuit breaker. Installation should be performed by an accredited professional. Verify all parts are present in the yellow bag before starting.
Recommended Hanging Heights
To ensure optimal lighting and aesthetics, follow these guidelines:
- Kitchen Island: Center the linear pendant over the island. Use one pendant for every 24 inches of island length. Fixtures should hang at least 30 inches above the countertop.
- Dining Room Table: Fixtures should hang at least 30 inches above the table. Use a fixture that is 12 inches narrower than the width of the table.
- Open Areas: The bottom of the fixture should hang at least 7.5 feet from the floor. Ensure there is clearance for any opening doors.
Preparation
Carefully remove the fixture from the carton and locate the yellow parts bag. Remove the old fixture and mounting strap from the wall. Hold the new mounting plate (B) up to the ceiling and mark the holes. Drill holes and insert the plastic anchors (P) until they are flush with the ceiling.
Assembly and Mounting
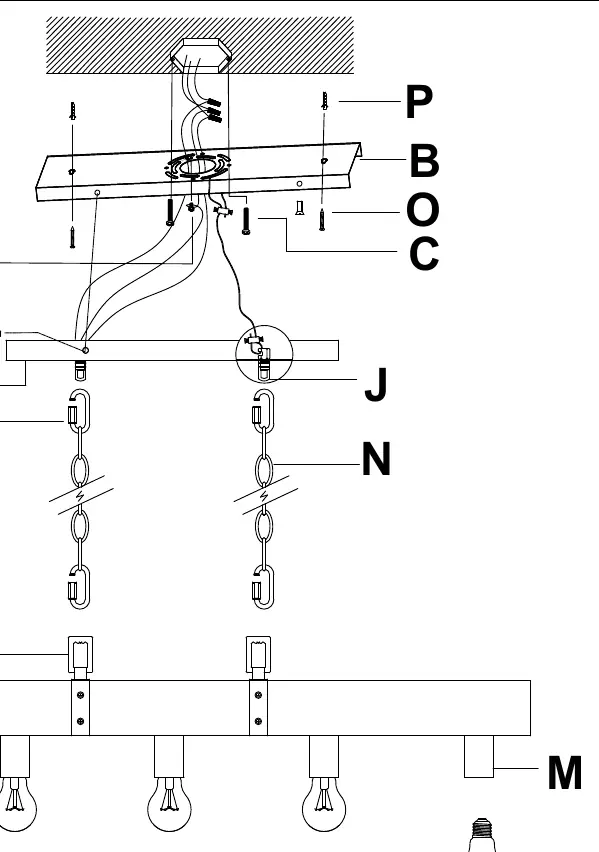
- Measure the required chain (N) length for the desired hanging height. Use pliers to remove excess chain if necessary.
- Attach chain connectors (H) to both ends of the chains (N).
- Feed the fixture wires through the top loop (L) and up through the chain (every three links).
- Attach the chains to the canopy loops (J) and secure the connectors.
- Align the mounting plate (B) with the plastic anchors (P) and secure it using mounting screws (O). If installing into wood beams, use screws (O) directly. Secure the mounting plate to the junction box using screws (C).
Wiring Instructions
Have an assistant support the fixture's weight during wiring. Connect the fixture wires to the power supply wires from the junction box as follows:
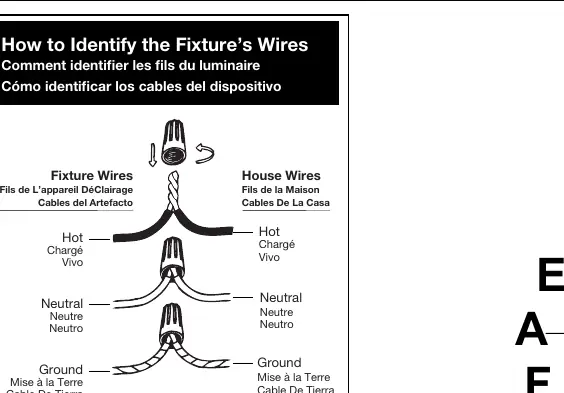
- Hot: Connect to the hot wire (smooth, black, or transparent with black inner thread).
- Neutral: Connect to the neutral wire (ribbed, white, or transparent with white inner thread).
- Ground: Connect to the ground wire (copper, bare metal, green, or transparent with green inner thread).
Twist the wire ends together and secure with a wire connector. Ensure all twists are in the same direction. If there is no house ground wire, wrap the fixture's ground wire around the ground screw (E) on the mounting bracket.
Finishing the Installation
Hold the canopy (F) up to the mounting strap (B). Align the side holes and secure with mounting screws (A). Install the light bulbs (not included) into the sockets (M) according to the fixture's specifications. Do not exceed the maximum recommended wattage. Turn on the power and test the fixture.
Manufacturer information
Wayfair LLC
Practical help
Common problems
Fixture not hanging level
Adjust the chain length using pliers to ensure both sides are balanced and the fixture is level.
No house ground wire available
Locate the ground screw (E) on the mounting bracket and wrap the fixture's ground wire around it, then tighten securely.
Before use
- Turn off power supply at the fuse or circuit breaker.
- Verify all parts are present in the yellow bag.
- Measure the desired hanging height before cutting the chain.
- Ensure you have a drill and screwdriver ready.
- Confirm you have the correct light bulbs (not included).
Specs in practice
- Neutral Wire
- Ribbed, white, or transparent wire with white inner thread.
Images and diagrams
- Wiring Diagram: Illustrates the correct connection of Hot, Neutral, and Ground wires using wire connectors.
- Assembly Diagram: Shows the mounting plate (B), canopy (F), chain (N), and fixture body (M) configuration.
Model compatibility
- Use only specified bulbs; do not exceed the maximum recommended wattage.
- Installation must be performed by an accredited professional.

Manual page author
David Miller
Documentation analyst
Organizes user manual content into clear summaries, with attention to model details, product context, and everyday usability.