Furniture / Chairs & Seating
Assembly Instructions for Wayfair Ashford X Back Side Chair 1859-23-S3
A complete assembly guide for the Wayfair Ashford X Back Side Chair (1859-23-S3). Includes step-by-step installation instructions, parts list, hardware requirements, and essential safety maintenance tips.
Quick answers from the manual
Quick answer
- This document provides assembly instructions for the Ashford X Back Side Chair (1859-23-S3), including a parts list, step-by-step assembly guide, and safety warnings. p. 1
Key actions
- Assemble the chair on a soft surface like a carpet. p. 1
- Tighten all screws and bolts every 6 weeks. p. 1
First start
- Assemble the chair by attaching the apron frame to the back, then adding the stretchers and front legs, and finally tightening all hardware. p. 1
Problems and fixes
Parts missing, broken, or damaged
Stop use of this product until repairs are made.
p. 1Technical specifications
| Parameter | Value | Meaning | Pages |
|---|---|---|---|
| Max Capacity | 250 lbs | Maximum weight limit for the chair. | p. 1 |
Where to find it in the PDF
- Assembly Instructions p. 1
Table of contents
Manual images
Click an image to enlargeQuick guide from the manual
This document provides instructions for assembling the Ashford X Back Side Chair. Please note the following critical information before starting:
- Max Capacity: 250 lbs.
- Tools: An Allen Key is provided. A screwdriver is required but not provided.
- Power Tools: Use of power tools is not recommended.
- Maintenance: Check all screws and bolts every 6 weeks to ensure they remain tight.
- Safety: Do not use as a step stool or ladder. Use only on even surfaces.
Parts and Hardware
Before beginning assembly, ensure all parts are present:
- Parts: Chair Back, Seat, Front Leg Left, Front Leg Right, Side Stretcher (Right), Side Stretcher (Left).
- Hardware: Pan Head Screws (4 pcs), JCBC Bolts Long (8 pcs), JCBC Bolts Short (2 pcs), Lock Washers (10 pcs), Flat Washers (10 pcs), Allen Key (1 pc), Glue (1 pc).
Assembly Instructions
Step 1: Attach Apron Frame
Position the chair back on a soft surface, such as a carpet. Place the chair apron frame onto the middle rail of the chair back with the dowel fully inserted into the pre-drilled holes. Ensure the screw holes on the apron frame are facing down.
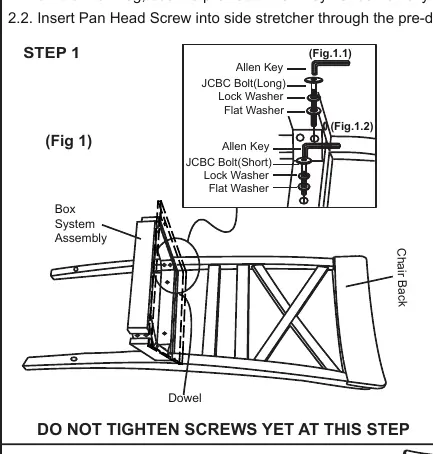
- Insert JCBC Bolt (Long) through a Lock Washer and a Flat Washer into the pre-drilled holes on the apron frame at rear corners.
- Insert the JCBC Bolt (Short) through a Lock Washer and a Flat Washer into the pre-drilled holes on the apron frame at the rear rail.
Step 2: Attach Stretchers and Front Legs
Apply glue to all pre-drilled holes before attaching the stretchers. Insert each side stretcher into the pre-drilled holes on both rear legs, ensuring screw holes on the stretcher are facing down. Place the assembled front legs to the corner block of the frame and insert the side stretcher into the legs.

- Insert the JCBC Bolt (Long) through a Lock Washer, a Flat Washer, and the pre-drilled holes of the corner block into the pre-drilled holes on the front leg. Use the provided Allen Key, but do not fully tighten the bolts yet.
- Insert the Pan Head Screw into the side stretcher through the pre-drilled holes and tighten with a screwdriver.
Step 3: Final Assembly
Turn the chair upright. Check its balance and tighten all screws and bolts to complete the assembly.
Safety and Maintenance
To ensure the longevity and safety of your chair, follow these guidelines:
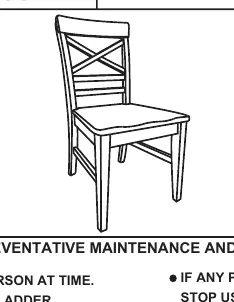
- Use this product only for seating one person at a time.
- Do not sit on any part of this product except the seat.
- If any parts are missing, broken, damaged, or worn, stop using the product until repairs are made.
- Dispose of packaging properly; plastic bags are not toys and can cause suffocation.
- This item does not meet commercial use standards; commercial use will void all warranties.
Manufacturer information
Wayfair LLC
Practical help
Common problems
Chair feels unstable or wobbly
Check all screws and bolts to ensure they are tight. Ensure the chair is placed on an even floor surface.
Parts are missing or damaged
Stop using the product immediately until repairs are made or parts are replaced.
Before use
- Verify all parts and hardware are present according to the parts list.
- Prepare a soft surface (e.g., carpet) to prevent scratching during assembly.
- Ensure you have a screwdriver available (not provided).
- Do not use power tools for assembly.
- Check that all screws and bolts are tightened after initial assembly.
Specs in practice
- Max Capacity
- 250 lbs. Do not exceed this weight limit.
- Maintenance Interval
- Check all screws and bolts every 6 weeks to ensure they remain tight.
Images and diagrams
- Fig 1 illustrates the assembly of the chair back and apron frame.
- Fig 2 illustrates the assembly of the front legs and stretchers.
- Step 3 shows the final upright position for tightening.
Model compatibility
- This product is for residential use only and does not meet commercial use standards.

Manual page author
Emily Carter
User documentation editor
Prepares concise manual descriptions and highlights the most useful setup, operation, and maintenance information for readers.