Lighting / Outdoor Landscape
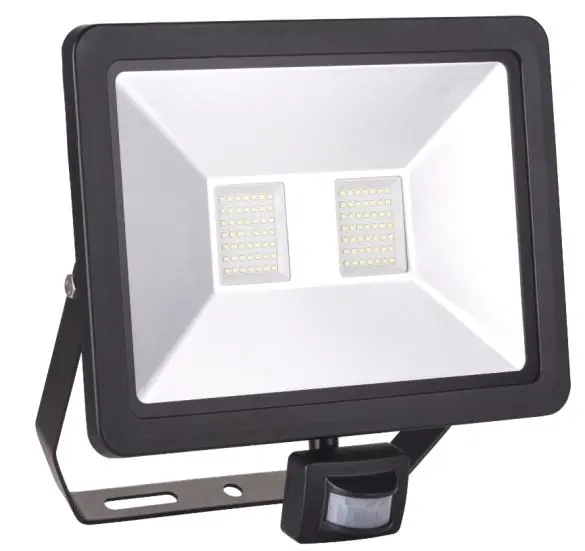
WeTeLux 100W LED Floodlight with 150° PIR
Quick guide for the WeTeLux 100W LED Floodlight with 150° PIR. Includes installation instructions, wiring diagrams, motion sensor settings, and safety precautions.
Table of contents
Manual images
Click an image to enlargeImportant Information
The WeTeLux 100W LED Floodlight with 150° PIR is designed for illuminating house entrances, driveways, and outdoor areas. It is splashwaterproof (IP44) and intended for private use only. This device is not suitable for continuous professional operation.
Safety Instructions
- Electrical Safety: Installation must be performed by a qualified electrician. Ensure the mains voltage matches the specifications (230 V~ / 50 Hz).
- Mounting: Maintain a minimum distance of 1 meter from the front of the floodlight to other objects. Do not mount near flammable surfaces or objects.
- Operation: Do not look directly into the LEDs. Do not cover the unit during operation. If the housing is damaged, discontinue use immediately.
- Environment: Do not operate in areas with flammable gases, vapors, or explosive dust. Not intended for use at altitudes above 2000 meters.
Installation
Installation must be performed in a voltage-free state. Ensure the circuit is protected by a 10/16A fuse and an earth leakage circuit breaker (FI switch).

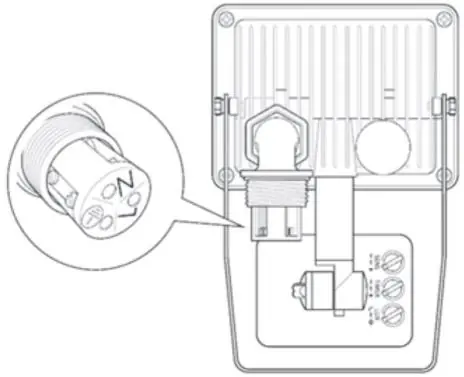
- Wiring: Connect the three wires of the power cable to the terminals: N (Blue), L (Brown/Black), and PE (Green/Yellow).
- Warning: The floodlight must be connected to the ground (PE). If the floodlight glows faintly when switched off, swap the L and N wires.
- Mounting: Secure the wall mount to a stable, vibration-free surface using suitable screws and dowels. Tilt the floodlight to the desired angle and tighten the hinge adjusting screws.
Operation and Settings
The motion sensor can be adjusted horizontally and vertically. There are three control knobs on the sensor:
- SENS: Adjusts the motion sensitivity.
- TIME: Sets the illumination duration after motion is detected (10±5 seconds to 10±1 minutes).
- LUX: Adjusts light sensitivity. Turn towards the sun icon for operation in brighter conditions, or towards the moon icon for operation only in darkness.
Cleaning and Maintenance
Clean the housing using a dry or lightly moistened cloth. Do not use aggressive chemicals or abrasives. Keep the motion sensor lens clean at all times to ensure proper functionality.
Technical Data
- Voltage: 230 V~ 50 Hz
- Power: 100 W
- Luminous Flux: 8000 lm
- Color Temperature: 6500 K
- Protection Class: I (IP 44)
- Detection Angle: 150°
- Sensor Range: 8 to 10 meters
Practical help
Common problems
Floodlight glows faintly when switched off
Swap the L and N wires in the connection terminals.
Motion sensor triggers randomly
Strong transmitters (e.g., amateur radio, mobile masts) in the vicinity may cause interference.
Sensor range is shorter than expected
The range is temperature-dependent; it is generally higher in colder ambient temperatures.
Before use
- Verify mains voltage is 230V/50Hz.
- Ensure the installation surface is stable and vibration-free.
- Confirm a 10/16A fuse and FI protective switch are installed.
- Ensure the protective earth (PE) cable is connected.
- Check that the mounting location is at least 5m away from swimming pools or ponds.
Images and diagrams
- The wiring diagram illustrates the correct connection of N, L, and PE wires to the terminal block.
- The sensor adjustment diagram shows the location of the SENS, TIME, and LUX knobs.
Model compatibility
- Not suitable for continuous professional operation.
- Not for use at altitudes exceeding 2000 meters.

Manual page author
Emily Carter
User documentation editor
Prepares concise manual descriptions and highlights the most useful setup, operation, and maintenance information for readers.