Lighting / Outdoor Landscape
User Manual for WeTeLux 10W LED Floodlight
Quick guide for the WeTeLux 10W LED Floodlight (Article No. 90 08 22). Includes installation instructions, wiring diagrams, safety precautions, and technical specifications.
Table of contents
Manual images
Click an image to enlargeQuick guide from the manual
The WeTeLux 10W LED Floodlight is designed for illuminating house entrances, driveways, and similar areas. It is suitable for both indoor and outdoor use, featuring an IP65 rating for protection against dust and water jets. Important: Installation must be performed by a qualified electrician. The device is not dimmable and must not be operated in or under water.
Overview of components
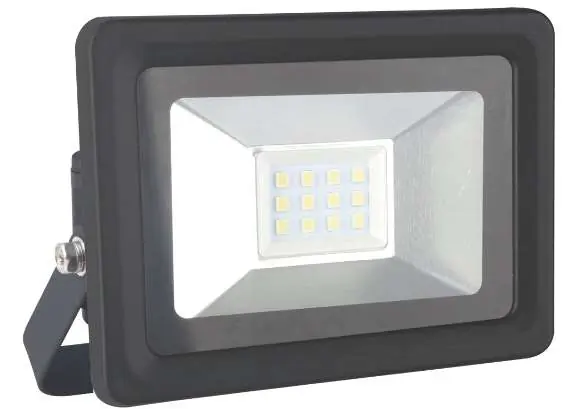
- 1: Wall Mount
- 2: Safety Glass
- 3: LED Panel
- 4: Cable Gland
- 5: Lock Nut
- 6: Waterproof Grommet
- 7: Hinge Adjusting Screws
Safety instructions
- The device must be connected to a 230 V~ / 50 Hz power supply.
- Ensure the mains voltage matches the data on the type label.
- Do not install near flammable surfaces, furniture, or decorative materials.
- Maintain a minimum distance of 1 meter from the front of the floodlight to other objects.
- Do not cover the floodlight during operation.
- If the housing is damaged, stop using the device immediately.
- The LED cannot be replaced.
Installation
Installation must be carried out by a qualified technician familiar with relevant electrical regulations.

- Power Disconnection: Ensure the power supply is completely disconnected by removing the circuit fuse or switching off the circuit breaker. Secure against unauthorized restart.
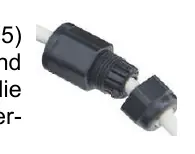
- Cable Preparation: Unscrew the lock nut (5) from the cable gland (4). Guide the power cable through the lock nut and the waterproof grommet (6).
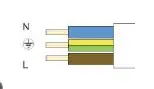
- Wiring: Connect the three wires of the power cable to the terminals:
- N: Blue
- L: Brown/Black
- PE: Green/Yellow (Protective Earth)
- Final Assembly: Re-tighten the lock nut (5) and secure the cable with the waterproof grommet (6).
- Mounting: Attach the wall mount (1) to a stable surface using two or three suitable screws.
- Adjustment: Tilt the floodlight to the desired angle and tighten the hinge adjusting screws (7).
Cleaning and maintenance
Clean the housing only with a dry or lightly moistened cloth. Do not use aggressive chemicals or abrasives. If the floodlight glows faintly when switched off, swap the L and N cable connections.
Technical data
- Rated Voltage: 230 V~ 50 Hz
- Power: 10 W
- Brightness: 800 lm
- Color Temperature: 6500 K
- Protection Class: I
- Degree of Protection: IP65
- Dimensions: 110 x 85 x 67 mm
- Weight: 302 g
Practical help
Common problems
Floodlight glows faintly when switched off
Swap the L and N cable connections in the terminals.
Damaged housing or glass
Do not use the device; replace broken glass immediately or dispose of the unit if the housing is damaged.
No protective earth (PE) cable available
Do not install the floodlight. You must draw a new mains cable with a protective earth connection.
Before use
- Verify mains voltage is 230V/50Hz.
- Ensure the installation surface is stable and vibration-free.
- Check for hidden cables, gas, or water pipes before drilling.
- Ensure a qualified electrician is available for installation.
- Confirm the location is not in or under water.
Specs in practice
- Protection Class I
- Requires a protective earth (PE) connection for safety.
Images and diagrams
- Wiring: Connect N to Blue, L to Brown/Black, and PE to Green/Yellow.
- Cable Gland: Ensure the cable passes through the lock nut and waterproof grommet to maintain the IP65 seal.
Model compatibility
- Not dimmable.
- Not suitable for continuous professional operation.
- Minimum 1m distance to other objects required.

Manual page author
Michael Turner
Technical manual editor
Reviews PDF manuals for structure, safety notes, and practical product details so readers can find the right information quickly.